Some day or other, every PHP programmer is faced with the performance issue caused by a script with a huge loop. If one its operation takes a lot of time and there are thousands of such iterations, then the threat of script execution time lack is more than real.
One of the options is to bypass the problem with CRON tool: schedule to execute CRON script every 60 seconds with new parameters from each iteration. But there are several disadvantages of such approach.
The first problem stems from the fact that some web hosts do not allow using CRON. For example, WPEngine demands their users to request about enabling alternate CRON via support. But even after that, it will not work if the site has password protection.
The second drawback is in the architecture of the script. One should be sure that the script can handle an error if it happens in the middle of the loop. Otherwise, if some iteration fails, others will not be executed at all.
However, another solution is in using message queues. In this case, all operations are pushed to the queue and processed one-by-one by some script in the background.
Cloning of worker scripts extends this approach. If there are N worker scripts, we can organize consequential processing. This will decrease the time of script execution in N times.
Lots of services implement the queues: gearman, Beanstalkd, IronMQ, Amazon SQS, etc. Scaling scripts can be performed via some tool, for example, supervisord.
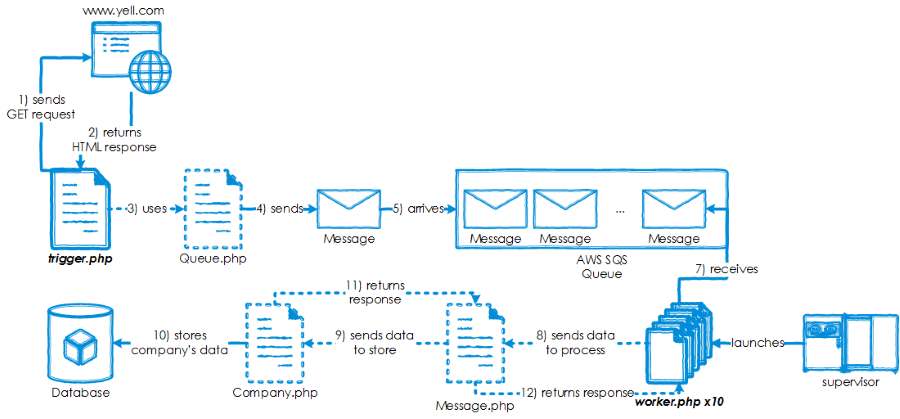
In this article, we are going to work with Amazon SQS queues for scraping Yellow Pages website Yell.com. There will be two main scripts: a trigger script for collecting data and pushing it to the queue and a worker script for processing messages received from the queue. Finally, we should have all the scraped data in a DB table. The full roadmap is displayed below.
Preparation
1. Installing Composer packages
First of all, we’ll install packages used for scraping and work with the DB in this article.
Also, we will need the latest version of AWS SDK for PHP – it will help us to work with queues.
Let’s write the following lines into composer.json:
{
    "require": {
        "guzzlehttp/guzzle": "^6.2",
        "symfony/dom-crawler": "^3.1",
        "symfony/css-selector": "^3.1",
        "doctrine/dbal": "~2.5.4",
        "aws/aws-sdk-php": "^3.18"
    }
}
Now we can move to the project directory cd /path/to/project and install all packages via one-line Composer’s command:
composer install2. Installing Supervisord service
Supervisord is a tool for controlling and monitoring processes for UNIX systems. That’s why its installation on Windows machines has some particularity. Here we’ll describe only the common way of installation.
If our system has Internet access, then we can use easy_install.
sudo easy_install supervisorSometimes it may require installing some additional packages,for example, gcc.
The next step is to create a configuration file.
echo_supervisord_conf > /home/myuser/supervisord.conf
We got a sample file with default configurations. We add the following lines to describe our program script.
[program:scraper]
command=/usr/bin/php /path/to/worker.php
numprocs=10
process_name=%(program_name)s_%(process_num)02d
directory=/path/to/
stderr_logfile=/path/to/log/errors.log
stdout_logfile=/path/to/log/output.log
autostart=true
autorestart=true
user=nginx
stopsignal=KILL
The command line describes what program (/usr/bin/php) has to execute our worker script (/path/to/worker.php).
The parameter numprocs defines how many processes to launch.
Script errors and output will be written to the files /path/to/log/errors.log and /path/to/log/output.log respectively.
In our case, parameter user has nginx value, as web server NGINX executes PHP scripts on behalf of nginx user.
You can read meanings of other parameters in the Supervisord documentation.
3. Creating AWS queue
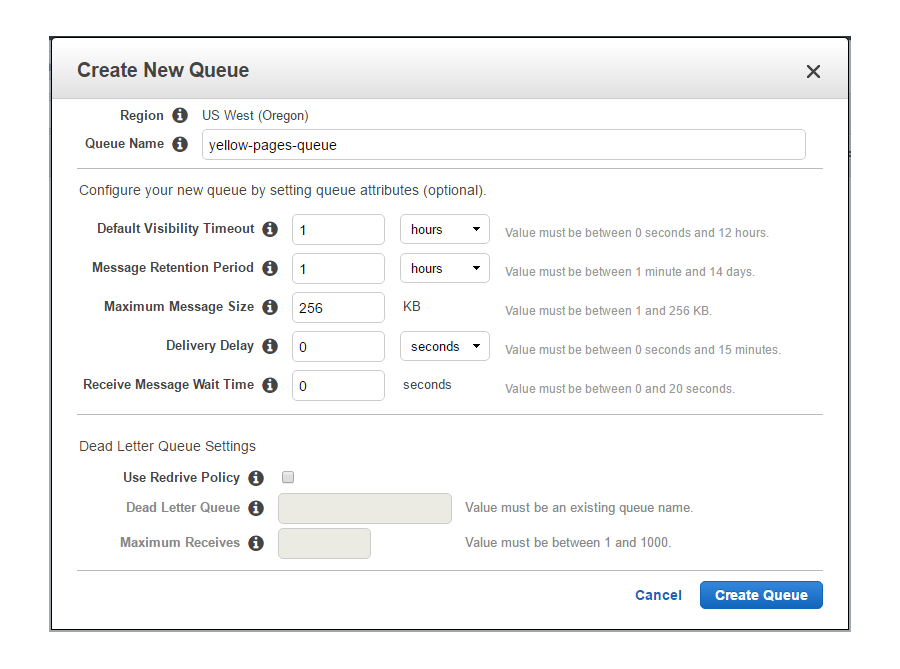
The next step is to create a queue for storing messages sent by the trigger and received by the workers. There are three ways to do this: use AWS console, AWS CLI or AWS SDK. We’ll choose the first option because there is no need to automate this action – we are going to create only one persistent queue.
In the console menu Services, find SQS icon and go to its home page. If you do this the first time, you need to click the button Get Started Now. If you already have experience with SQS, click the button Create New Queue. The pop-up window Create New Queue will appear. Here enter Queue Name, set the following parameters or leave the default values.
We need to change Default Visibility Timeout and Message Retention Period. The reason is the following. We can have a lot of messages, and it may take some time to process them all. If the timeout and the period are too small, we can just lose the last messages while processing the first ones. When you finish with it, hit the button Create Queue. You will see the created empty queue with 0 available messages and 0 messages in flight.
It concludes the preparation part, and now we are ready to start programming.
4. Creating DB table
As we are going to store our scraped data, we need to create a database table for them. Let it have three columns: company’s title, website, and ID for the primary key.
CREATE DATABASE IF NOT EXISTS `yellows` DEFAULT CHARACTER SET utf8 COLLATE utf8_general_ci;
USE `yellows`;

CREATE TABLE IF NOT EXISTS `companies` (
  `company_id` tinyint(2) UNSIGNED NOT NULL AUTO_INCREMENT,
  `company_title` VARCHAR(100) NOT NULL,
  `company_website` VARCHAR(255) NOT NULL,
  PRIMARY KEY (`company_id`)
) ENGINE=InnoDB DEFAULT CHARSET=utf8 AUTO_INCREMENT=1;
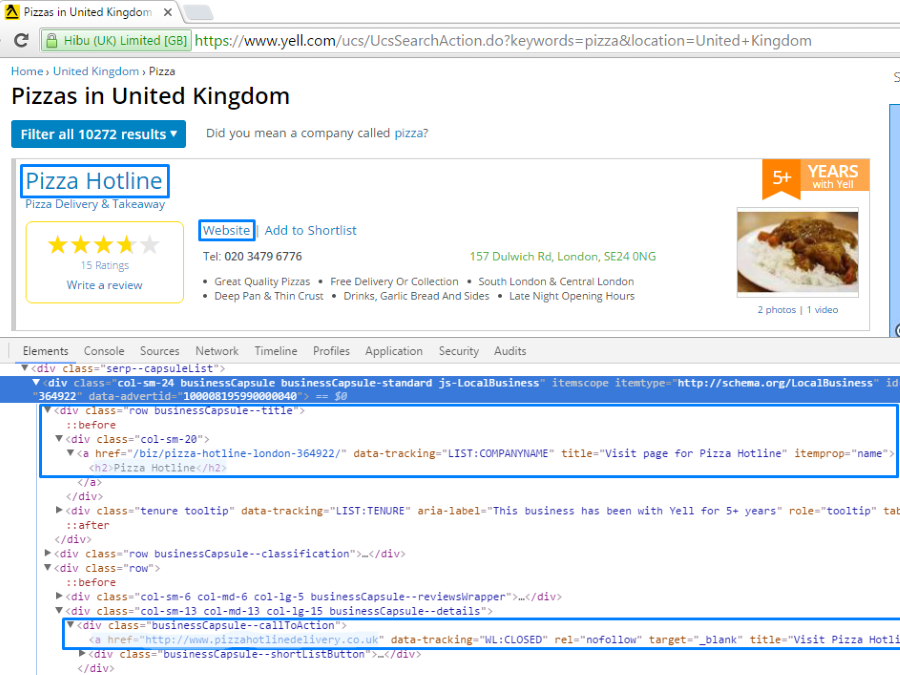
5. Investigating Yell.com page
Firstly, we need to know where to find necessary data on the page. The page contains 15 blocks with the companies’ info. Each block has .businessCapsule class. The company’s title is located in the h2 heading. The company’s website link is inside block with .businessCapsule--callToAction class.
Programming
1. Trigger
The trigger script is the starting point of our path. It is responsible for:
- 1) fetching HTML pages from the website www.yell.com;
- 2) splitting them into HTML blocks – one block per one company;
- 3) pushing HTML block as messages to the AWS queue.
It uses some dependencies included in the top of the file.
require_once __DIR__ . '/vendor/autoload.php';
require_once __DIR__ . '/config.php';
require_once __DIR__ . '/classes/Message.php';
require_once __DIR__ . '/classes/Queue.php';

use GuzzleHttp\Client;
use GuzzleHttp\Exception\ClientErrorResponseException;
use Symfony\Component\DomCrawler\Crawler;
use Symfony\Component\CssSelector;
The first task is to get the website page’s body using Guzzle HTTP Client. The client sends a request to Yell.com URL with an array of options. One of the options are headers: User-Agent, Upgrade-Insecure-Requests, and Cookie. They allow the request to look the same as if it had been sent using the browser. The file config.php contains PHP constants URL, USER_AGENT, and COOKIE.
<?php

define('URL', 'https://www.yell.com/ucs/UcsSearchAction.do');
define('USER_AGENT', 'Mozilla/5.0 (Windows NT 10.0)'
           . ' AppleWebKit/537.36 (KHTML, like Gecko)'
           . ' Chrome/48.0.2564.97'
           . ' Safari/537.36');
define('COOKIE', 'FUID=0214357288; ... D_HID=HwZgQ9+yW9806Hi34580O9s6ZwGj23tdU5MMPKg/6tU');
Sometimes Yell website redirects users to the error page. It happens if the request does not seem to be real. To prevent this redirect, we’ll use allow_redirects = false option.
To find companies, it is necessary to input keywords and locations. For this purpose, we add a query with the keyword and the location to the $options array.
During the request sending, something can go wrong. That’s why we use try .. catch construction.
<?php

$options = array(
    'headers'     => array(
        'User-Agent'                => USER_AGENT,
        'Upgrade-Insecure-Requests' => 1,
        'Cookie'                    => COOKIE
    ),
    'allow_redirects' => false,
    'query'           => array(
        'keywords' => 'pizza',
        'location' => 'UK'
    )
);

try {
    $response = (new Client())->request('GET', URL, $options);
    $body = (string) $response->getBody(true);
} catch (ClientErrorResponseException $e) {
    $responseBody = $e->getResponse()->getBody(true);
    echo $responseBody;
}
The second task is to parse body into separate blocks filtered by the class selector. Each block contains one company’s information. In its turn, each queue message represents one block.
We write this part inside the try .. catch construction too.
<?php

try {

 // $body = ...

 $crawler = new Crawler($body);
 $companies = $crawler
     ->filter('.businessCapsule')
     ->each(function (Crawler $node) { return $node->html(); });
 unset($crawler);

} catch (ClientErrorResponseException $e) { ... }
If Crawler extracted at least one company in the previous step, then the third task is to send messages.
Firstly, it is necessary to specify the queue. To do this, we pass the queue’s name to an instance of the custom Queue class. The queue name should be the same as we used during the queue creation. We use QUEUE constant defined in config.php.
<?php
	define('QUEUE', 'yellow-pages-queue');
Then we present each element of the $companies array as a message – an instance of the custom Message class.
Now the Message object can be sent to the queue using the send() method.
<?php

try {
    // ...
    // unset($crawler);
    if ($companies) {
        $queue = new Queue(QUEUE);
        foreach ($companies as $company) {
            $message = new Message(compact('company'));
            $queue->send($message);
            unset($message);
        }
        unset($queue);
    }
} catch (ClientErrorResponseException $e) { ... }
2. Worker
The worker is the key script in the whole process. It should work all the time in the infinite loop: check if there is any message in the queue. If it finds the message, it receives and processes it with process() method. After that, the worker deletes the message from the queue. If there is no message in the queue, the worker script gets inactive for 20 seconds, and then starts from the beginning.
<?php

    require_once __DIR__ . '/vendor/autoload.php';
    require_once __DIR__ . '/config.php';
    require_once __DIR__ . '/classes/Message.php';
    require_once __DIR__ . '/classes/Queue.php';

    $queue = new Queue(QUEUE);

    while (true) {
        $message = $queue->receive();
        if ($message) {
            try {
                $process = $message->process();
                $queue->delete($message);
            } catch (Exception $e) {
                $queue->delete($message);
                echo $e->getMessage();
            }
        } else {
            sleep(20);
        }
    }
3. Classes
These custom classes use and extend classes from George Webb’s PHP SQS tutorial.
3.1. Queue
Queue class consists of a constructor and three methods: send(), receive() and delete().
The constructor sets up a connection to the AWS queue: initializes SQS client and gets the queue’s URL for other methods. It uses AWS_CONFIG constant from config.php:
<?php

define('AWS_CONFIG', serialize(array(
    'region' => 'us-west-2',
    'version' => 'latest',
    'credentials' => array(
        'key'    => 'J0HNDOEJOHND0EJ0HND0',
        'secret' => 'J0hnDoejOHNd0EJ0HNd0j0HNdOEjohnd0eJ0hNd0'
    )
)));
<?php

use Aws\Sqs\SqsClient;

class Queue
{
    private $name, $url, $sqs_client;

    public function __construct($name)
    {
        try {
            $this->name = $name;
            $this->sqs_client = new SqsClient(unserialize(AWS_CONFIG));
            $this->url = $this->sqs_client->getQueueUrl(
            	array('QueueName' => $this->name)
            )->get('QueueUrl');
        } catch (Exception $e) {
            echo 'Error getting the queue url ' . $e->getMessage();
        }
    }

    // ...
}
The method send() is for sending JSON representation of the message to QueueUrl.
<?php

    public function send(Message $message)
    {
        try {
            $this->sqs_client->sendMessage(array(
                'QueueUrl' => $this->url,
                'MessageBody' => $message->asJson()
            ));
            return true;
        } catch (Exception $e) {
            echo 'Error sending message to queue ' . $e->getMessage();
            return false;
        }
    }
The method receive() is for receiving messages from the queue. It returns the first message as an instance of Message class. If there is no messages, the method returns boolean value false.
<?php

    public function receive()
    {
        try {
            $result = $this->sqs_client->receiveMessage(array(
                'QueueUrl' => $this->url
            ));
            if ($result['Messages'] == null) {
                return false;
            }
            $result_message = array_pop($result['Messages']);
            return new Message($result_message['Body'], $result_message['ReceiptHandle']);
        } catch (Exception $e) {
            echo 'Error receiving message from queue ' . $e->getMessage();
            return false;
        }
    }
The method delete() is for deleting messages from the queue by message’s receipt handle parameter.
<?php

    public function delete(Message $message)
    {
        try {
            $this->sqs_client->deleteMessage(array(
                'QueueUrl' => $this->url,
                'ReceiptHandle' => $message->receipt_handle
            ));
            return true;
        } catch (Exception $e) {
            echo 'Error deleting message from queue ' . $e->getMessage();
            return false;
        }
    }
3.2. Message
The class Message contains a constructor and two methods: asJson() and process().
The constructor converts a message from JSON format to an array and then initialize values of properties company and receipt_handle.
<?php

require __DIR__ . '/Company.php';

use Symfony\Component\DomCrawler\Crawler;
use Symfony\Component\CssSelector;

class Message
{
    public $company, $receipt_handle;

    public function __construct($data, $receipt_handle = '')
    {
        if (is_string($data)) {
            $data = json_decode($data, true);
        }
        $this->company = $data['company'];
        $this->receipt_handle = $receipt_handle;
    }
}
The method asJson() converts Message object to JSON format acceptable by the AWS queue.
<?php

    public function asJson()
    {
        return json_encode(array('company' => $this->company));
    }
The method process() parsed company’s HTML block. It extracts details using Crawler, forms an instance of Company class and saves it to DB using save() method.
There is an array of selectors for filtering company’s title and website. If there is a node which matches the selector, then we store its value to the variable. Otherwise, the variable’s value is set to empty string.
<?php

    public function process()
    {
        $filters = array(
            'title'   => 'h2',
            'website' => '.businessCapsule--callToAction > a'
        );
        $crawler = new Crawler($this->company);

        $node   = $crawler->filter($filters['title']);
        $title   = ($node->count()) ? $node->text() : '';

        $node = $crawler->filter($filters['website']);
        $website = ($node->count()) ? $node->attr('href') : '';

        unset($crawler);

        $company = new Company($title, $website);
        return $company->save();
    }
3.3. Company
Company class presents a DB model with a constructor and the only method save().
The constructor connects to the DB and initializes values for the class properties with passed arguments. The DB configuration is written in config.php.
<?php

define('DB_CONFIG', serialize(array(
    'user'     => 'root',
    'password' => '',
    'host'     => 'localhost',
    'driver'   => 'pdo_mysql'
)));
The method save() just inserts company’s title and website to the DB table.
<?php

    public function save()
    {
        $query = 'INSERT INTO `yellows`.`companies` (`company_title`, `company_website`)'
               . ' VALUES (?, ?)';
        return $this->conn->executeQuery($query, array($this->title, $this->website));
    }
Testing
1. Launching trigger and worker scripts
As mentioned above, the worker scripts should be running all the time. So we launch them in the first place.
For this purpose, we need to start supervisord service.
sudo /usr/local/bin/supervisord -c /home/myuser/supervisord.conf
If it has started successfully, then 10 /path/to/log/output_x.log files will appear in the /path/to/ directory.
Now we can run the trigger script in the browser http://my.example.com/trigger.php.
If its execution did not cause any errors, we just see a blank page. After the page load finishes, we can look at the results.
2. Monitoring Amazon SQS
In the Amazon SQS console, we should see 15 messages at the start of the script execution.

Then this number will decrease as the workers processed some of them.

Finally, there should be 0 messages left in the queue.
3. View DB results
If the pages have been successfully scraped, the database table should contain 15 companies.
1,"Paramount Pizza","http://paramountpizza.co.uk/"
2,"Pizza Luciano","http://www.pizzaluciano.co.uk/"
3,"Pizza Top","http://www.pizza-top.co.uk"
4,"American Pizza Slice","http://www.americanpizzaslice.co.uk"
5,"Mamma's American Pizza Co","http://www.mammas.co.uk"
6,"Snappy Tomato Pizza","http://www.snappytomatopizza.co.uk/site/restaurant/details/16"
7,"MOGANOJAX","http://www.moganojax.co.uk"
8,"Domino's Pizza","http://www.dominos.co.uk"
9,"Pizza Hotline","http://www.pizzahotlinedelivery.co.uk"
10,"Pizza Pro",
11,"Caspian Pizza","http://www.caspianpizza.com"
12,"Snappy Tomato Pizza","http://www.snappytomatopizza.co.uk/site/restaurant/details/9"
13,"Paramount Pizza","http://www.paramountpizza.co.uk/"
14,"Capones Pizza Parlour","http://www.caponespizzaparlour.co.uk"
15,"Pizza Bellezza","http://www.pizzabellezza.com"
In conclusion, we want to say a couple words about some possibilities of extending. The next step is to check if the worker finishes messages processing. This can be implemented in different ways. For example, you can log some statistics to the DB table: how many messages were sent, received and processed. If sent number is equal to processed number, you know the scrape is finished. You can have another script to compare these numbers and display the progress. Also, you can check out these AWS queue attributes: ApproximateNumberOfMessages, ApproximateNumberOfMessagesNotVisible, and ApproximateNumberOfMessagesDelayed in your additional script. It depends on your application purposes. Anyway, most of the work has already been done. You can download all the files here.
Wow!!! Really a great post. I’d like to know if the worker has a timeout or it never stops. In your example you are launching 10 of these. This means that there are 10 scripts that run forever?
Hi, thanks for the comment! They will run forever, but since there is sleep() call if there are no messages in SQS, it won’t comsume any CPU power and hence no server load. This is more convenient, since they are always online and ready to work , you just need to send a message to the SQS queue
Great post.
i have a question concerning the use of Beanstalkd queue instead of the aws queue. how oes this works?