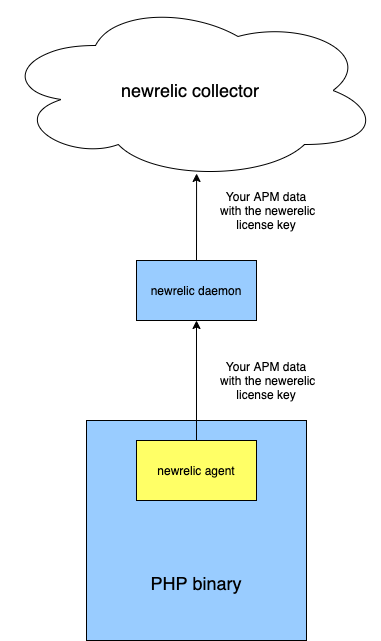
There are a couple of APM tools on the market now and newrelic is definitely one of the biggest players there. It offers PHP integration by providing an agent and a daemon tool. The former integrates into your PHP binary as an extension and collects the APM data of your app on runtime. While the latter is responsible for accepting the collected data from the agent and send it to newrelic connector (an external newrelic server). Here is how the flow looks:
Nowadays PHP developers tend to use docker for their local development and K8S deployments, so setting up newrelic inside docker containers was a recent task done by our team.
These days setting up a PHP-FPM container separately from the web server one is a common setup, moreover, it’s more *nix-like letting each subsystem of your setup to solve just one task and do it the best it can. So we will consider here a setup with two separate containers (we’re not counting the ones you may have to solve other tasks, we’re talking only about PHP here):
- php-fpm with newrelic agent extension
- newrelic PHP daemon container
These are marked as blue rectangles on the diagram above.
Luckily newrelic supports a docker image for the daemon (p.2), so let’s just add it to our docker-compose.yaml :
version: "3.6"
services:
  newrelic:
    networks:
      - main
    container_name: test-project-newrelic
    image: newrelic/php-daemon
It will listen to 31339 port in the main network (no need to expose the port for external connections) and the agent will connect to it as newrelic:31339 later when we add it.
Let’s see how we can build the agent for your php-fpm container. We’re assuming here you’ve got a newrelic key – either trial or commercial one. And we’re assuming you will be basing on your existing php-fpm image. We will use official PHP 7.4 FPM image here in this tutorial. Let’s have our own Dockerfile extending php:7.4-fpm and adding the agent extension and setting the environment there. We will need not only to build the extension, but also to set the newrelic key as well as the newrelic daemon host and port where agent will send your app APM info. Let’s pass the arguments from our docker-compose.yaml into the Dockerfile context:
version: "3.6"
services:
  newrelic:
    networks:
      - main
    container_name: test-project-newrelic
    image: newrelic/php-daemon
  php:
    build:
      context: './docker/php'
      dockerfile: Dockerfile
      args:
        NEWRELIC_KEY: "xxxxxxxxxxxxxxxxxxxxxxxxxxxx"
        NEWRELIC_APP_NAME: "Some Test Application"
        NEWRELIC_DAEMON_ADDRESS: "newrelic:31339"
networks:
  main:
and then use them in Dockerfile where we add the step to install newrelic extension and put all our env vars into its config:
FROM php:7.4-fpm

ARG NEWRELIC_KEY
ARG NEWRELIC_APP_NAME
ARG NEWRELIC_DAEMON_ADDRESS

RUN curl -o newrelic.tar.gz https://download.newrelic.com/php_agent/release/newrelic-php5-9.10.1.263-linux.tar.gz \
  && gzip -dc newrelic.tar.gz | tar xf - \
  && cd newrelic-php5-9.10.1.263-linux \
  && NR_INSTALL_USE_CP_NOT_LN=1 NR_INSTALL_SILENT=1 ./newrelic-install install \
  && rm -rf ../newrelic-php5-9.10.1.263-linux newrelic.tar.gz \
  && sed -i \
           -e 's/"REPLACE_WITH_REAL_KEY"/'"$NEWRELIC_KEY"'/' \
           -e 's/newrelic.appname = "PHP Application"/newrelic.appname = '"$NEWRELIC_APP_NAME"'/' \
           -e 's/;newrelic.daemon.app_connect_timeout =.*/newrelic.daemon.app_connect_timeout=15s/' \
           -e 's/;newrelic.daemon.start_timeout =.*/newrelic.daemon.start_timeout=5s/' \
           -e 's/;newrelic.daemon.address =.*/newrelic.daemon.address='"$NEWRELIC_DAEMON_ADDRESS"'/' \
           -e 's/;newrelic.daemon.dont_launch =.*/newrelic.daemon.dont_launch = 3/' \
           /usr/local/etc/php/conf.d/newrelic.ini
Here we set the application name reported to newrelic connector to ‘Some Test Application’ passed from the build-args of docker-compose, set the recommended timeout values , the newrelic daemon hostname and port and (important!) we tell php agent NOT to start the local daemon as we have it as external container (see option newrelic.daemon.dont_launch = 3).
Now we have newrelic setup ready and need to add some PHP to profile. Let’s create an empty symfony web project with the following command in app/ folder:
composer create-project symfony/website-skeleton app
Wait till composer downloads all dependencies and runs post-install commands and then we can mount the app folder in our docker-compose.yaml as /var/www/html inside php container:
volumes:
  - ./app:/var/www/html
And since we have a web application here we would need an nginx container (let’s use the official image) with the code mounted there as well and an nginx virtualhost config that we will place under docker/nginx/app.conf. Here is an example of nginx app.conf:
server {
    listen 80;
    server_name localhost;

    error_log /proc/self/fd/2;
    access_log /proc/self/fd/1;

    root /var/www/html/public;

    location / {
        try_files $uri /index.php$is_args$args;
    }

    location ~ ^/app\.php(/|$) {
        fastcgi_pass php:9000;
        fastcgi_split_path_info ^(.+\.php)(/.*)$;
        include fastcgi_params;
        fastcgi_param SCRIPT_FILENAME $realpath_root$fastcgi_script_name;
        fastcgi_param DOCUMENT_ROOT $realpath_root;
        internal;
    }

    location ~ \.php$ {
        fastcgi_pass  php:9000;
        fastcgi_param SCRIPT_FILENAME $document_root$fastcgi_script_name;
        include       fastcgi_params;
        fastcgi_read_timeout 3000;
    }
}
Note that you would need
- ./app:/var/www/html
mount in both nginx and php service as both of them require access to the project files. Don’t forget to put all three services into one network, so the resulting docker-compose.yaml will look like:
version: "3.6"
services:
  newrelic:
    networks:
      - main
    container_name: test-project-newrelic
    image: newrelic/php-daemon
  php:
    build:
      context: './docker/php'
      dockerfile: Dockerfile
      args:
        NEWRELIC_KEY: "xxxxxxxxxxxxxxxxxxxxxxxxxxxx"
        NEWRELIC_APP_NAME: "Some Test Application"
        NEWRELIC_DAEMON_ADDRESS: "newrelic:31339"
    volumes:
      - ./app:/var/www/html
    networks:
      - main
  web:
    image: nginx
    ports:
      - "80:80"
    volumes:
      - ./app:/var/www/html
      - ./docker/nginx/app.conf:/etc/nginx/conf.d/default.conf
    networks:
      - main
networks:
  main:
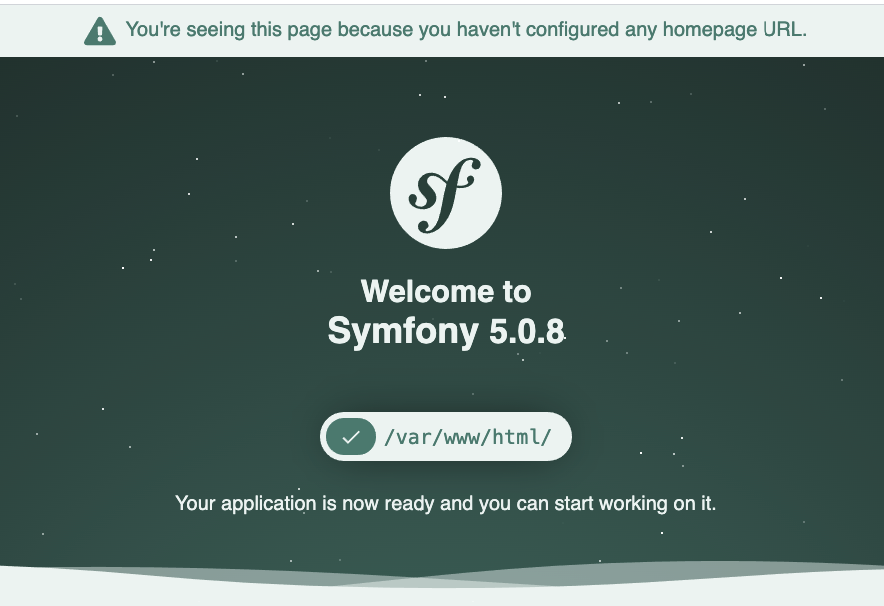
If everything is fine and if you open http://localhost in your browser, you should see default symfony page:
and if you call test-project-newrelic you should see something like:
2020/05/10 12:47:36.703140 (1) Info: New Relic daemon version 9.10.1.263-50bdf7fd22bd [listen=”8f1b45cd1725:31339″ startup=init pid=1 ppid=0 uid=0 euid=0 gid=0 egid=0 runtime=”go1.9.7″ GOMAXPROCS=4 GOOS=linux GOARCH=amd64]
2020/05/10 12:47:36.763262 (13) Info: New Relic daemon version 9.10.1.263-50bdf7fd22bd [listen=”8f1b45cd1725:31339″ startup=init pid=13 ppid=1 uid=0 euid=0 gid=0 egid=0 runtime=”go1.9.7″ GOMAXPROCS=4 GOOS=linux GOARCH=amd64]
2020/05/10 12:47:36.763482 (13) Info: collector configuration is &{CAFile: CAPath: Proxy:}
2020/05/10 12:47:36.764710 (13) Info: daemon listening on :31339
2020/05/10 12:51:05.574061 (13) Info: Reporting to: https://rpm.newrelic.com/accounts/xxxxxx/applications/xxxxxxx
2020/05/10 12:51:05.574490 (13) Info: app ‘Some Test Application’ connected with run id ‘xxxxxxxx-xxxxxxxxx’
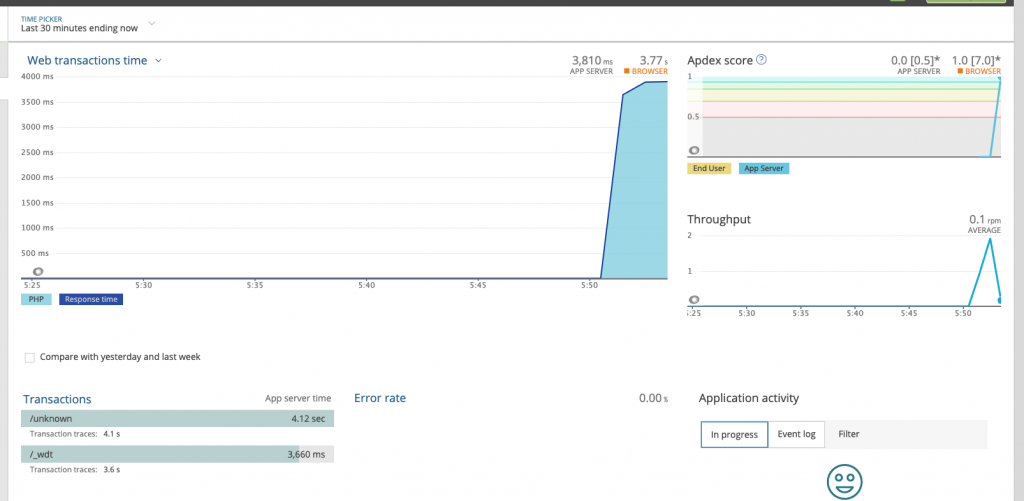
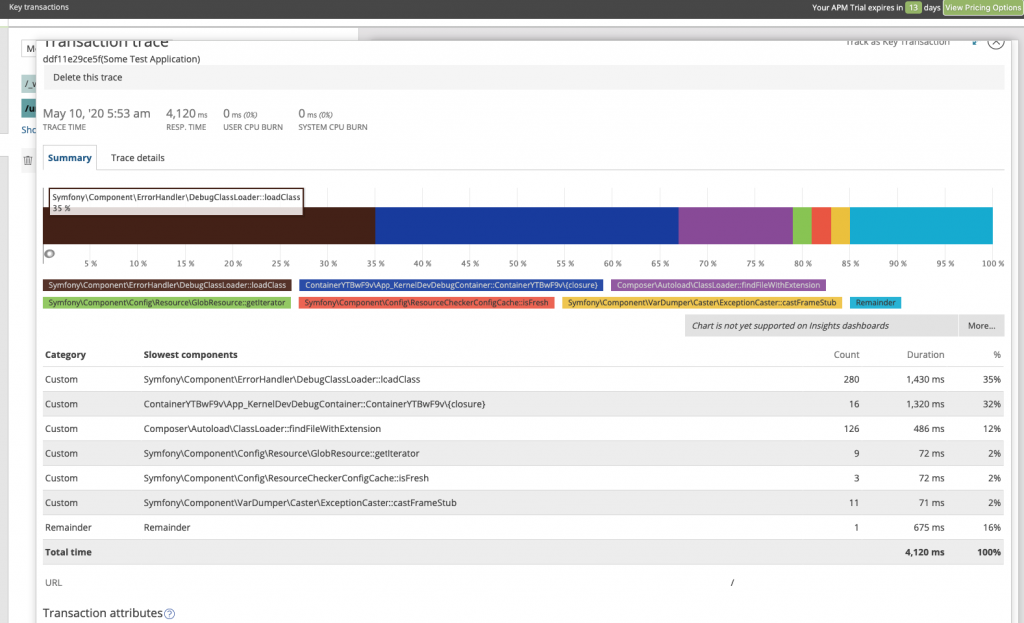
Wait a few minutes till the data is processed by newrelic and you should start seeing it in your newrelic account:
As usual, see the repo with all the config from this article in our github