Zendesk is a great platform for the fast creating your own CRM which can be used to save and process your customers’ feedback as a tickets. So if your company has a website which uses WordPress platform, and you’d like to convert all/one form(s) submissions into a Zendesk ticket, here is a solution we suggest.
We are going to develop the plugin for creating and updating Zendesk tickets by users of some WordPress site using Zendesk API and Gravity Forms Plugin (further abbreviated as GF). We chose GF because it’s a de-facto standard for forms creation in WP world nowadays.
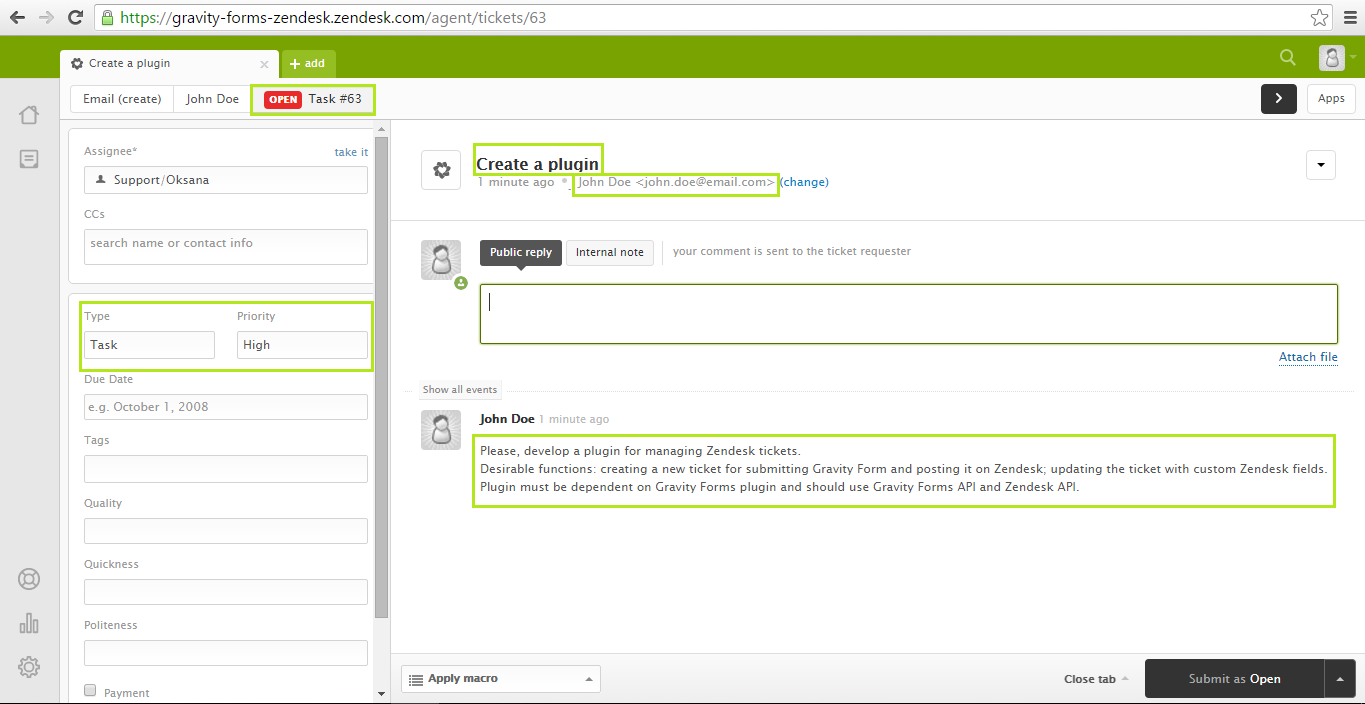
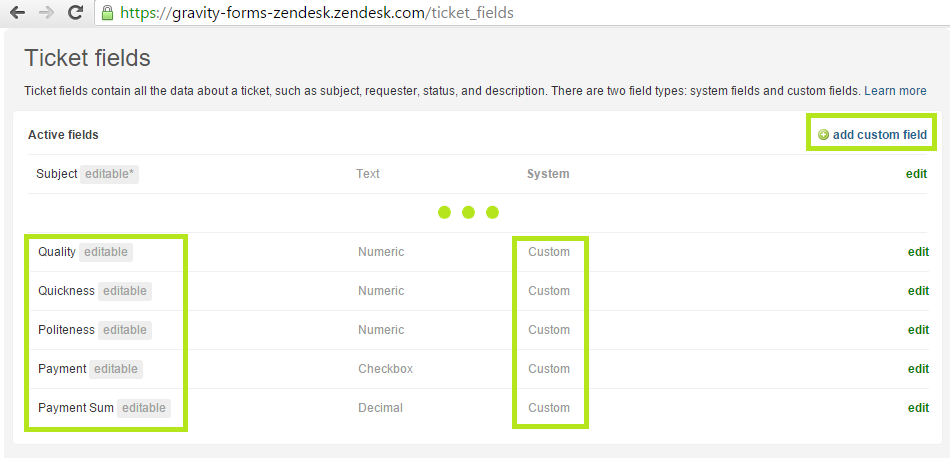
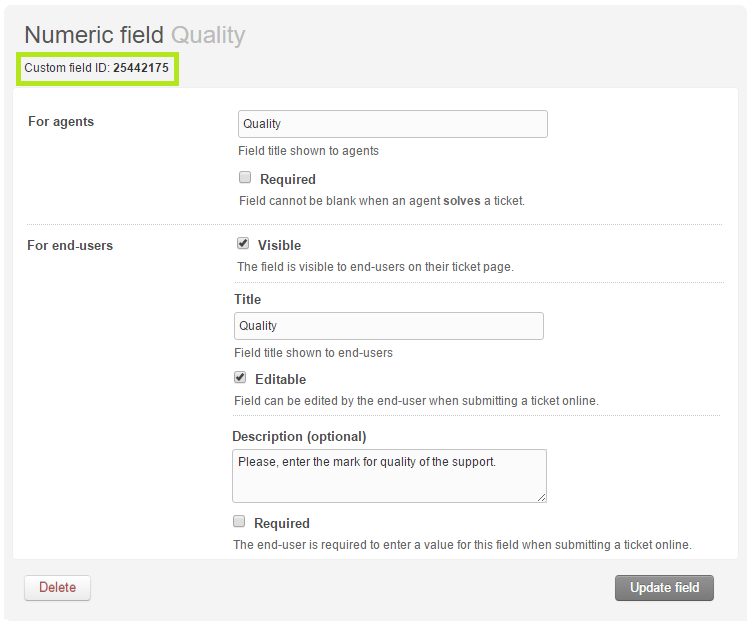
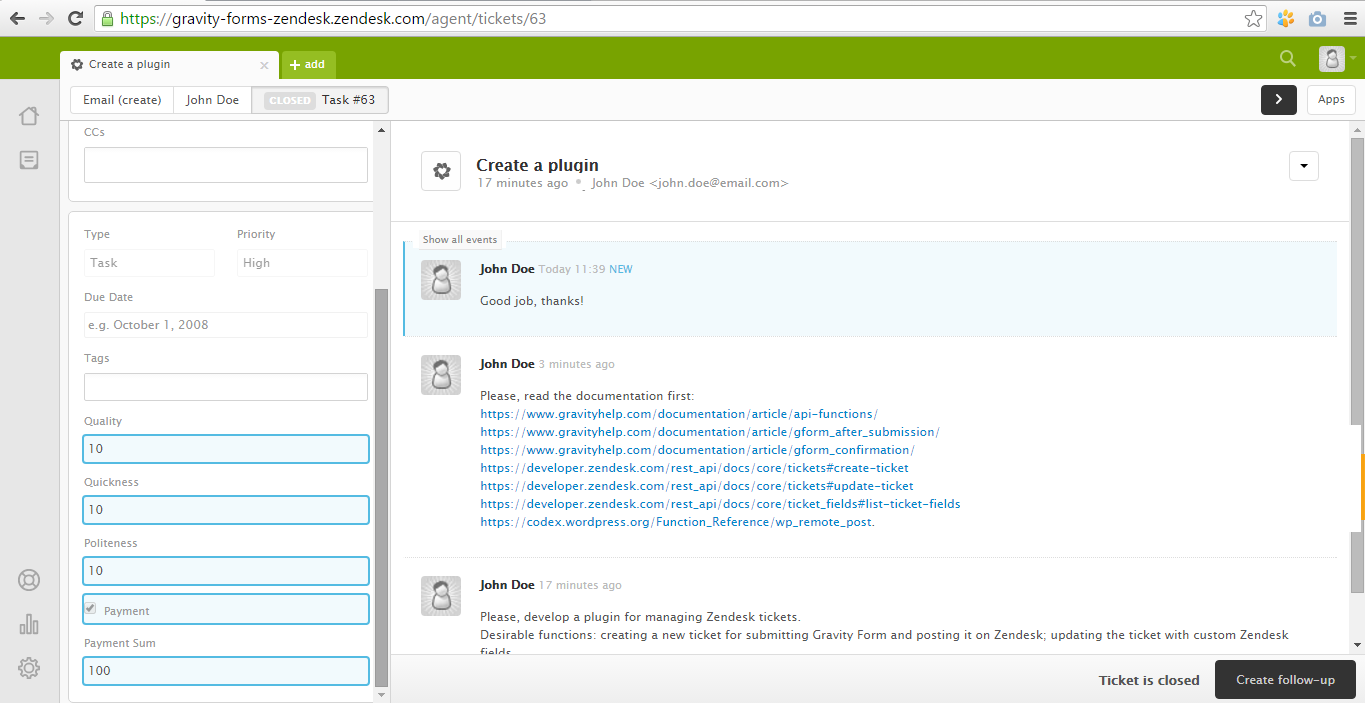
In this article we’ll go through the all steps of creating, tuning and using the plugin which a plugin developer, a website admin and a user have to do. In the end we want to see a ticket with all system and some custom fields created on the WordPress side and located in the Zendesk CRM area.
1. Developer: mark the plugin structure
Let’s name our plugin as gravity-forms-zendesk. This plugin will be based on the WordPress Plugin Boilerplate – a beautiful template for writing plugins in OOP style. After making some changes the final structure of the plugin’s folder will look like this:
admin/
---- img/
-------- gravity-forms-zendesk-logo.png
---- js/
-------- gravity-forms-zendesk-admin.js
---- partials/
-------- gravity-forms-zendesk-admin-display.php
---- class-gravity-forms-zendesk-admin.php
---- index.php
includes/
---- class-gravity-forms-zendesk-activator.php
---- class-gravity-forms-zendesk-deactivator.php
---- class-gravity-forms-zendesk-loader.php
---- class-gravity-forms-zendesk.php
---- index.php
public/
---- class-gravity-forms-zendesk-public.php
---- index.php
gravity-forms-zendesk.php
index.php
LICENSE.txt
README.txt
uninstall.php
We have two main classes: Gravity_Forms_Zendesk_Admin – for defining admin-side functions, and Gravity_Forms_Zendesk_Public – for defining user-side functions. There is also the third main class Gravity_Forms_Zendesk where the Admin and Public classes’ methods will be called as callbacks for some WordPress actions and filters.
2. Developer: create a plugin options page
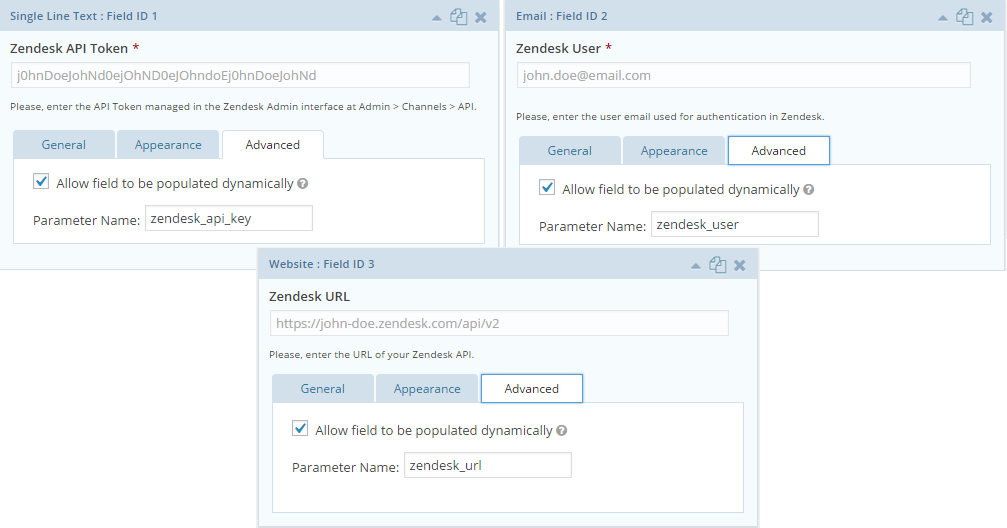
To make requests, a developer must be authorized against the API by one of these three ways. Here we choose the basic authentication with an API Token and a email address. Also we need to provide the URL of Zendesk CRM. All this data is custom, so we need to implement some options page, where the admin can fill these fields with his own values.
2.1. Build the form Settings
The developer prepares the Settings form (see screenshot below) using GF plugin. Later this form can be exported as a JSON file and then imported anywhere the plugin will be installed. Notice, we define parameters for the pre-populated fields to make the form show the settings submitted at the previous time.
2.2. Register the plugin’s settings
It is necessary to register the settings which will be used at the options page. We’ll do this in two steps.
Step 1 is to add an action to the admin hooks function in the Gravity_Forms_Zendesk class.
private function define_admin_hooks() {
    // ...
    $this->loader->add_action( 'admin_init', $plugin_admin, 'register_settings' );
}
Step 2 is to implement the register_settings() method of the Gravity_Forms_Zendesk_Admin class.
private $option_name = 'zendesk';

public function register_settings() {
    register_setting( $this->plugin_name, $this->option_name . '_api_key' );
    register_setting( $this->plugin_name, $this->option_name . '_user' );
    register_setting( $this->plugin_name, $this->option_name . '_url' );
}
2.3. Add the options page
Here a programmer needs to add the admin_menu action to the admin hooks function in the Gravity_Forms_Zendesk class.
private function define_admin_hooks() {
    // ...
    $this->loader->add_action( 'admin_menu', $plugin_admin, 'add_menu' );
}
The function add_menu() itself is defined in the Gravity_Forms_Zendesk_Admin class:
public function add_menu() {
    add_menu_page(
        'Gravity Forms Zendesk', 'Gravity Forms Zendesk',
        'manage_options', 'gravity-forms-zendesk-settings',
        array( $this, 'display_settings_page' ),
        plugin_dir_url( __FILE__ ) . 'img/gravity-forms-zendesk-logo.png',
        $this->version
    );
}

public function display_settings_page() {
    include_once 'partials/gravity-forms-zendesk-admin-display.php';
}
2.4. Display Settings form on the options page
In this file gravity-forms-zendesk-admin-display.php the form Settings will be functionally embedded. Also there will be a message shown after successful submit of this form. To embed the form will be used a function call provided by GF plugin. Pay attention that keys in the $fields array are exactly the same as the parameters in the Settings form’s fields.
        Data has been successfully updated.


 esc_attr(get_option('zendesk_api_key')),
        'zendesk_user'    => esc_attr(get_option('zendesk_user')),
        'zendesk_url'     => esc_attr(get_option('zendesk_url'))
    );

    gravity_form('Settings', false, false, false, $fields, false);
?>
2.5. Update the settings and delete an entry after Settings form submission
The last step of developing Settings page is to update settings received after the form submit. This function will look like the following (written in the Gravity_Forms_Zendesk_Admin class).
public function update_settings( $entry ) {
    update_option( $this->option_name . '_api_key', rgar( $entry, '1' ) );
    update_option( $this->option_name . '_user', rgar( $entry, '2' ) );
    update_option( $this->option_name . '_url', rgar( $entry, '3' ) );

    return true;
}
As you see, to get the value of the specific form field the GF function rgar() was used. Notice, the field ID must be a string.
Also it is necessary to add an action in the Gravity_Forms_Zendesk class, using GF event gform_after_submission and pointing that this action will be execute after submitting the form with ID 1:
private function define_admin_hooks() {
    // ...
    $this->loader->add_action( 'gform_after_submission_1', $plugin_admin, 'update_settings' );
}
GF plugin leaves an entry in the database after each submit of its form. If this entry is unnecessary, the developer can delete it permanently. We’ll use this function in our plugin: add an action in the Gravity_Forms_Zendesk class:
private function define_admin_hooks() {
    // ...
    $this->loader->add_action( 'gform_after_submission',   $plugin_admin, 'delete_entry' );
}
and implement the function delete_entry() in the Gravity_Forms_Zendesk_Admin class using GF API function:
public function delete_entry( $entry ) {
    GFAPI::delete_entry( $entry['id'] );
}
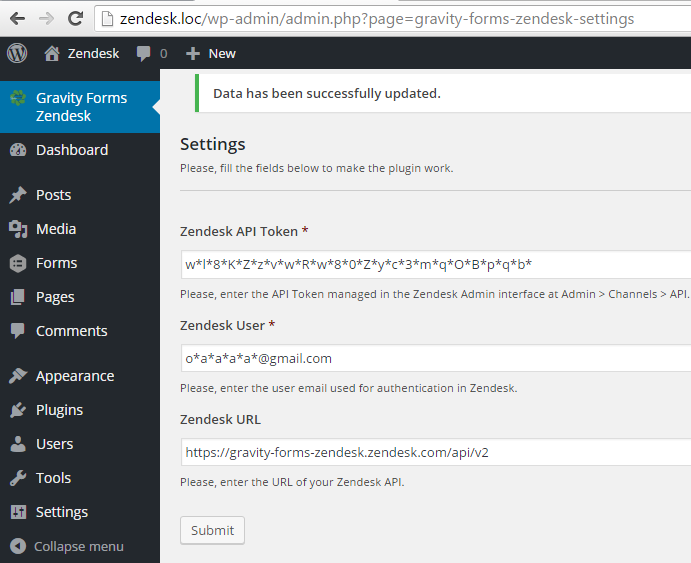
3. Admin: fill Settings form
Before the developer will be able to make API requests, the admin must enter the settings.
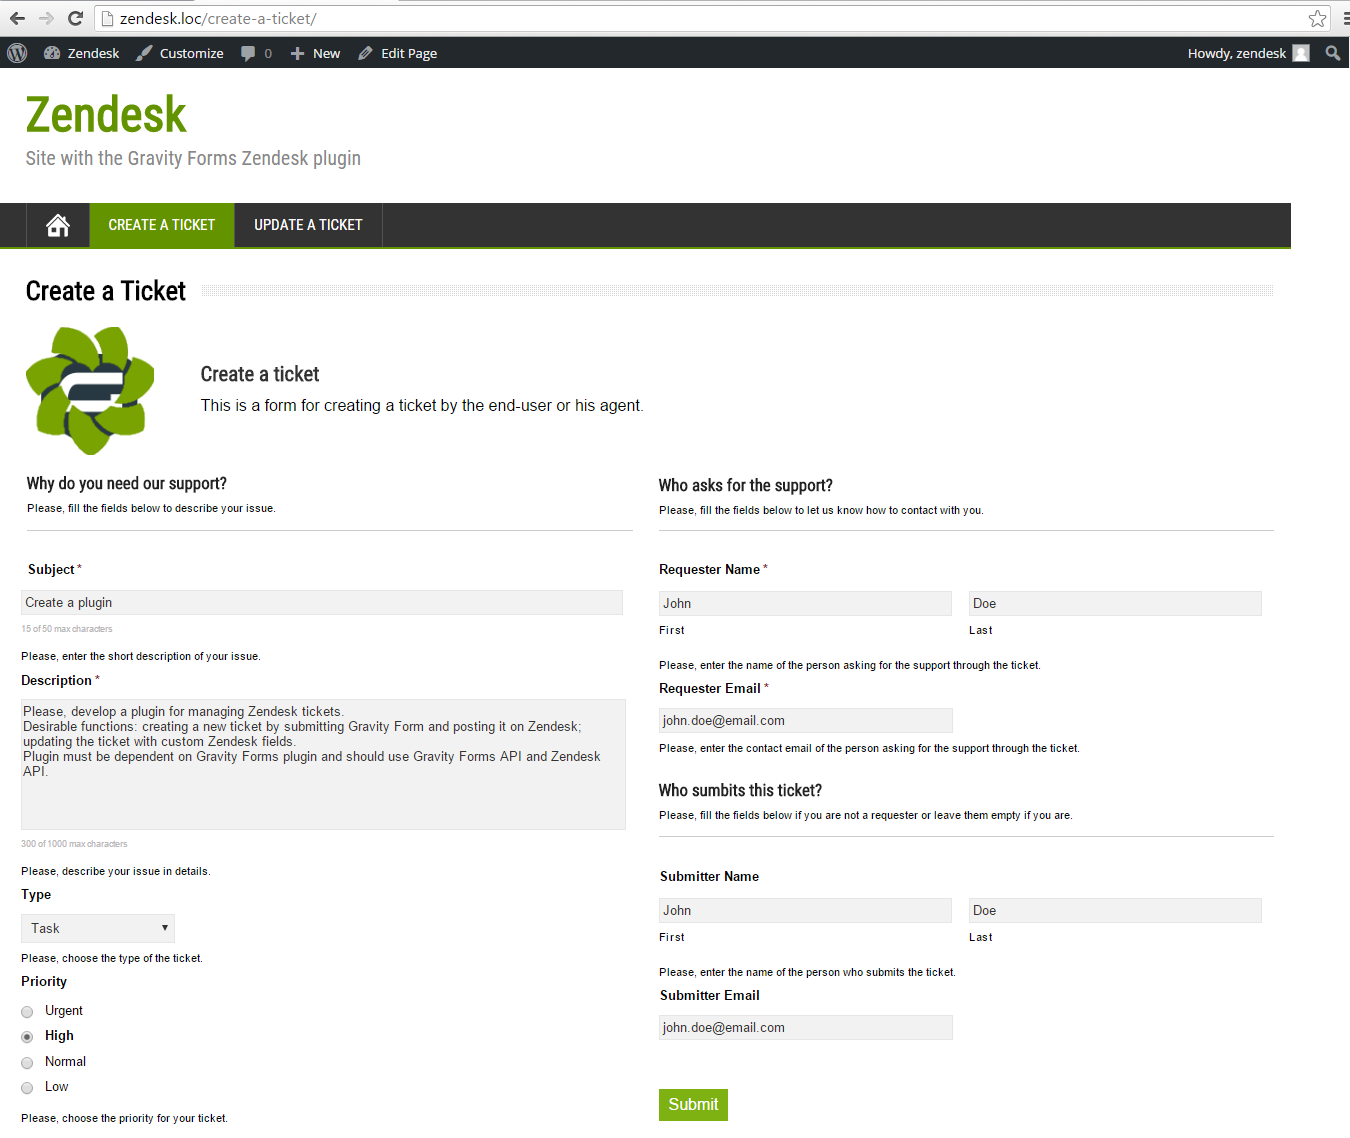
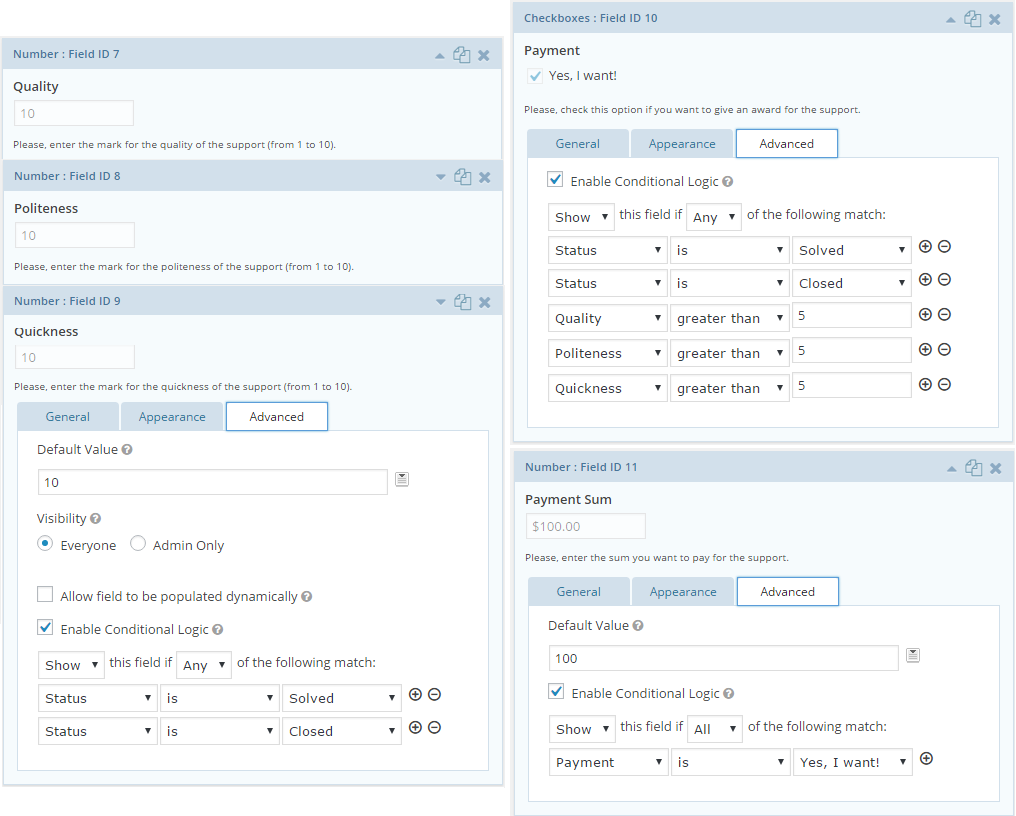
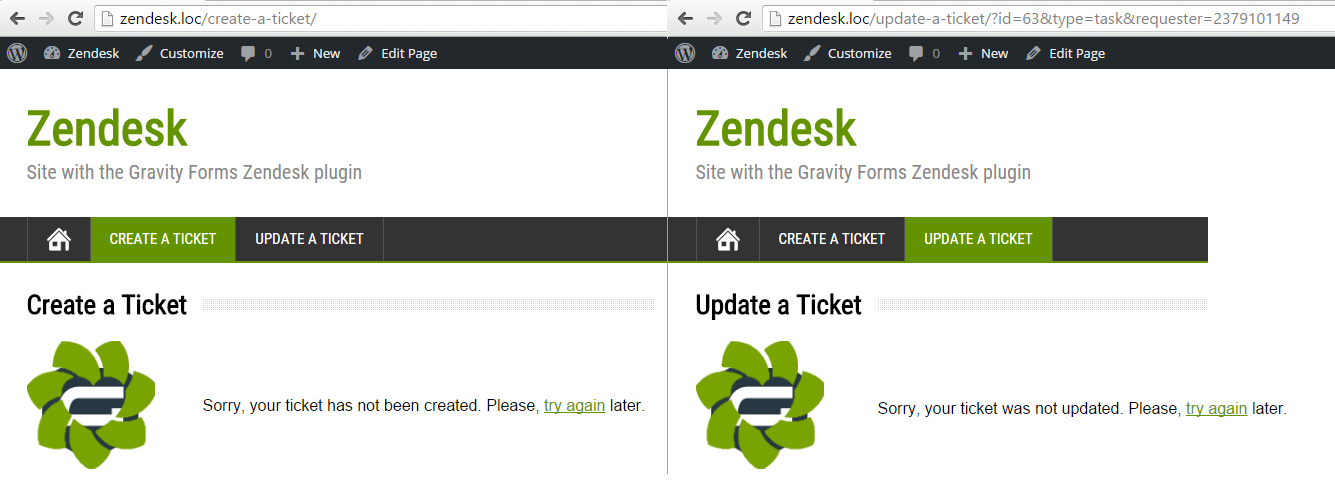
4. Developer: build Create a ticket form
The first form for creating a ticket is pretty easy so its building doesn’t need any comments.
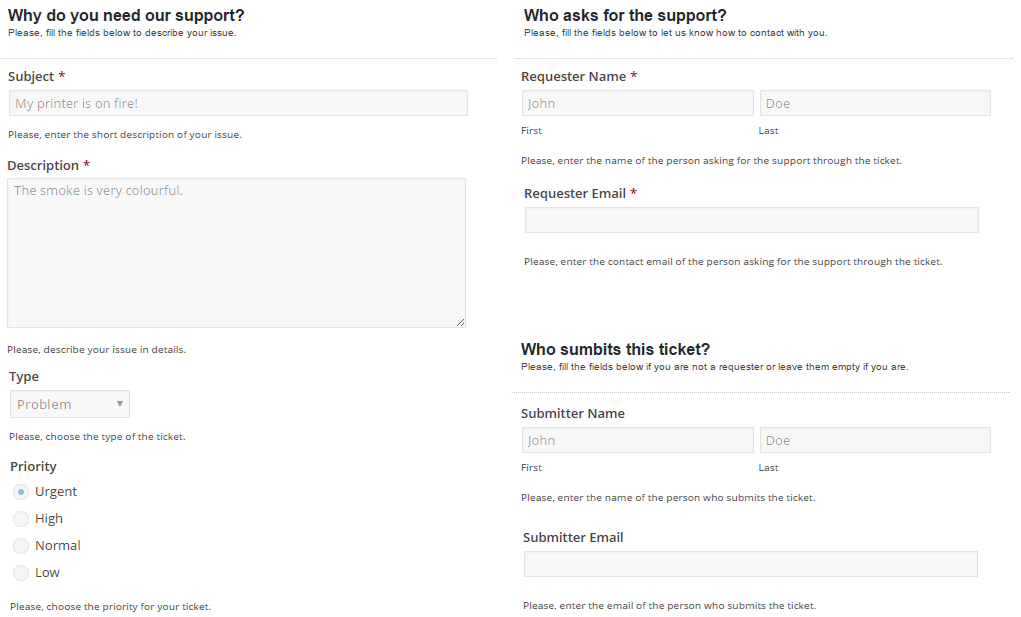
5. Admin: embed Create a ticket form into the page
To insert this form into the WordPress page, the admin can use such a shortcode provided by GF API.
[gravityform id="2" title="true" description="true"]
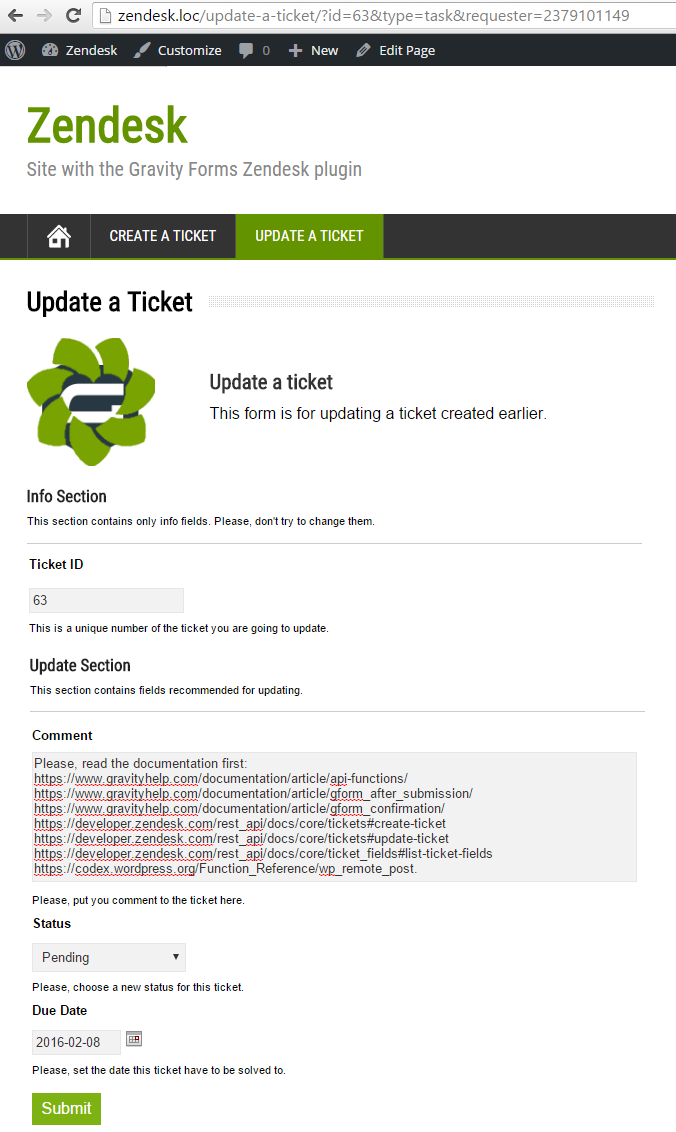
6. Developer: implement create_ticket() function
The function create_ticket() will be called after the triggering of gform_confirmation GF event. It has three main blocks: getting data from the form ‘Create a ticket’, posting this data to the Zendesk CRM, and proceeding the response from Zendesk API.
6.1. Get form data
We’ll get the data in the same way as for the previous form – using rgar() function. But this time there are some fields that have options or sub-fields, so they have complicated ID with two parts: for example, Name field has two sub-fields: First with ID ‘5.3’ and Last with ID ‘5.6’.
Also we have to take care about deleting DB entries left by the GF plugin. The function delete_entry() will be similar to the previous one, but there is a difference in the input parameters: there will be three arguments for the gform_confirmation event instead of the only necessary argument for the gform_after_submission which was used for proceeding Settings form.
public function delete_entry($confirmation, $form, $entry) {
    GFAPI::delete_entry($entry['id']);
}
6.2. Post ticket data
It will be necessary to make remote requests for several times, so we can take this functionality out to the separate method post_ticket(). It will prepare headers and other metadata, and send a request to Zendesk API using the WP function wp_remote_post(). It is important to add Content-Type and Accept headers because requests and response need to has JSON format (as the documentation says). Let’s give this function’s code here:
private function post_ticket( $method, $ticket, $uri ) {

    $auth = base64_encode(get_option( $this->option_name . '_user' ) . '/token:'
                . get_option ( $this->option_name . '_api_key' ) );

    $args = array(
            'method' => $method,
            'timeout' => 45,
            'redirection' => 5,
            'httpversion' => '1.0',
            'blocking' => true,
            'headers' => array(
                'Authorization' => "Basic $auth",
                'Content-Type' => 'application/json',
                'Accept' => 'application/json'
            ),
            'body' => json_encode( $ticket ),
            'cookies' => array()
    );

    return wp_remote_post( get_option( $this->option_name . '_url') . $uri , $args);
}
6.3. Process Zendesk response
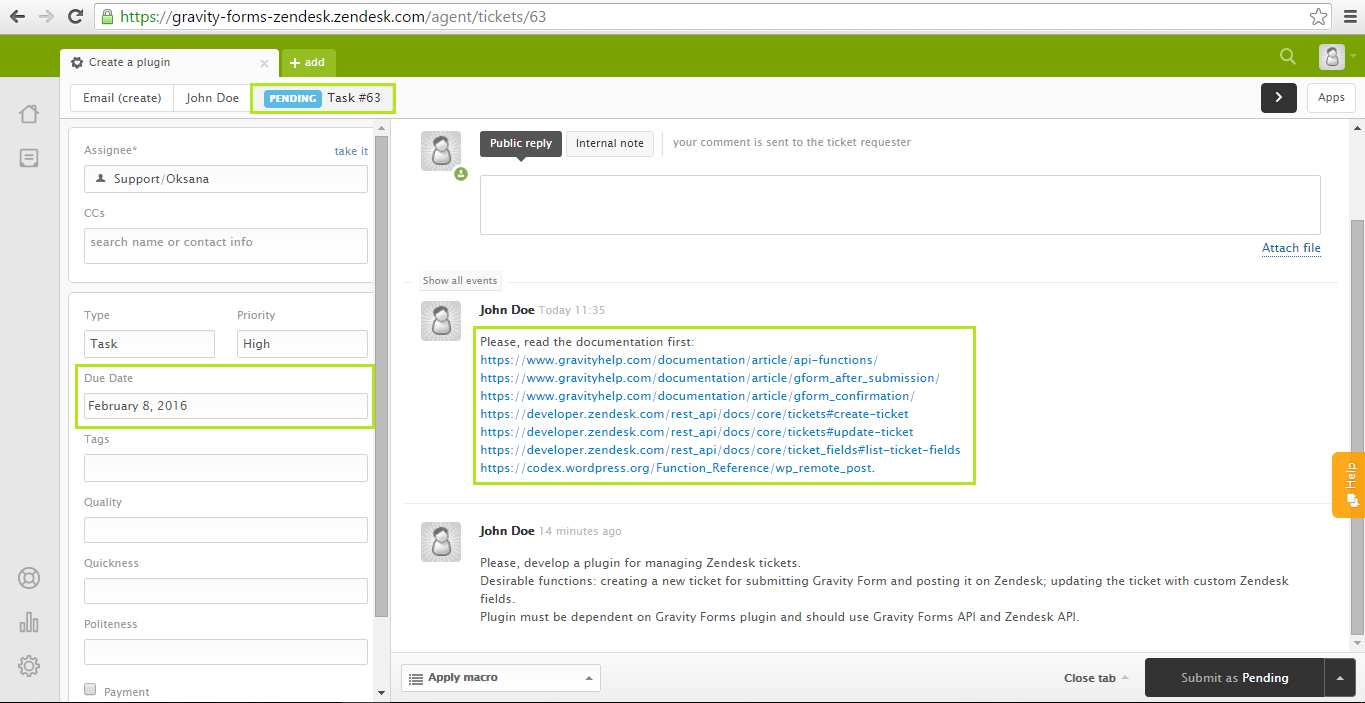
To continue work with the submitted ticket, the plugin needs to know ticket ID, ticket type and ticket requester ID. This data will be received with Zendesk response. If ticket creating succeeds, Zendesk API returns response with 201 code and the body with all ticket properties. So before we get the necessary data, we must check its presence in the response. That will be done within the private methods body_exists() and ticket_exists(). Their code is given below.
private function body_exists( $response, $code = 200 ) {
    return ( isset( $response )
            && array_key_exists( 'response', $response )
            && array_key_exists( 'code', $response['response'] )
            && $response['response']['code'] === $code
            && array_key_exists( 'body' , $response )
    );
}

private function ticket_exists( $body ) {
    return ( property_exists( $body, 'ticket' )
            && property_exists( $body->ticket, 'url' )
            && property_exists( $body->ticket, 'type' )
            && property_exists( $body->ticket, 'requester_id' )
    );
}
Now it is possible to write the whole function create_ticket() in the Gravity_Forms_Zendesk_Public class.
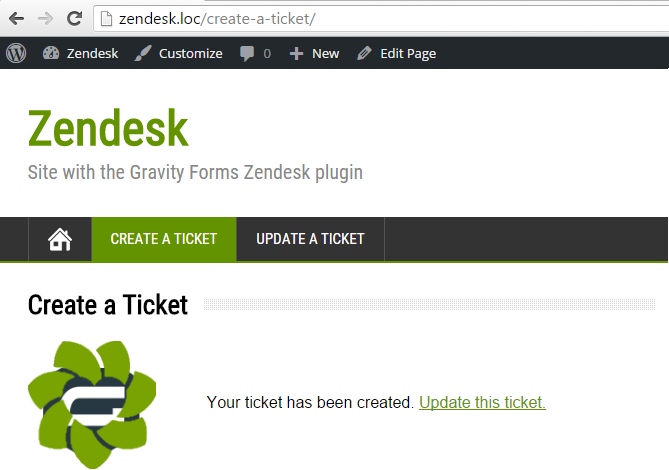
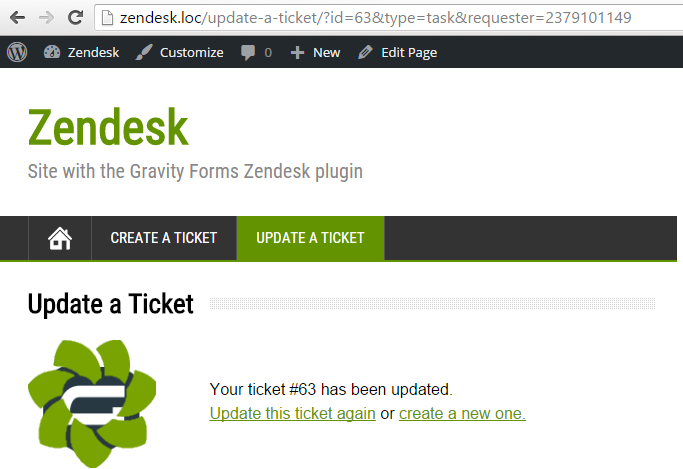
public function create_ticket( $confirmation, $form, $entry ) {
    $ticket = array(
            'ticket' => array(
                    'subject' => rgar( $entry, '1' ),
                    'comment' => array(
                        'body' => rgar( $entry, '2' )
                    ),
                    'type' => rgar( $entry, '3' ),
                    'priority' => rgar( $entry, '4' ),
                    'requester' => array(
                        'name' => rgar( $entry, '5.3' ) .' ' . rgar( $entry, '5.6' ),
                        'email' => rgar( $entry, '6' )
                    ),
                    'sumbitter' => array(
                        'name' => rgar( $entry, '7.3' ) . ' ' . rgar( $entry, '7.6' ),
                        'email' => rgar( $entry, '8' )
                    )
                )
        );

    $response = $this->post_ticket( 'POST', $ticket, '/tickets.json' );

    $confirmation = 'Sorry, your ticket has not been created.'
                  . ' Please, <a href="' . $this->create_url . '">'
                  . 'try again</a> later.';

    if ( $this->body_exists( $response, 201 ) ) {

        $body = json_decode( $response['body'] );

        if ( $this->ticket_exists( $body ) ) {

            $args = array( 'id' => $this->get_ticket_id( $body->ticket->url ),
                       'type' => $body->ticket->type,
                       'requester' => $body->ticket->requester_id );

            $confirmation = 'Your ticket has been created. <a href="'
                      . $this->update_url . '?' . http_build_query($args)
                          . '">Update this ticket.</a>';
            }
        }

        return $confirmation;
}
Of course, we need to add the filter to the Gravity_Forms_Zendesk
private function define_public_hooks() {
    //...
    $this->loader->add_filter( 'gform_confirmation_2', $plugin_public, 'create_ticket', 10, 3 );
}