This article is a sequel of Automating EC2 scaling using on-demand and spot instances with AWS SDK for PHP.
The system we described there is not perfect for using it as a platform for web application: several EC2 instances are launched from the same AMI but each instance has its own database isolated from others.
Here we’re going to use the already existing system and extend it with some RDS instances, which will be common for all EC2 instances and scaled in the same way as EC2 instances.
At the moment of writing this article AWS wasn’t providing load balancer for RDS instances. So the solution is to use a special instance (created via AWS or not) with a tool for balancing instance connections based on proxy technology, for example HAProxy.
Our previous scheme will be complicated by some new items, and the work flow will get some new steps:
- 1. Launch: the main EC2 on-demand instance, instance with HAProxy and RDS instance. For testing we’ll install simple WordPress site on the main EC2 instance.
- 2. Connect: connection between the EC2 instance and the RDS instance will be proxied by HAProxy, so firstly, we’ll connect RDS instance to the HAProxy and then the EC2 instance to the HAProxy.
- 3. Scale: let’s assume that for every new EC2 spot instance we need to create a new RDS read replica. EC2 instance scaling is triggered by a Cloud Watch alarm and an auto scaling policy. The alternative of policy for RDS instances will be a SNS notification sent by AWS to some endpoint. In our case this endpoint is a PHP script located on the independent instance. After receiving the notification a new read replica will be created or deleted.
In the previous article we used the existing default VPC and subnets. But in some cases they may be absent or inappropriate for the specific task. That’s why this time we’re going to start from scratch: create and configure VPC, subnets and other parts of the system environment described in the scheme below.

Preparation
We’re going to write a PHP script using AWS SDK for PHP. Installation process of its main package was described in the previous article. But here we need an additional class – SNS Message Validator – that is going separately from the SDK.
1. Install SNS Message Validator class
This class can be installed the same way as the full SDK for PHP – via Composer one-line command.
composer require aws/aws-php-sns-message-validator2. Install PHPSeclib
During the script execution we’ll need to connect to the created EC2, HAProxy and RDS instances remotely. We can do this manually but the most commands can be programmed, so we chose this way and used PHPSeclib – PHP library for SSH connections. It is more convenient than standard PHP SSH2 library, especially in authentication with .pem key. Nevertheless it uses SSH2 module, and we need to install it. For Linux OS this can be done using the following commands.
sudo yum -y install libssh2 libssh2-devel gcc make
sudo pecl install -f ssh2
libssh2 prefix? [autodetect] :
[Enter]
sudo vim /etc/php.d/ssh2.ini
extension=ssh2.so
php -m | grep ssh
If the last command produces the response ssh2, then we know that SSH package is installed, and we are ready to get PHPSeclib. Firstly, we need to go to our script directory, for example cd /var/www, and, secondly, execute the following operations:
sudo wget https://github.com/phpseclib/phpseclib/archive/master.zip
sudo unzip master.zip
cd phpseclib-master
composer install
At this point the preparatory stage is over, and we are ready to start programming.
Programming
Here we are going to write four PHP scripts (config.php, class.php, script.php and action.php), four shell scripts (haproxy_install.sh, haproxy_services_start.sh, lemp_install.sh, lemp_services_start.sh), and place them to the public accessible server (let’s call it further as script server). It is not mandatory, but if you want to execute these scripts on the local machine, you need to do some additional steps described here.
1. Configuration file
In this article we’ll only complement the configuration file config.php with some new custom PHP constants. They will be added in each section as they appear in the script. It was possible to avoid creation of this file in the previous article, but here you need to have it, because its data will be shared between two independent scripts.
2. Prepare environment
The system environment consists of an internet gateway, a route table, a VPC, subnets and a security group. Therefore, our task is to create all components and connect them with each other.
Note: everything described in this subsection can be done manually in the AWS console or even missed if these items are already present.
We’ll declare a custom class DemoApi in the class.php.
<?php
require_once __DIR__ . '/config.php';
require_once __DIR__ . '/vendor/autoload.php';

use Aws\ElasticLoadBalancing\ElasticLoadBalancingClient;
use Aws\AutoScaling\AutoScalingClient;
use Aws\CloudWatch\CloudWatchClient;
use Aws\Ec2\Ec2Client;

class DemoApi
{
    private $ec2Client, $asClient, $cwClient, $elbClient;

    public function __construct()
    {
        $params = array('region'  => AWS_REGION,
                        'version' => AWS_VERSION,
                        'credentials' => [
                            'key'    => 'J0HNdOEJOHND0EJOHNDO',
                            'secret' => 'J0hndOEjOHND0eJoHNDOj0HNd0EJOHND0EJOHNDo',
                        ]);

        $this->ec2Client = new Ec2Client($params);
        $this->cwClient  = new CloudWatchClient($params);
        $this->asClient  = new AutoScalingClient($params);
        $this->elbClient = new ElasticLoadBalancingClient($params);
    }
}
?>
2.1. Create internet gateway
The role of the internet gateway is the communication between instances in the VPC and the Internet. Its ID will be used further, that’s why we need to store it in the private class member $internetGatewayID.
<?php
    private $internetGatewayID;

    public function createInternetGateway() {
        try {
            $result = $this->ec2Client->createInternetGateway([]);
            $this->internetGatewayID = $result->get('InternetGateway')['InternetGatewayId'];
            return $this;
        } catch (Exception $e) {
            $this->logException(__FUNCTION__, $e->getMessage());
            return false;
        }
    }
?>
2.2. Create VPC
Virtual Private Cloud (VPC) is a virtual network where EC2 instances and other AWS resources can be launched.
First of all, we need to define a range of IP addresses – CIDR block – which will be covered by this VPC. This data will be stored in VPC_CIDR constant in the config.php file.
<?php define('VPC_CIDR', '171.33.0.0/16'); ?>
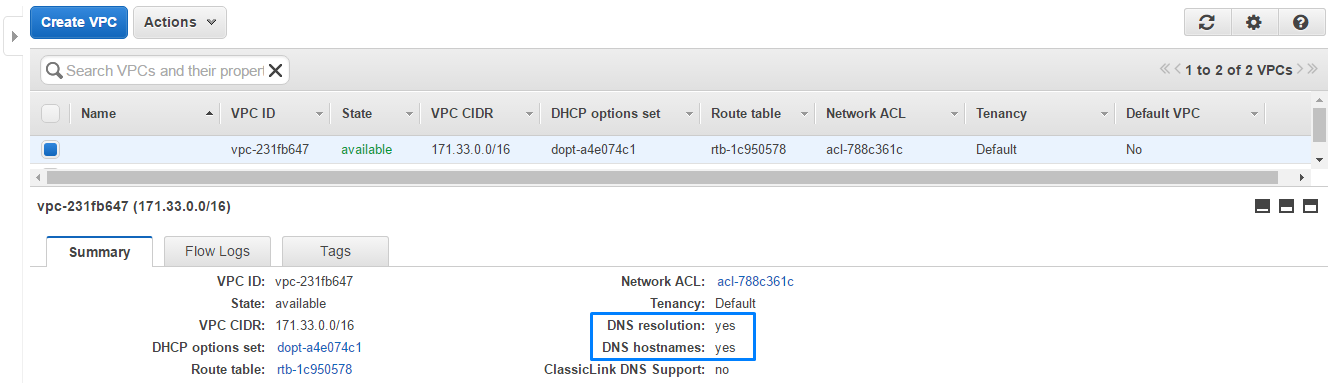
To enable Internet access for our instances it is necessary to attach the Internet gateway to its VPC. Instances will not get public IP and DNS names by default. It can be changed by modifying VPC attributes Enable DNS Hostnames and Enable DNS Support. For this purpose we’ll add the following method into the class.php file.
<?php
    private $vpcID;

    public function createVPC() {
        try {
            $result = $this->ec2Client->createVpc(['CidrBlock' => VPC_CIDR]);
            $this->vpcID = $result->get('Vpc')['VpcId'];
            $this->ec2Client->attachInternetGateway([
                'InternetGatewayId' => $this->internetGatewayID,
                'VpcId' => $this->vpcID
            ]);
            $this->ec2Client->modifyVpcAttribute([
                'EnableDnsHostnames' => ['Value' => true],
                'VpcId' => $this->vpcID
            ]);
            $this->ec2Client->modifyVpcAttribute([
                'EnableDnsSupport' => ['Value' => true],
                'VpcId' => $this->vpcID
            ]);
            return $this;
        } catch (Exception $e) {
            $this->logException(__FUNCTION__, $e->getMessage());
            return false;
        }
    }
?>
2.3. Create subnets
We are going to use the VPC not only for launching the EC2 instances, but for the RDS instances too. The appropriate VPC for RDS should span at least two Availability Zones. That’s why after creating the VPC we’ll add two subnets in different Availability Zones. The same as for the VPC it is necessary to specify the CIDR block for the subnets, moreover the CIDR blocks of the subnets must not overlap.
<?php
    define('SUBNET_A_CIDR', '171.33.0.0/20');
    define('SUBNET_B_CIDR', '171.33.16.0/20');
?>
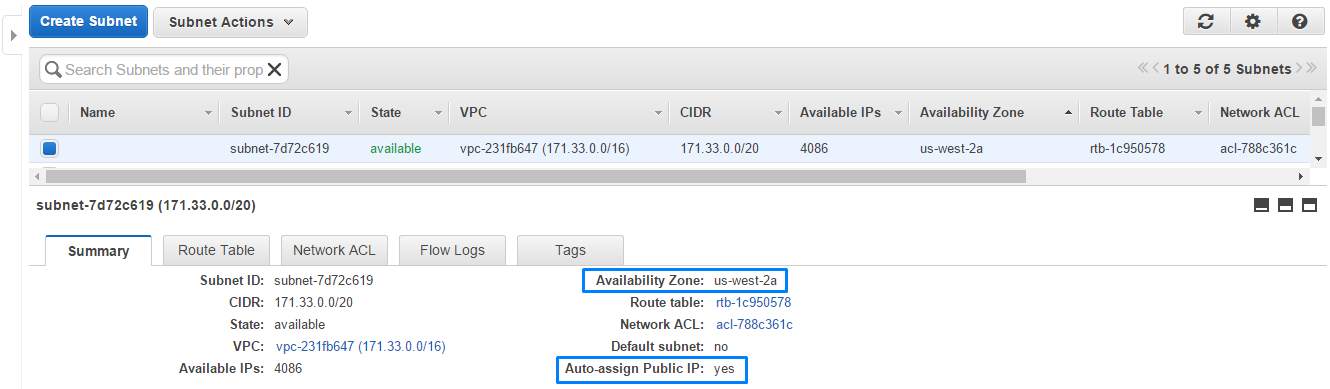
We need to set subnet attribute MapPublicIpOnLaunch into value true, so that EC2 instances launched in this subnet will be public accessible.
<?php
    private $subnetAID, $subnetBID;

    public function createSubnets() {
        try{
            $result = $this->ec2Client->createSubnet([
                'AvailabilityZone'  => AWS_REGION . 'a',
                'CidrBlock'         => SUBNET_A_CIDR,
                'VpcId'             => $this->vpcID
            ]);
            $this->subnetAID = $result->get('Subnet')['SubnetId'];
            $this->ec2Client->modifySubnetAttribute([
                'MapPublicIpOnLaunch' => ['Value' => true],
                'SubnetId'            => $this->subnetAID
            ]);

            $result = $this->ec2Client->createSubnet([
                'AvailabilityZone'  => AWS_REGION . 'b',
                'CidrBlock'         => SUBNET_B_CIDR,
                'VpcId'             => $this->vpcID
            ]);
            $this->subnetBID = $result->get('Subnet')['SubnetId'];
            $this->ec2Client->modifySubnetAttribute([
                'MapPublicIpOnLaunch' => ['Value' => true],
                'SubnetId' => $this->subnetBID
            ]);

            return $this;
        } catch (Exception $e) {
            $this->logException(__FUNCTION__, $e->getMessage());
            return false;
        }
    }
?>
2.4. Configure route table
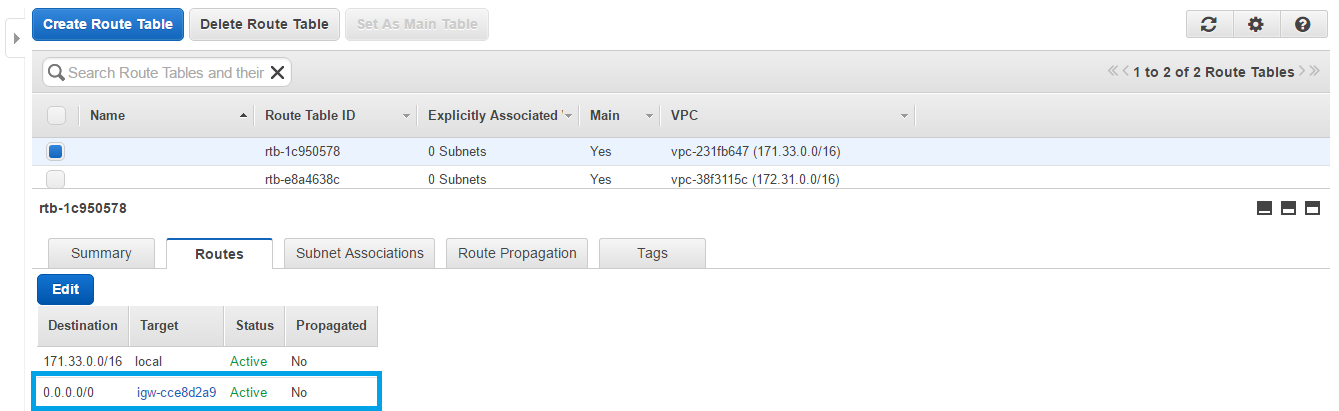
To make all VPC subnets public we need to do one more step: route all VPC traffic to the Internet Gateway. This can be done by adding a new route in the route table connected to our VPC. createRoute() method requires specifying destination CIDR block (all IP addresses), Internet gateway ID and route table ID.
<?php
    public function prepareRouteTable() {
        try {
            $result = $this->ec2Client->describeRouteTables([
                'Filters' => [
                    [
                        'Name'   => 'vpc-id',
                        'Values' => [$this->vpcID]
                    ]
                ]
            ]);
            $routeTableID = $result->get('RouteTables')[0]['RouteTableId'];

            $this->ec2Client->createRoute([
                'DestinationCidrBlock'  => '0.0.0.0/0',
                'GatewayId'             => $this->internetGatewayID,
                'RouteTableId'          => $routeTableID
            ]);

            return $this;
        } catch (Exception $e) {
            $this->logException(__FUNCTION__, $e->getMessage());
            return false;
        }
    }
?>
2.5. Create security group
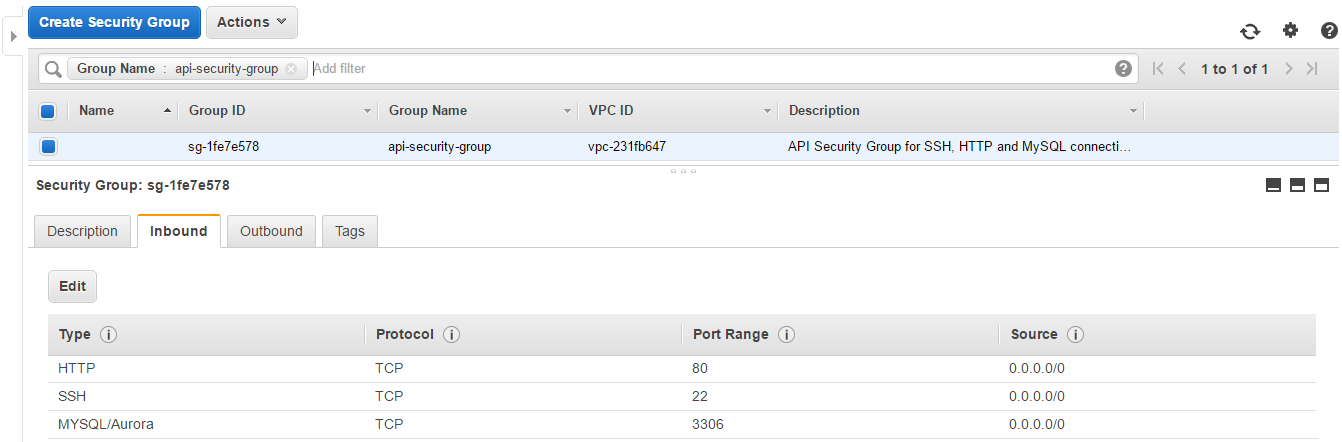
Comparing to the security group in the previous article, this security group will contain one more input rule, as we need to open 3306 port for MySQL connections with the RDS instances. Security group’s name is defined in the config.php.
<?php define('NAME_SECURITY_GROUP', 'api-security-group'); ?>
Here is the code of the createSecurityGroup() method. Highlighted lines respond to the new lines added in this script.
<?php
    private $securityGroupID;

    public function createSecurityGroup() {
        try {
            $result = $this->ec2Client->createSecurityGroup([
                'Description'   => 'API Security Group for SSH, HTTP and MySQL connections.',
                'GroupName'     => NAME_SECURITY_GROUP,
                'VpcId'         => $this->vpcID
            ]);
            $this->securityGroupID = $result->get('GroupId');

            $this->ec2Client->authorizeSecurityGroupIngress([
                'GroupId'       => $this->securityGroupID,
                'IpProtocol'    => 'TCP',
                'ToPort'        => 22,
                'FromPort'      => 22,
                'CidrIp'        => '0.0.0.0/0'
            ]);
            $this->ec2Client->authorizeSecurityGroupIngress([
                'GroupId'       => $this->securityGroupID,
                'IpProtocol'    => 'TCP',
                'ToPort'        => 80,
                'FromPort'      => 80,
                'CidrIp'        => '0.0.0.0/0'
            ]);
            $this->ec2Client->authorizeSecurityGroupIngress([
                'GroupId'       => $this->securityGroupID,
                'IpProtocol'    => 'TCP',
                'ToPort'        => 3306,
                'FromPort'      => 3306,
                'CidrIp'        => '0.0.0.0/0'
            ]);
            return $this;
        }  catch (Exception $e) {
            $this->logException(__FUNCTION__, $e->getMessage());
            return false;
        }
    }
?>
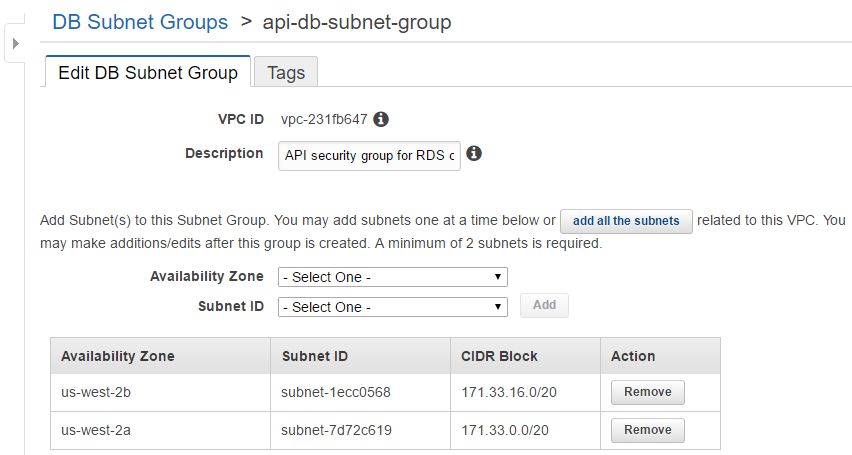
2.6. Create DB subnet group
The RDS instance needs to have a DB subnet group. This group will combine two subnets created earlier: subnet A and subnet B. As usually we’ll define its name as a constant in the config.php.
<?php define('NAME_DB_SUBNET_GROUP', 'api-db-subnet-group'); ?>
As we are going to use a RDS method createDBSubnetGroup(), we need to include a RDS client into our main script class.php.
<?php
    use Aws\Rds\RdsClient;

    private $rdsClient;

    public function __construct() {
        $this->rdsClient = new RdsClient($params);
    }

    public function createDBSubnetGroup()
    {
        try {
            $this->rdsClient->createDBSubnetGroup([
                'DBSubnetGroupDescription'  => 'API security group for RDS connections.',
                'DBSubnetGroupName'         => NAME_DB_SUBNET_GROUP,
                'SubnetIds'                 => [$this->subnetAID, $this->subnetBID],
                'Tags'                      => [
                    [
                        'Key'   => 'Name',
                        'Value' => NAME_DB_SUBNET_GROUP,
                    ]
                ]
            ]);
            return $this;
        } catch (Exception $e) {
            $this->logException(__FUNCTION__, $e->getMessage());
            return false;
        }
    }
?>
2.7. Create key pair
This method was presented in the previous article script. Here we just add right permissions: .pem key should be only readable by its owner. This new line is highlighted.
<?php
    public function createKeyPair() {
        try {
            $result = $this->ec2Client->createKeyPair([
                'KeyName' => NAME_KEY_PAIR,
            ]);
            $key = $result->get('KeyMaterial');
            $filename = __DIR__ . '/' . NAME_KEY_PAIR . '.pem';
            file_put_contents($filename, $key);
            chmod($filename, 0400);
            return $this;
        } catch (Exception $e) {
            $this->logException(__FUNCTION__, $e->getMessage());
            return false;
        }
    }
?>
3. Run instances
This subsection will contain methods for launching instances.
3.1. Run EC2 instance
The main EC2 instance will be created in the subnet A with the tag Name which will be used for identifying the EC2 instance in the second script. The instance name is defined in config.php.
<?php define('NAME_EC2_INSTANCE', 'api-ec2-instance'); ?>
<?php
    private $ec2InstanceID;
    public function createEC2Instance() {
        try {
            $result = $this->ec2Client->runInstances([
                'BlockDeviceMappings'               => [
                    [
                        'DeviceName'    => '/dev/xvda',
                        'Ebs'           => [
                            'DeleteOnTermination'   => true,
                            'SnapshotId'            => 'snap-2974047b',
                            'VolumeSize'            => 8,
                            'VolumeType'            => 'gp2',
                        ]
                    ]
                ],
                'ImageId'                           => EC2_AMI_ID,
                'InstanceInitiatedShutdownBehavior' => 'stop',
                'InstanceType'                      => EC2_INSTANCE_TYPE,
                'KeyName'                           => NAME_KEY_PAIR,
                'MaxCount'                          => 1,
                'MinCount'                          => 1,
                'Monitoring'                        => ['Enabled' => false],
                'SecurityGroupIds'                  => [$this->securityGroupID],
                'SubnetId'                          => $this->subnetAID
            ]);
            $this->ec2InstanceID = $result->get('Instances')[0]['InstanceId'];

            $this->ec2Client->createTags([
                'Resources' => [$this->ec2InstanceID],
                'Tags'      => [
                    [
                        'Key'   => 'Name',
                        'Value' => NAME_EC2_INSTANCE
                    ]
                ]
            ]);
            return $this;
        } catch (Exception $e) {
            $this->logException(__FUNCTION__, $e->getMessage());
            return false;
        }
    }
?>
3.2. Run HAProxy instance
The instance with HAProxy tool will be created in the same way. It will also contain Name tag with NAME_HAPROXY_INSTANCE value.
<?php define('NAME_HAPROXY_INSTANCE', 'api-haproxy-instance'); ?>
In the class.php we are writing:
<?php
    private $haproxyInstanceID;
    public function createHAProxyInstance() {
        try {
            $result = $this->ec2Client->runInstances([
                'BlockDeviceMappings'               => [
                    [
                        'DeviceName'    => '/dev/xvda',
                        'Ebs'           => [
                            'DeleteOnTermination'   => true,
                            'SnapshotId'            => 'snap-2974047b',
                            'VolumeSize'            => 8,
                            'VolumeType'            => 'gp2',
                        ]
                    ]
                ],
                'ImageId'                           => EC2_AMI_ID,
                'InstanceInitiatedShutdownBehavior' => 'stop',
                'InstanceType'                      => EC2_INSTANCE_TYPE,
                'KeyName'                           => NAME_KEY_PAIR,
                'MaxCount'                          => 1,
                'MinCount'                          => 1,
                'Monitoring'                        => ['Enabled' => false],
                'SecurityGroupIds'                  => [$this->securityGroupID],
                'SubnetId'                          => $this->subnetAID
            ]);
            $this->haproxyInstanceID = $result->get('Instances')[0]['InstanceId'];

            $this->ec2Client->createTags([
                'Resources' => [$this->haproxyInstanceID],
                'Tags' => [
                    [
                        'Key' => 'Name',
                        'Value' => NAME_HAPROXY_INSTANCE
                    ]
                ]
            ]);
            return $this;
        } catch (Exception $e) {
            $this->logException(__FUNCTION__, $e->getMessage());
            return false;
        }
    }
?>
3.3. Run RDS instance
The RDS instance is characterized by a set of constants, defined in the config.php:
<?php
    define('DB_INSTANCE_TYPE', 'db.t2.micro');
    define('DB_INSTANCE_STORAGE', 5);
    define('DB_INSTANCE_ENGINE', 'MySQL');
    define('DB_INSTANCE_ENGINE_VERSION', '5.6.27');
    define('DB_INSTANCE_NAME', 'api-db-instance');
    define('DB_INSTANCE_REPLICA_NAME', 'api-db-instance-replica');
    define('DB_USERNAME', 'api_root');
    define('DB_PASSWORD', 'aqswdefr1');
    define('DB_NAME', 'wordpress_database');
?>
To launch the RDS instance in the created VPC, it is necessary to specify the VPC security group.
<?php
    public function createDBInstance() {
        try {
            $result = $this->rdsClient->createDBInstance([
                'AllocatedStorage'          => DB_INSTANCE_STORAGE,
                'AutoMinorVersionUpgrade'   => true,
                'AvailabilityZone'          => AWS_REGION . 'a',
                'BackupRetentionPeriod'     => 35,
                'DBInstanceClass'           => DB_INSTANCE_TYPE,
                'DBInstanceIdentifier'      => DB_INSTANCE_NAME,
                'DBName'                    => DB_NAME,
                'DBSubnetGroupName'         => NAME_DB_SUBNET_GROUP,
                'Engine'                    => DB_INSTANCE_ENGINE,
                'EngineVersion'             => DB_INSTANCE_ENGINE_VERSION,
                'LicenseModel'              => 'general-public-license',
                'MasterUserPassword'        => DB_PASSWORD,
                'MasterUsername'            => DB_USERNAME,
                'MultiAZ'                   => false,
                'Port'                      => 3306,
                'PubliclyAccessible'        => true,
                'StorageType'               => 'gp2',
                'VpcSecurityGroupIds'       => [$this->securityGroupID]
            ]);
            return $this;
        } catch (Exception $e) {
            $this->logException(__FUNCTION__, $e->getMessage());
            return false;
        }
    }
?>
4. Configure instances
This subsection is dedicated to the configuration methods.
After instances have been launched, it will take some time to get them running. As an instance gets its IP only in the running state, we need first to check if it is running and only then store its IP into the class attribute.
4.1. Get DB endpoint
The database endpoint will be used in several configuration methods, so it is useful to get this endpoint and store it. We are going to check instance state every 30 seconds, until we get its endpoint or attempts count reaches 10 times.
<?php
    define('INSTANCE_CHECK_TIMEOUT', 30);
    define('INSTANCE_CHECK_COUNT',   10);
?>
<?php
    private $dbInstanceIP;
    public function getDBEndpoint() {
        $count = 0;
        do {
            if ($count++) sleep(INSTANCE_CHECK_TIMEOUT);
            $result = $this->rdsClient->describeDBInstances([
                'DBInstanceIdentifier' => DB_INSTANCE_NAME
            ]);
            $this->dbInstanceIP = $result->get('DBInstances')[0]['Endpoint']['Address'];
        } while (!$this->dbInstanceIP && $count < INSTANCE_CHECK_COUNT);
        return $this;
    }
?>
4.2. Prepare HAProxy instance
To prepare HAProxy instance we need to setup HAProxy tool and make some changes in its configuration file. The whole process goes through 7 steps.
1. Get instance IP
Firstly, we’ll get the instance IP as it is necessary for establishing a SSH connection. The same operation we’ll do for the main EC2 instance, so let’s create a separate private method getInstanceIP().
It’s easy to get any additional information about the instance by its ID. Similar to the previous method we’ll check IP availability every 30 seconds until we get the IP or attempts limit is equal to 10.
<?php
    private function getInstanceIP($id) {
        $count = 0;
        do {
            if ($count++) sleep(INSTANCE_CHECK_TIMEOUT);
            $result = $this->ec2Client->describeInstances([
                'InstanceIds' => [$id]
            ]);
            $ip = $result->get('Reservations')[0]['Instances'][0]['PublicIpAddress'];
        } while (!$ip && $count < INSTANCE_CHECK_COUNT);
        return $ip;
    }
?>
2. Get instance status
Even if the instance is running, we can’t connect to it until it successfully goes through 2 status checks. Therefore, the next step is to check the instance status and wait while it doesn’t have ok value. This will be done in the getInstanceStatus() private method.
<?php
    private function getInstanceStatus($id)
    {
        $count = 0;
        do {
            if ($count++) sleep(INSTANCE_CHECK_TIMEOUT);
            $result = $this->ec2Client->describeInstanceStatus([
                'InstanceIds' => [$id]
            ]);
            $status = $result->get('InstanceStatuses')[0]['InstanceStatus']['Status'];
        } while ($status != 'ok' && $count < INSTANCE_CHECK_COUNT);
        return $status;
    }
?>
3. Connect to instance
When we are sure that the instance is available for SSH connection, we can connect to it using its IP, .pem key storing and a username defined in the config.php file.
<?php define('SSH_USERNAME', 'ec2-user'); ?>
We’ll use PHPSeclib library for SSH connection, so we need to include its autoload file into our class.php script and import its RSA, SSH2 and SCP classes via use operator.
A RSA class object is used for loading the .pem key, and a SSH2 object provides login to the instance using this key and username. In case of an unsuccessful login the method will throw a custom exception: SSH login has been failed.. The SCP class will be used later for file transferring.
<?php
    require_once __DIR__ . '/phpseclib-master/vendor/autoload.php';
    use phpseclib\Crypt\RSA;
    use phpseclib\Net\SSH2;
    use phpseclib\Net\SCP;

    private $ssh;
    private function connectToInstance($ip)
    {
        $key = new RSA();
        $key->load(file_get_contents(__DIR__ . '/' . NAME_KEY_PAIR . '.pem'));
        $this->ssh = new SSH2($ip);
        if (!$this->ssh->login(SSH_USERNAME, $key)) {
            throw new Exception('SSH login has been failed.');
        }
        return $this;
    }
?>
4. Install HAProxy tool
We are going to execute a shell script which contains commands for HAProxy tool download and setup. This script will be created on our server side, then sent to the HAProxy instance and executed there.
Note: this script contains some insecure actions, so it’s better to do this installation manually and then use AMI of this instance in the future.
Here is a code for this shell script haproxy_install.sh.
It contains several parts:
1. Download and install HAProxy
Yum option -y is used to prevent prompt which requests confirmation of the installation.
sudo yum -y install haproxy
2. Make reserved copies for existing configuration files
It’s a good practice to save an original file before it will be edited. It gives a possibility of reverting all changes back. We’ll edit /etc/haproxy/haproxy.cfg file which contains HAProxy tool settings (IPs of proxied servers, authentication credentials and so on) and /etc/rsyslog.conf – configuration file of the rsyslog daemon which will be used by HAProxy for logging.
sudo cp /etc/haproxy/haproxy.cfg{,.original}
sudo cp /etc/rsyslog.conf{,.original}
3. Set proper permissions for further operations
To put changes into the mentioned files, our SSH user needs to have the permission to do this. The owner of /etc/haproxy and /etc/rsyslog.d directories is root. So we add the ec2-user to the root group and change permissions of the directories and their files to group reading and writing. Finally, we need to exit – then the changes will take effect.
Note: we’ll remove ec2-user from the root group in the end of the configuring.
sudo usermod -a -G root ec2-user
sudo chmod -R g+w /etc/rsyslog.d
sudo find /etc/rsyslog.d -type d -exec chmod 2775 {} \;
sudo find /etc/rsyslog.d -type f -exec chmod ug+rw {} \;
sudo chmod -R g+w /etc/haproxy
sudo find /etc/haproxy -type d -exec chmod 2775 {} \;
sudo find /etc/haproxy -type f -exec chmod ug+rw {} \;
exit
It may take some time to execute this script, so we need to wait for its execution:
<?php
    private function waitExecution() {
        sleep(120);
    }
?>
5. Editing configuration files
rsyslog.conf
The file /etc/rsyslog.conf may be used by other programmes, so first of all, we need to receive it from the HAProxy instance via SCP get() method. Then we’ll add the following content after the line # Provides UDP syslog reception:
$ModLoad imudp
$UDPServerAddress 127.0.0.1
$UDPServerRun 514
haproxy.cfg
As for /etc/haproxy/haproxy.cfg file, it is used only by the HAProxy tool, so we prearrange it and store on our server. Its content is presented below.
global
    log         127.0.0.1 local0 notice
    chroot      /var/lib/haproxy
    pidfile     /var/run/haproxy.pid
    maxconn     4000
    user        haproxy
    group       haproxy
    daemon
    stats socket /var/lib/haproxy/stats
defaults
    mode                    tcp
    log                     global
    option                  tcplog
    option                  dontlognull
    option                  http-server-close
    option                  redispatch
    retries                 3
    timeout http-request    10s
    timeout queue           1m
    timeout connect         10s
    timeout client          1m
    timeout server          1m
    timeout http-keep-alive 10s
    timeout check           10s
    maxconn                 3000
listen MySQL *:3306
    mode tcp
    balance roundrobin
    option mysql-check user haproxy_check
    option log-health-checks
    server api-db-instance
listen stats *:80
    mode http
    balance
    stats enable
    stats uri /
    stats realm Strictly\ Private
    stats auth haproxy:aqswdefr1
As you see, the line 31 is highlighted that means it needs to be changed according to the received DB endpoint:
server api-db-instance " . $this->dbInstanceIP . ":3306 check.
We’ll edit these two files using one method editHAProxyConfig().
<?php
    private function editHAProxyConfig()
    {
        (new SCP($this->ssh))->get('/etc/rsyslog.conf', __DIR__ . '/files/rsyslog.conf');
        $this->editFile('/files/rsyslog.conf',["# Provides UDP syslog reception"],
                        ["# Provides UDP syslog reception\r\n\$ModLoad imudp\r\n"
                        . "\$UDPServerAddress 127.0.0.1\r\n\$UDPServerRun 514"])
             ->editFile('/files/haproxy.cfg', ["server api-db-instance"],
                        ["server api-db-instance " . $this->dbInstanceIP . ":3306 check"]);
        return $this;
    }
    private function editFile($filename, $old, $new)
    {
        $content = file_get_contents(__DIR__ . $filename);
        foreach ($old as $no => $line) {
            $content = str_replace($line, $new[$no], $content);
        }
        file_put_contents(__DIR__ . $filename, $content);
        return $this;
    }
?>
haproxy.conf
There is one more file which will configure HAProxy logging. It is haproxy.conf, and it contains the following line:
if ($programname == 'haproxy') then -/var/log/haproxy.log
6. Put files on the HAProxy instance
After the files are edited on our side, we should send them back to the HAProxy instance. This will be done by sendFiles() function. It creates an instance of SCP class and applies its put() method to each file one by one.
<?php
    private function sendFiles($files) {
        $scp = new SCP($this->ssh);
        foreach ($files as $local => $remote) {
            $result = $scp->put($remote, $local, SCP::SOURCE_LOCAL_FILE);
            $this->logAction(__FUNCTION__, "Sending file $remote", $result);
        }
        return $this;
    }
?>
We use logAction() method to be sure that all files were sent successfully.
<?php
    private function logAction($function, $action, $message) {
        $log = "$function : $action\r\n$message\r\n\r\n";
        file_put_contents(__DIR__ . '/script.log', $log, FILE_APPEND);
    }
?>
7. Start services
Finally, we can start the HAProxy tool and rsyslog daemon by sending end executing the following shell script haproxy_services_start.sh.
sudo mv /home/ec2-user/rsyslog.conf /etc/rsyslog.conf
sudo service rsyslog restart
sudo service rsyslog status
sudo service haproxy start
sudo service haproxy status
The first command in this script moves rsyslog.conf from the home directory to the /etc directory. It is necessary because we couldn’t put this file straight to the /etc folder as we don’t have proper permissions for this action.
8. Disconnect from instance
Now we can close SSH connection with the HAProxy instance using this method:
<?php
    private function disconnectFromInstance() {
        $this->ssh->exec('exit');
        unset($this->ssh);
        return $this;
    }
?>
The whole process is described in the prepareHAProxyInstance() method.
<?php
    public function prepareHAProxyInstance()
    {
        try {
            $this->haproxyInstanceIP = $this->getInstanceIP($this->haproxyInstanceID);
            $this->getInstanceStatus($this->haproxyInstanceID);
            $this->connectToInstance($this->haproxyInstanceIP);
            $this->ssh->exec('mkdir files');
            $this->executeCommands('/files/haproxy_install.sh');
            $this->waitExecution();

            $this->connectToInstance($this->haproxyInstanceIP);
            $this->editHAProxyConfig();
            $files = array(
                __DIR__ . '/files/haproxy.conf' => '/etc/rsyslog.d/haproxy.conf',
                __DIR__ . '/files/haproxy.cfg'  => '/etc/haproxy/haproxy.cfg',
                __DIR__ . '/files/rsyslog.conf' => '/home/ec2-user/rsyslog.conf'
            );

            $this->sendFiles($files);
            $this->executeCommands('/files/haproxy_services_start.sh');
            $this->waitExecution();
            $this->disconnectFromInstance();

            return $this;
        } catch (Exception $e) {
            $this->logException(__FUNCTION__, $e->getMessage());
            return false;
        }
    }
?>
4.3. Prepare EC2 instance
Preparing EC2 instance consists from installing and configuring of LEMP stack and WordPress.
1. Install LEMP and WP
We’ll write a shell script lemp_install.sh for installing necessary services remotely and automatically. It also consists of several parts:
1. Download and install services
We’re going to install MySQL server, NGINX and PHP 5.5.
sudo yum -y install mysql-server nginx php55-fpm.x86_64 php55-mysqlnd.x86_64 php55-gd.x86_64
2. Make reserved copies for existing configuration files
sudo cp /etc/nginx/nginx.conf{,.original}
sudo cp /etc/php-fpm.d/www.conf{,.original}
3. Download and installing WordPress
sudo mkdir /var/www
sudo wget -P/var/www http://wordpress.org/latest.tar.gz
sudo tar -xzvf /var/www/latest.tar.gz -C /var/www
sudo mv /var/www/wordpress/* /var/www
sudo cp /var/www/wp-config-sample.php /var/www/wp-config.php
4. Set proper permissions
sudo usermod -a -G root ec2-user
sudo chgrp -R root /etc/nginx
sudo chmod -R g+w /etc/nginx
sudo find /etc/nginx -type d -exec chmod 2775 {} \;
sudo find /etc/nginx -type f -exec chmod ug+rw {} \;
sudo chgrp -R root /etc/php-fpm.d
sudo chmod -R g+w /etc/php-fpm.d
sudo find /etc/php-fpm.d -type d -exec chmod 2775 {} \;
sudo find /etc/php-fpm.d -type f -exec chmod ug+rw {} \;
sudo usermod -a -G nginx ec2-user
sudo chown -R nginx:nginx /var/www
sudo chmod -R g+w /var/www
sudo find /var/www -type d -exec chmod 2775 {} \;
sudo find /var/www -type f -exec chmod ug+rw {} \;
exit
2. Edit configuration files
1. PHP-FPM config
The default server for php-fpm service is Apache. As long as we use NGINX, we need to change user and group settings in the www.conf file.
user  = nginx
group = nginx
2. NGINX config
In the nginx.conf file we change the web-server directory and write rules for PHP scripts.
http {
    # ...
    server {
        listen       80 default_server;
        listen       [::]:80 default_server;
        server_name  localhost;
        root         /var/www;

        location / {
            root /var/www;
            index index.php index.html index.htm;
        }
        location ~ \.php$ {
            root           /var/www;
            fastcgi_pass   127.0.0.1:9000;
            fastcgi_index  index.php;
            fastcgi_param  SCRIPT_FILENAME  $document_root$fastcgi_script_name;
            include        fastcgi_params;
        }
    }
}
3. WordPress config
After WordPress installation it is necessary to configure it by modifying wp-config.php: set proper DB name, username, password and FTP constants.
<?php
    define('DB_NAME', 'wordpress_database');
    define('DB_USER', 'wordpress_user');
    define('DB_PASSWORD', 'aqswdefr1');
    define('FS_METHOD', 'direct');
    define('FTP_BASE', '/var/www');
    define('FTP_CONTENT_DIR', '/var/www//wp-content/');
    define('FTP_PLUGIN_DIR', '/var/www//wp-content/plugins/');
    define('FTP_HOST', '');
?>
3. Start services
In this shell script lemp_services_start.sh we’ll start all services and setup their autostart on the instance boot.
sudo service mysqld start
sudo service mysqld status
sudo service nginx start
sudo service nginx status
sudo service php-fpm start
sudo service php-fpm status
sudo chkconfig --levels 235 mysqld on
sudo chkconfig --levels 235 nginx on
sudo chkconfig --levels 235 php-fpm on
So the full method prepareEC2Instance() will look in a such way.
<?php
    public function prepareEC2Instance() {
        try {
            $this->editWordpressConfig();
            $this->ec2InstanceIP = $this->getInstanceIP($this->ec2InstanceID);
            $this->getInstanceStatus($this->ec2InstanceID);
            $this->connectToInstance($this->ec2InstanceIP);
            $this->ssh->exec('mkdir files');
            $this->executeCommands('/files/lemp_install.sh');
            $this->waitExecution();

            $this->connectToInstance($this->ec2InstanceIP);
            $files = array(
                __DIR__ . '/files/nginx.conf'    => '/etc/nginx/nginx.conf',
                __DIR__ . '/files/www.conf'      => '/etc/php-fpm.d/www.conf',
                __DIR__ . '/files/wp-config.php' => '/var/www/wp-config.php'
            );
            $this->sendFiles($files);
            $this->executeCommands('/files/lemp_services_start.sh');
            $this->waitExecution();
            $this->disconnectFromInstance();

            return $this;
        }  catch (Exception $e) {
            $this->logException(__FUNCTION__, $e->getMessage());
            return false;
        }
    }
?>
4.4. Prepare RDS instance
Preparing DB instance consists in creating a DB user for HAProxy and a DB user for WordPress and granting them proper privileges. This will be done by importing users.sql to the DB.
INSERT INTO `mysql`.`user` (`Host`, `User`) VALUES ('{HAPROXY_INSTANCE_IP}', 'haproxy_check');
GRANT ALL PRIVILEGES ON `%`.* TO 'haproxy_check'@`%` WITH GRANT OPTION;
INSERT INTO `mysql`.`user` (`User`, `Password`) VALUES ('{DB_WP_USERNAME}', PASSWORD('{DB_WP_PASSWORD}'));
GRANT ALL PRIVILEGES ON `{DB_NAME}`.* TO '{DB_WP_USERNAME}' IDENTIFIED BY '{DB_WP_PASSWORD}';
FLUSH PRIVILEGES;
As you see, this file contains some templates in the curly brackets {} which should be replaced by the corresponding values via editFile() function.
We’ll connect to the RDS instance by specifying the host as an option of mysql command.
<?php
    public function prepareDBInstance() {
        try {
            $this->editFile('/files/users.sql',
                ['{HAPROXY_INSTANCE_IP}', '{DB_WP_USERNAME}',
                 '{DB_WP_PASSWORD}', '{DB_NAME}'],
                [$this->haproxyInstanceIP, DB_WP_USERNAME,
                 DB_WP_PASSWORD, DB_NAME]);

            $command = 'mysql -h ' . $this->dbInstanceIP . ' -P 3306 '
                     . '--user=' . DB_USERNAME . ' --password=' . DB_PASSWORD
                     . ' ' . DB_NAME . ' < ' . __DIR__ . '/files/users.sql';
            shell_exec($command);
        } catch (Exception $e) {
            $this->logException(__FUNCTION__, $e->getMessage());
            return false;
        }
    }
?>
5. Prepare EC2 auto scaling
In this subsection we are going to describe methods for creating objects participating in EC2 auto scaling: a EC2 image, a load balancer, a launch configuration and an auto scaling group.
5.1. Create EC2 image
We need to create an image from the main EC2 instance to use it later as a template for auto scaling instances.
<?php
    private $ec2ImageID;
    public function createEC2Image()
    {
        try {
            $result = $this->ec2Client->createImage([
                'Description'   => 'API Image: LEMP + WP',
                'InstanceId'    => $this->ec2InstanceID,
                'Name'          => 'api-ec2-image'
            ]);
            $this->ec2ImageID = $result->get('ImageId');
            return $this;
        }  catch (Exception $e) {
            $this->logException(__FUNCTION__, $e->getMessage());
            return false;
        }
    }
?>
5.2. Create load balancer
In the previous article we already created the method. But now we’re going to modifying it by changing listeners and health check target. We also define the name of the load balancer in the config.php.
<?php define('NAME_LOAD_BALANCER', 'api-load-balancer'); ?>
Here is the updated method for load balancer creating.
<?php
    public function createLoadBalancer() {
        try {
            $this->elbClient->createLoadBalancer([
                'Listeners' => [
                    [
                        'InstancePort'      => 80,
                        'InstanceProtocol'  => 'HTTP',
                        'LoadBalancerPort'  => 80,
                        'Protocol'          => 'HTTP',
                    ]
                ],
                'LoadBalancerName'  => NAME_LOAD_BALANCER,
                'Scheme'            => 'internet-facing',
                'SecurityGroups'    => [$this->securityGroupID],
                'Subnets'           => [$this->subnetAID],
                'Tags'              => [
                    [
                        'Key'   => 'Name',
                        'Value' => NAME_LOAD_BALANCER
                    ]
                ]
            ]);
            $this->elbClient->configureHealthCheck([
                'HealthCheck'       => [
                    'HealthyThreshold'      => 10,
                    'Interval'              => 30,
                    'Target'                => 'HTTP:80/',
                    'Timeout'               => 5,
                    'UnhealthyThreshold'    => 2,
                ],
                'LoadBalancerName'  => NAME_LOAD_BALANCER,
            ]);
            $this->elbClient->registerInstancesWithLoadBalancer([
                'Instances'         => [
                    ['InstanceId'   => $this->ec2InstanceID]
                ],
                'LoadBalancerName'  => NAME_LOAD_BALANCER
            ]);
            return $this;
        } catch (Exception $e) {
            $this->logException(__FUNCTION__, $e->getMessage());
            return false;
        }
    }
?>
5.3. Create launch configuration
In this version of the createLaunchConfiguration() we changed ImageId argument to the ID of the image we created above.
<?php
    public function createLaunchConfiguration() {
        try {
            $this->asClient->createLaunchConfiguration([
                'AssociatePublicIpAddress'  => true,
                'EbsOptimized'              => false,
                'ImageId'                   => $this->ec2ImageID,
                'InstanceMonitoring'        => ['Enabled' => false],
                'InstanceType'              => EC2_INSTANCE_TYPE,
                'KeyName'                   => NAME_KEY_PAIR,
                'LaunchConfigurationName'   => NAME_LAUNCH_CONFIGURATION,
                'SecurityGroups'            => [$this->securityGroupID],
                'SpotPrice'                 => SPOT_INSTANCE_PRICE,
                'Tags'                      => [
                    [
                        'Key'   => 'Name',
                        'Value' => NAME_LAUNCH_CONFIGURATION
                    ]
                ]
            ]);
            return $this;
        } catch (Exception $e) {
            $this->logException(__FUNCTION__, $e->getMessage());
            return false;
        }
    }
?>
5.4. Create auto scaling group
This time we change the max size of the auto scaling group from 1 to 3.
<?php
    public function createAutoScalingGroup() {
        try {
            $this->asClient->createAutoScalingGroup([
                'AvailabilityZones'         => [AWS_REGION . 'a'],
                'AutoScalingGroupName'      => NAME_AUTO_SCALING_GROUP,
                'DesiredCapacity'           => 0,
                'LaunchConfigurationName'   => NAME_LAUNCH_CONFIGURATION,
                'LoadBalancerNames'         => [NAME_LOAD_BALANCER],
                'MaxSize'                   => 3,
                'MinSize'                   => 0,
                'Tags'                      => [
                    [
                        'Key'   => 'Name',
                        'Value' => NAME_AUTO_SCALING_GROUP
                    ]
                ],
                'VPCZoneIdentifier'         => $this->subnetAID
            ]);
            return $this;
        }  catch (Exception $e) {
            $this->logException(__FUNCTION__, $e->getMessage());
            return false;
        }
    }
?>
5.5. Create scaling policies
Now we can add two scaling policies to the auto scaling group: api-scalein-policy – for increasing capacity by one new spot instance and api-scaleout-policy – for removing one instance from the group.
<?php
    private $scaleInPolicyARN, $scaleOutPolicyARN;
    public function createScaleInPolicy() {
        try
        $result = $this->asClient->putScalingPolicy([
                'AdjustmentType'        => 'ChangeInCapacity',
                'AutoScalingGroupName'  => NAME_AUTO_SCALING_GROUP,
                'PolicyName'            => 'api-scalein-policy',
                'PolicyType'            => 'SimpleScaling',
                'ScalingAdjustment'     => 1
            ]);
            $this->scaleInPolicyARN = $result->get('PolicyARN');
            return $this;
        } catch (Exception $e) {
            $this->logException(__FUNCTION__, $e->getMessage());
            return false;
        }
    }

    public function createScaleOutPolicy()
    {
        try {
            $result = $this->asClient->putScalingPolicy([
                'AdjustmentType'        => 'ChangeInCapacity',
                'AutoScalingGroupName'  => NAME_AUTO_SCALING_GROUP,
                'PolicyName'            => 'api-scaleout-policy',
                'PolicyType'            => 'SimpleScaling',
                'ScalingAdjustment'     => -1
            ]);
            $this->scaleOutPolicyARN = $result->get('PolicyARN');
            return $this;
        } catch (Exception $e) {
            $this->logException(__FUNCTION__, $e->getMessage());
            return false;
        }
    }
?>
6. Prepare RDS auto scaling
RDS auto scaling will straightly depend on EC2 auto scaling: if a new EC2 instance should be added (alarm triggered), then a new DB replica should appear. The mechanism which about this alarm event is a SNS web service. So in this section the following items should be created: SNS topic, Cloud Watch alarms and DB replicas.
6.1. Create SNS topic
Amazon SNS manages the sending of messages (by publisher) to some subscribing endpoint (subscriber). In our case the publisher is a Cloud Watch alarm which will produce and send a notification to some topic. The subscriber is our web server with the PHP script (action script) receiving the notification from the topic it is subscribed to.
So there are 3 things we need to do:
- 1. Create SNS topic and ubscribe the action script to the topic.
- 2. Confirm subscription on the web server where the script is located.
- 3. Point the alarms to SNS topic – specify topic ARN as an alarm action.
1. Create and subscribe to SNS topic
In the config.php we define IP address of the server where the script action.php is located.
<?php define('SCRIPT_HOST', '255.255.255.255'); ?>
This constant will be used as an endpoint in the subscription to the topic.
<?php
    use Aws\SNS\SNSClient;
    private $snsClient, $topicARN;
    public function __construct() {
        $this->snsClient = new SnsClient($params);
    }
    public function createSNSNotification()
    {
        try {
            $result = $this->snsClient->createTopic([
                'Name' => 'api-sns-topic'
            ]);
            $this->topicARN = $result->get('TopicArn');
            $this->snsClient->subscribe(array(
                'TopicArn' => $this->topicARN,
                'Protocol' => 'http',
                'Endpoint' => 'http://' . SCRIPT_HOST . '/action.php',
            ));
            return $this;
        } catch (Exception $e) {
            $this->logException(__FUNCTION__, $e->getMessage());
            return false;
        }
    }
?>
2. Confirm SNS subscription
Here we’ll create the script action.php on the server, include class.php in it, and get the POST message from the SNS topic.
<?php
    require_once __DIR__ . '/class.php';
    use Aws\Sns\Message;
    use Aws\Sns\MessageValidator;
    $messageValidator = new MessageValidator();
    $message = Message::fromRawPostData();
    $demoApi = new DemoApi(); $demoApi->logMessage($message);

    if ($messageValidator->isValid($message)) {
        switch ($message['Type']) {
            case 'SubscriptionConfirmation':
                $demoApi->logMessage($message['Type']);
                $demoApi->getSNSSubscription($message);
                break;
        }
    }
?>
This message we process and send the confirmation via the method getSNSSubscription() defined in the class.php.
<?php
    public function getSNSSubscription($message) {
        try {
            $result = $this->snsClient->confirmSubscription(array(
                'Token'    => $message['Token'],
                'TopicArn' => $message['TopicArn']
            ));
            return $this;
        } catch (Exception $e) {
            $this->logException(__FUNCTION__, $e->getMessage());
            return false;
        }
    }
?>
6.2. Create Cloud Watch alarms
Now we know the topic ARN and the policies ARNs, so we can create alarms and use topic and policies as alarm actions. All alarms constants are defined in the config.php.
<?php
    define('ALARM_ADD_NAMESPACE', 'AWS/EC2');
    define('ALARM_ADD_METRIC_NAME', 'CPUUtilization');
    define('ALARM_ADD_COMPARISON_OPERATOR', 'GreaterThanOrEqualToThreshold');
    define('ALARM_ADD_STATISTIC', 'Average');
    define('ALARM_ADD_PERIOD', 300);
    define('ALARM_ADD_EVALUATION_PERIODS', 1);
    define('ALARM_ADD_THRESHOLD', 75);
    define('ALARM_ADD_NAME', 'api-alarm-increase');

    define('ALARM_REMOVE_NAMESPACE', 'AWS/EC2');
    define('ALARM_REMOVE_METRIC_NAME', 'CPUUtilization');
    define('ALARM_REMOVE_COMPARISON_OPERATOR', 'LessThanThreshold');
    define('ALARM_REMOVE_STATISTIC', 'Average');
    define('ALARM_REMOVE_PERIOD', 300);
    define('ALARM_REMOVE_EVALUATION_PERIODS', 1);
    define('ALARM_REMOVE_THRESHOLD', 50);
    define('ALARM_REMOVE_NAME', 'api-alarm-decrease');
?>
<?php
    public function createAddCapacityAlarm() {
        try {
            $this->cwClient->putMetricAlarm([
                'AlarmName'          => ALARM_ADD_NAME,
                'AlarmDescription'   => 'Add instance when CPU Utilization is '
                                        . 'grater or equal than threshold.',
                'AlarmActions'       => [
                    $this->scaleInPolicyARN,
                    $this->topicARN
                ],
                'ComparisonOperator' => ALARM_ADD_COMPARISON_OPERATOR,
                'Dimensions'         => [
                    [
                        'Name'  => 'InstanceId',
                        'Value' => $this->ec2InstanceID
                    ]
                ],
                'MetricName'        => ALARM_ADD_METRIC_NAME,
                'Namespace'         => ALARM_ADD_NAMESPACE,
                'EvaluationPeriods' => ALARM_ADD_EVALUATION_PERIODS,
                'Period'            => ALARM_ADD_PERIOD,
                'Statistic'         => ALARM_ADD_STATISTIC,
                'Threshold'         => ALARM_ADD_THRESHOLD
            ]);
            return $this;
        } catch (Exception $e) {
            $this->logException(__FUNCTION__, $e->getMessage());
            return false;
        }
    }

    public function createRemoveCapacityAlarm()
    {
        try {
            $result = $this->cwClient->putMetricAlarm([
                'AlarmName'          => ALARM_REMOVE_NAME,
                'AlarmDescription'   => 'Remove instance when CPU Utilization is '
                                        . 'lower than threshold.',
                'AlarmActions'       => [
                    $this->scaleOutPolicyARN,
                    $this->topicARN
                ],
                'ComparisonOperator' => ALARM_REMOVE_COMPARISON_OPERATOR,
                'Dimensions'         => [
                    [
                        'Name'  => 'InstanceId',
                        'Value' => $this->ec2InstanceID
                    ]
                ],
                'MetricName'        => ALARM_REMOVE_METRIC_NAME,
                'Namespace'         => ALARM_REMOVE_NAMESPACE,
                'EvaluationPeriods' => ALARM_REMOVE_EVALUATION_PERIODS,
                'Period'            => ALARM_REMOVE_PERIOD,
                'Statistic'         => ALARM_REMOVE_STATISTIC,
                'Threshold'         => ALARM_REMOVE_THRESHOLD
            ]);
            return $this;
        } catch (Exception $e) {
            $this->logException(__FUNCTION__, $e->getMessage());
            return false;
        }
    }
?>
6.3. Manage DB replicas
1. Finish action script
Let’s complete action.php with one more case statement for reaction on sent SNS notifications.
If we find that the message type is Notification and the message subject contains a word ALARM then we know it’s a notification from our alarms, and we only need to check from which of them and to execute appropriate task.
<?php
            case 'Notification':
                if (strpos($message['Subject'], 'ALARM') !== false) {
                    switch (json_decode($message['Message'])->AlarmName) {
                        case ALARM_ADD_NAME:
                            $demoApi->runCronJob('add_db_replica');
                            break;
                        case ALARM_REMOVE_NAME:
                            $demoApi->runCronJob('remove_db_replica');
                            break;
                    }
                }
                break;
?>
As it was already shown, RDS instance creation may take some time. We do not want our action script to wait while instance launch will finish, so we’ll run this task as a background (cron) job. The runCronJob() method is defined below.
<?php
    public function runCronJob($jobName) {
        $minute = intval(date('i')) + 1;
        $job = "$minute * * * * /usr/bin/php /var/www/$jobName.php "
             . "> /var/www/$jobName.log" . PHP_EOL;
        $filename = __DIR__ . '/crontab.txt';
        file_put_contents($filename, $job);
        shell_exec("sudo crontab -u ec2-user $filename 2>&1");
        unlink($filename);
        $result = shell_exec('sudo crontab -u ec2-user -l 2>&1');
        $this->logAction(__FUNCTION__, "Running cron job", $result);
    }
?>
This method can be divided into 3 parts:
- 1. Creating a text file crontab.txt with the cron command: executing the PHP file in a minute after launching the cron job.
- 2. Putting this text file to crontab as a job.
- 3. Checking if the command has been successfully written down to the crontab.
The name and content of the PHP file mentioned in the 1st point depends on the parameter given in the action.php script.
If it is add_db_replica.php, then it will contain the following:
<?php
    require_once __DIR__ . '/class.php';
    $demoApi = new DemoApi();
    $demoApi->addDBReplica();
    $demoApi->removeCronJob();
?>
The remove_db_replica.php has one different line:
<?php
    require_once __DIR__ . '/class.php';
    $demoApi = new DemoApi();
    $demoApi->removeDBReplica();
    $demoApi->removeCronJob();
?>
As these files will be executed as a cron job, they need to delete this cron job by themselves using the method removeCronJob():
<?php
    public function removeCronJob() {
        shell_exec('sudo crontab -u ec2-user -r 2>&1');
    }
?>
All we have left to do is to define methods for adding and removing DB replicas.
2. Add DB replica
To add a DB replica we need to do 2 steps.
1. Create DB replica via RDS client.
Here we specify
1) the name of the main DB as a source DB instance and
2) an identifier for this replica.
<?php
    private function createDBReplica($id) {
        try {
            $this->rdsClient->createDBInstanceReadReplica([
                'AutoMinorVersionUpgrade'       => true,
                'AvailabilityZone'              => AWS_REGION . 'a',
                'CopyTagsToSnapshot'            => true,
                'DBInstanceClass'               => DB_INSTANCE_TYPE,
                'DBInstanceIdentifier'          => $id,
                'Port'                          => 3306,
                'PubliclyAccessible'            => true,
                'SourceDBInstanceIdentifier'    => DB_INSTANCE_NAME,
                'StorageType'                   => 'gp2'
            ]);
            return $this;
        } catch (Exception $e) {
            $this->logException(__FUNCTION__, $e->getMessage());
            return false;
        }
    }
?>
2. Add a record to the HAProxy configuration file.
We need to add a line with the new DB server endpoint.
<?php
    private function addRecordToHAProxy($id, $prefix) {
        try {
            $record = "\nserver " . $id . " " . $id . $prefix . ":3306 check";
            $content = file_get_contents(__DIR__ . '/files/haproxy.cfg');
            $start = strrpos($content, ":3306 check") + strlen(":3306 check");
            $content = substr_replace($content, $record, $start, 0);
            file_put_contents(__DIR__ . '/files/haproxy.cfg', $content);
            $this->changeHAProxyConfig();
            return $this;
        } catch (Exception $e) {
            $this->logException(__FUNCTION__, $e->getMessage());
            return false;
        }
    }
?>
These two steps get together in one method addDBReplica().
After creating DB replica we need to wait some time while we can receive its endpoint, and only then add the records to HAProxy config.
<?php
    public function addDBReplica() {
        try {
            $id = DB_INSTANCE_REPLICA_NAME . '-' . time();
            $prefix = $this->getDBPrefix();
            $this->createDBReplica($id);

            $count = 0;
            do {
                if ($count++) sleep(INSTANCE_CHECK_TIMEOUT);
                $result = $this->rdsClient->describeDBInstances([
                    'DBInstanceIdentifier' => $id
                ]);
                $status = $result->get('DBInstances')[0]['DBInstanceStatus'];
            } while ($status != 'available' && $count < INSTANCE_CHECK_COUNT); $this->addRecordToHAProxy($id, $prefix);
            return $this;
        } catch (Exception $e) {
            $this->logException(__FUNCTION__, $e->getMessage());
            return false;
        }
    }
?>
3. Remove DB replica
To remove DB replica we need to do 4 steps.
1. Get the last DB replica.
We are going to delete the last added DB replica. It should be also in the available state else we won’t be able to delete it. So we’ll get all DB replicas (they will be returned in the descending order – the latest will be first), consistenly check their status and delete the available one.
<?php
    private function getLastReplica() {
        try {
            $result = $this->rdsClient->describeDBInstances([
                'DBInstanceIdentifier' => DB_INSTANCE_NAME
            ]);
            $replicas = $result->get('DBInstances')[0]['ReadReplicaDBInstanceIdentifiers'];

            foreach ($replicas as $replica) {
                $result = $this->rdsClient->describeDBInstances([
                    'DBInstanceIdentifier' => $replica
                ]);
                $status = $result->get('DBInstances')[0]['DBInstanceStatus'];
                if ($status == 'available') {
                    $lastReplica = $replica;
                    break;
                }
            }
            return $lastReplica;
        } catch (Exception $e) {
            $this->logException(__FUNCTION__, $e->getMessage());
            return false;
        }
    }
?>
2. Get DB prefix.
DB prefix is the part of its endpoint which is located between DB name and AWS subdomains. For example, if we have such RDS endpoint api-db-instance.cc9wzgrojwmf.us-west-2.rds.amazonaws.com, then the prefix is cc9wzgrojwmf.
We need to know it to compose the full replica name, because AWS returns only replica name we gave it during creation.
<?php
    private function getDBPrefix()
    {
        $this->getDBEndpoint();
        $start = strpos($this->dbInstanceIP, '.');
        return substr($this->dbInstanceIP, $start);
    }
?>
3. Delete DB replica.
Now we can delete DB replica using its name.
<?php
    private function deleteDBReplica($id)
    {
        try {
            $this->rdsClient->deleteDBInstance([
                'DBInstanceIdentifier'  => $id,
                'SkipFinalSnapshot'     => true
            ]);
            return $this;
        } catch (Exception $e) {
            $this->logException(__FUNCTION__, $e->getMessage());
            return false;
        }
    }
?>
4. Remove the record from the HAProxy configuration file.
The last step is to remove the record of the deleted DB from haproxy.cfg. Here we use not only the name of the replica but its full name with the prefix too.
<?php
    private function removeRecordFromHAProxy($id, $prefix) {
        try {
            $record = "\nserver " . $id . " " . $id . $prefix . ":3306 check";
            $this->editFile('/files/haproxy.cfg', [$record], ['']);
            $this->changeHAProxyConfig();
        } catch (Exception $e) {
            $this->logException(__FUNCTION__, $e->getMessage());
            return false;
        }
    }
?>
So now we can compose removeDBReplica() method consisting from these 4 steps.
<?php
    public function removeDBReplica() {
        try {
            $id = $this->getLastReplica();
            $prefix = $this->getDBPrefix();
            $this->deleteDBReplica($id);
            $this->removeRecordFromHAProxy($id, $prefix);
            return $this;
        } catch (Exception $e) {
            $this->logException(__FUNCTION__, $e->getMessage());
            return false;
        }
    }
?>
After all let’s create the main script script.php building the static part of the system.
It will be consist of two parts: before and after sleep() statement.
The before part will create the system environment, the main EC2 instance, HAProxy instance and RDS instance.
As these instances need time to be launched, we’ll wait for 300 seconds, and then continue with the second part.
In the after part the instances will be configured, and the system will be prepared for its scaling by creating load balancer, launch configuration, auto scaling group, scaling policies and alarms.
<?php
    require_once __DIR__ . '/class.php';
    $demoApi = new DemoApi();
    $demoApi->createInternetGateway()
            ->createVPC()
            ->createSubnets()
            ->prepareRouteTable()
            ->createSecurityGroup()
            ->createDBSubnetGroup()
            ->createKeyPair()
            ->createEC2Instance()
            ->createHAProxyInstance()
            ->createDBInstance();

    sleep(300);

    $demoApi->getDBEndpoint()
            ->prepareHAProxyInstance()
            ->prepareEC2Instance()
            ->prepareDBInstance()
            ->createEC2Image()
            ->createLoadBalancer()
            ->createLaunchConfiguration()
            ->createAutoScalingGroup()
            ->createSNSNotification()
            ->createScaleInPolicy()
            ->createScaleOutPolicy()
            ->createAddCapacityAlarm()
            ->createRemoveCapacityAlarm();
?>
Testing
During the whole testing we are going to note the time of each event – any significant change in the created system.
Run building script
It is obvious that the script.php will be executed at least 10 minutes. This process is too long for executing it in browser, so we need to run it using cron.
Let’s write in the console the following command:
crontab -eand continue in the opening prompt:
9 17 * * * /usr/bin/php /var/www/script.php > /var/www/script.log
This line means that our script.php will be executed at and all its output messages will be directed to the script.log file.
Note: /usr/bin/php is the path to php.exe in Linux, but it may be different in your system.
At we can admit that the process starts: the log file appeared and some system items are creating.
1. VPC
Our custom VPC is successfully created and modifyied, it resolves DNS and supports DNS hostnames.
VPC ID: vpc-231fb647
2. Subnet
Here is one of the custom subnet we created. It is available for auto-assigning public IPs to the instances when they will be launched in it.
Subnet ID: subnet-7d72c619
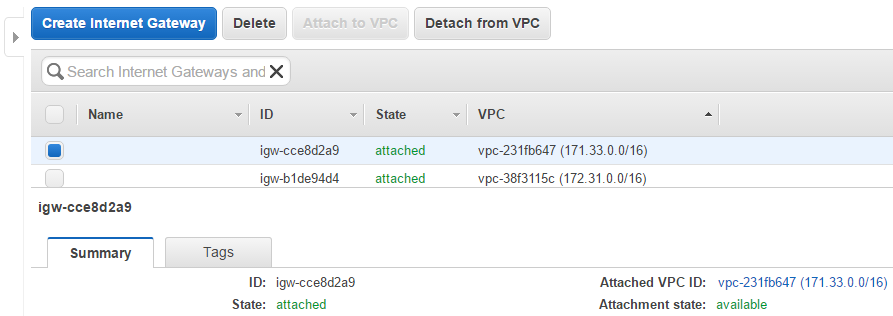
3. Internet gateway
The Internet gateway is also present and attached to the created VPC.
Internet gateway ID: igw-cce8d2a9
4. Route Table
In the route table we can see a new route addressed to all IPs.
5. Security group
The new security group has 3 inbound rules.
Security group ID: sg-1fe7e578
6. DB subnet group
If we open RDS tab in the AWS console, we’ll see the created database subnet group.
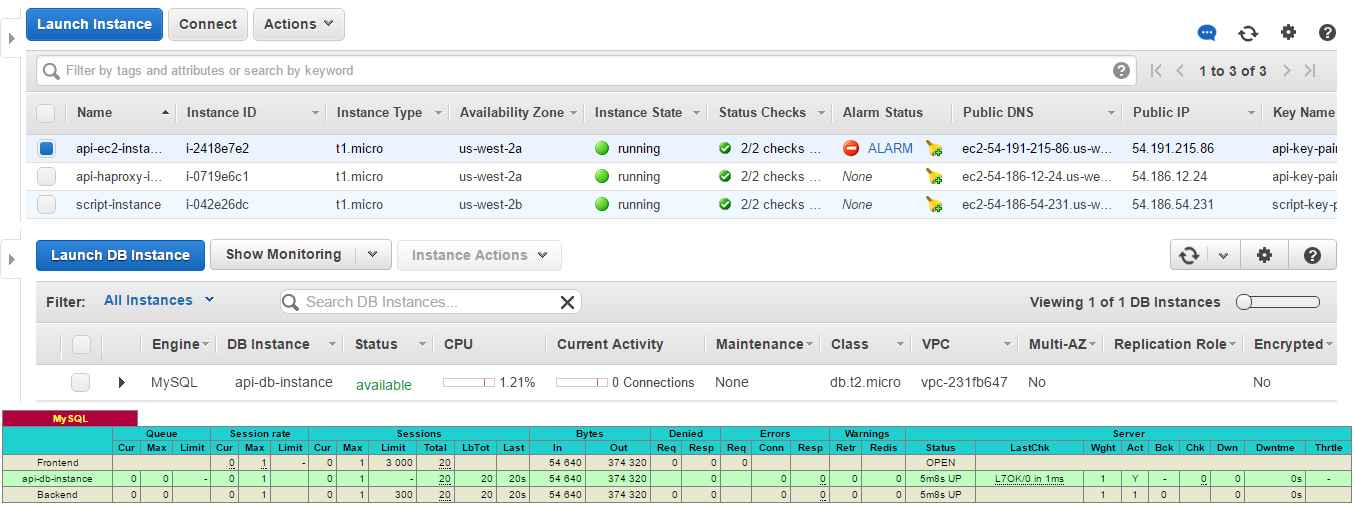
7. EC2 instances
The main EC2 and HAProxy instances were launched.
The main instance ID: i-2418e7e2
HAProxy instance ID: i-0719e6c1

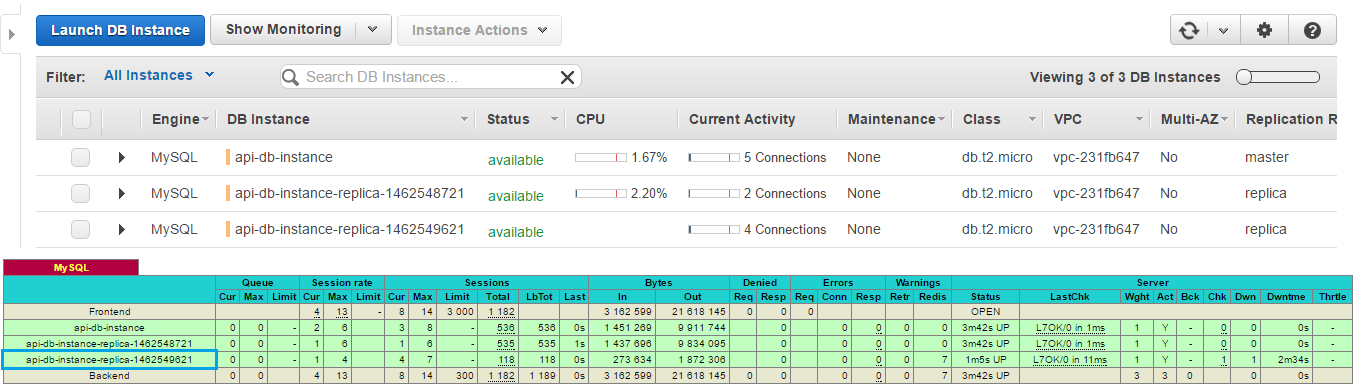
8. RDS instance
At the RDS instance was created.
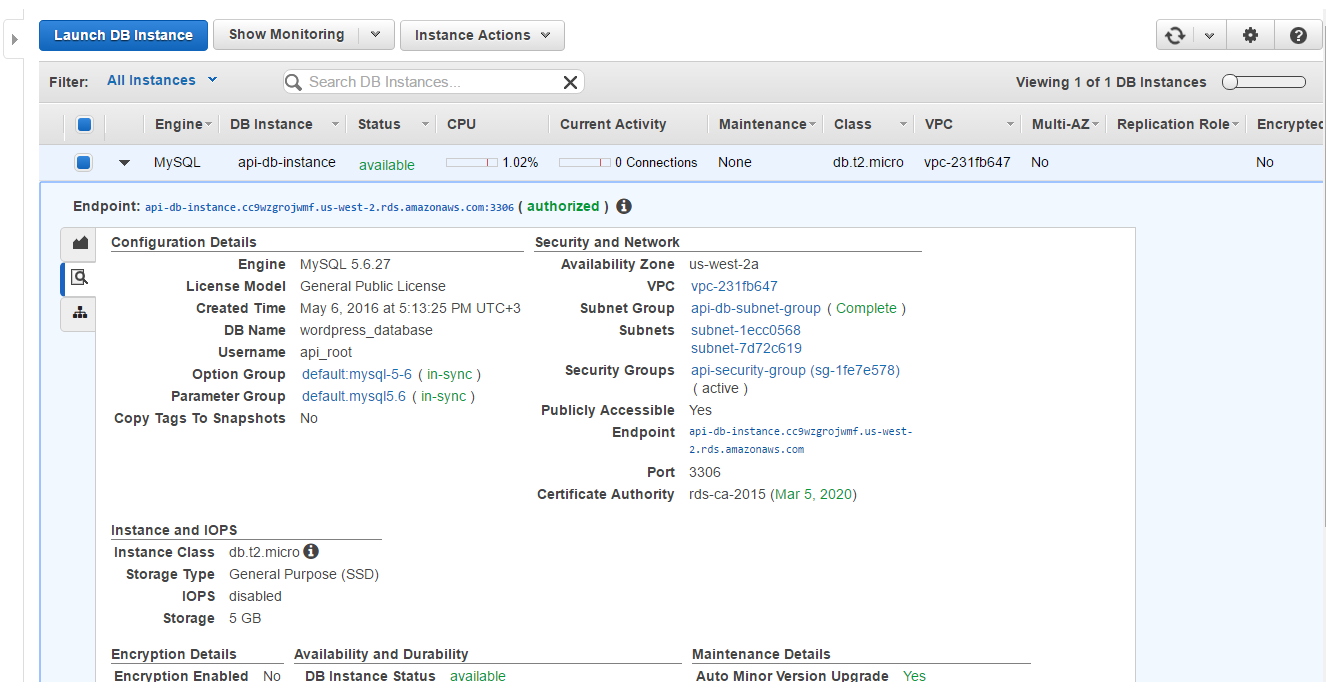
By the instances should be prepared, so we can see haproxy stats and WP site.
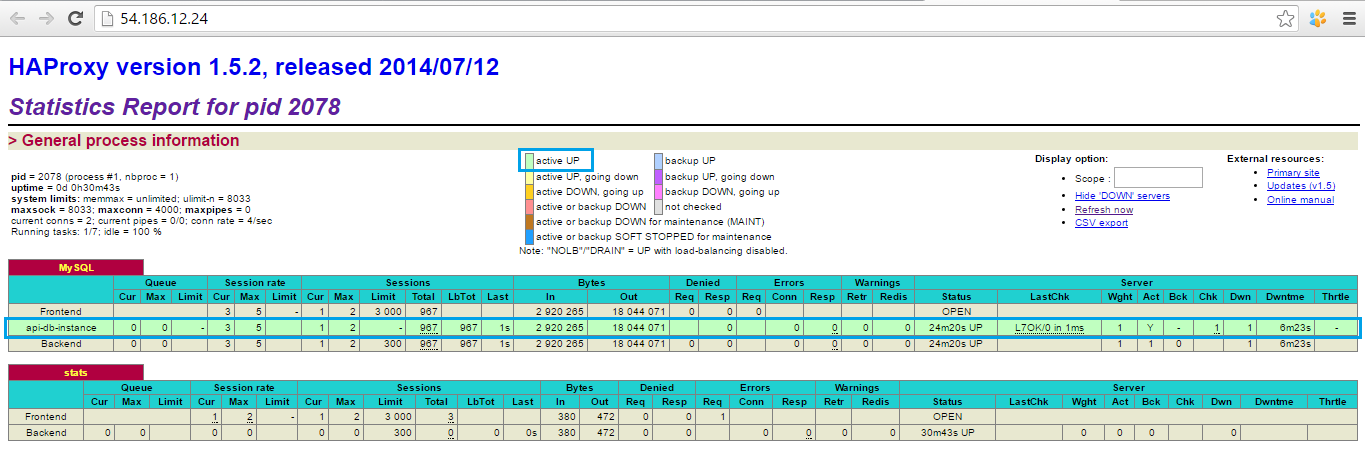
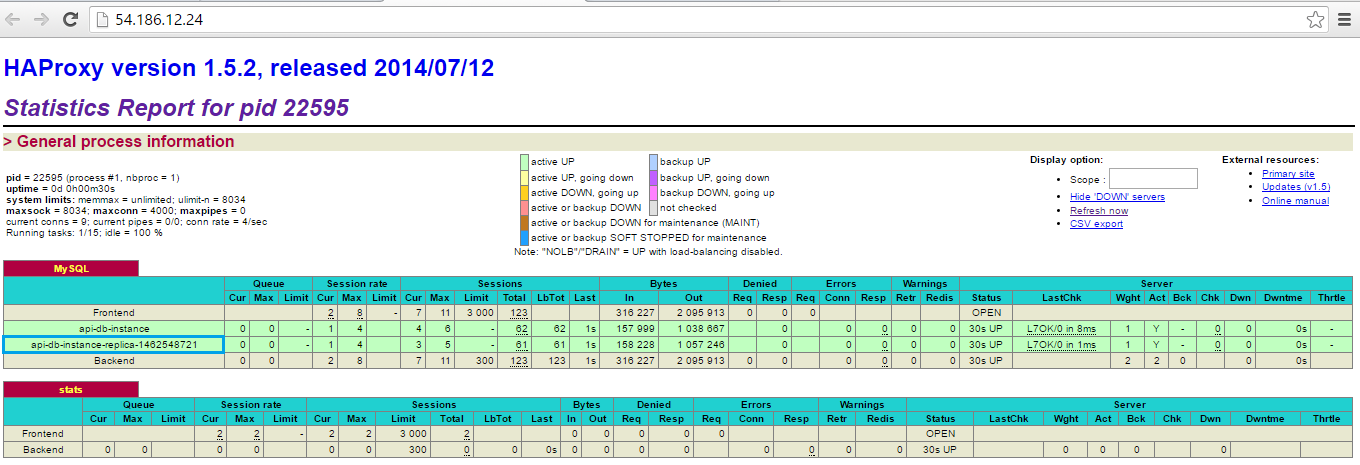
1. HAProxy stats
Firstly, we logged into HAProxy with the credentials defined in the haproxy.cfg.
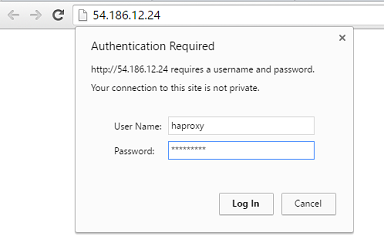
After that we could see the statistics: the only record was for the main RDS instance api-db-instance. It means that it is proxied by HAProxy – it is available by the same IP as HAProxy instance has.
2. WordPress site
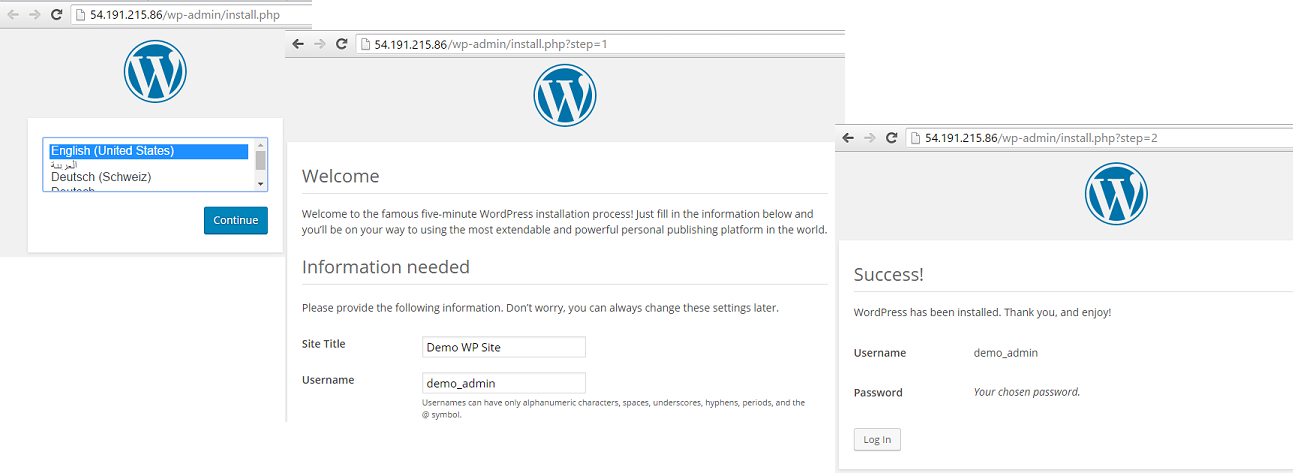
If we look at the main EC2 instance status, we’ll see that it has a warning sign.

The reason is that WordPress needs to be configured manually too, so it redirects from the index page to wp-admin/install.php with the 301 status code. If the instance returns status that is not equal to 200, then load balancer will think that the instance is unhealthy.
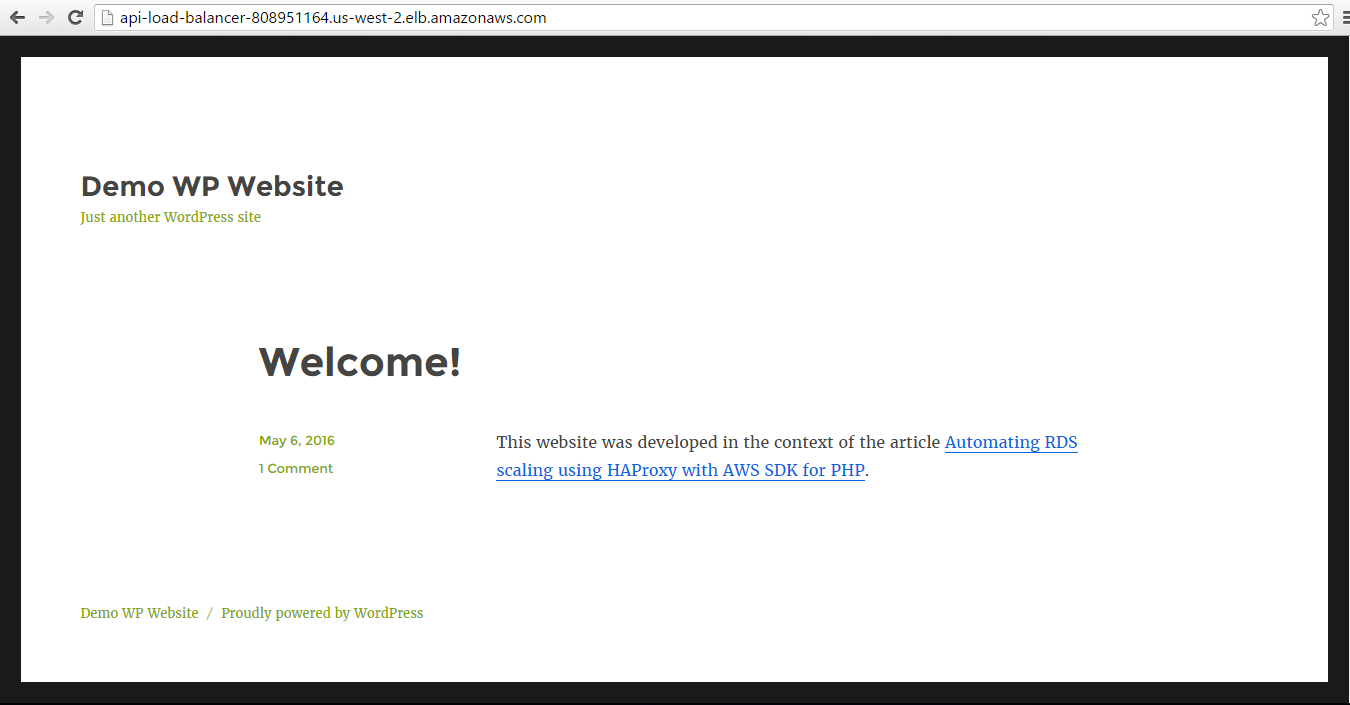
Thus, the first thing we needed to do was to open WP using the main EC2 instance DNS.
Later we were going to use load balancer DNS for the WP, so we needed to change WordPress URL and site URL in the WP dashboard.
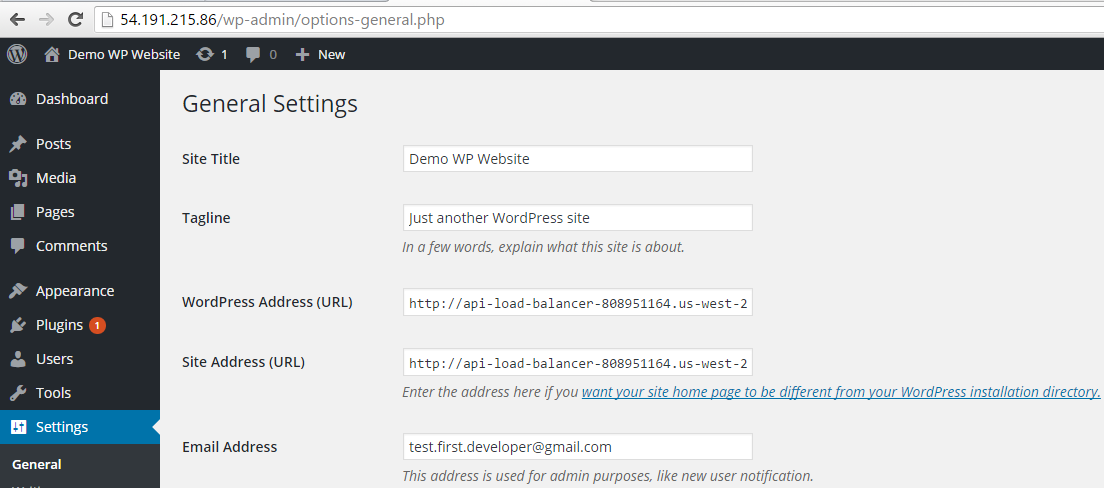
After we get sure that the main EC2 instance is in service of the load balancer, we’ll be able to use load balancer DNS address as website address.

We also can customize theme and change the default blog post: make such changes that will be reflected only in the DB which is common for all instances connected to the load balancer.
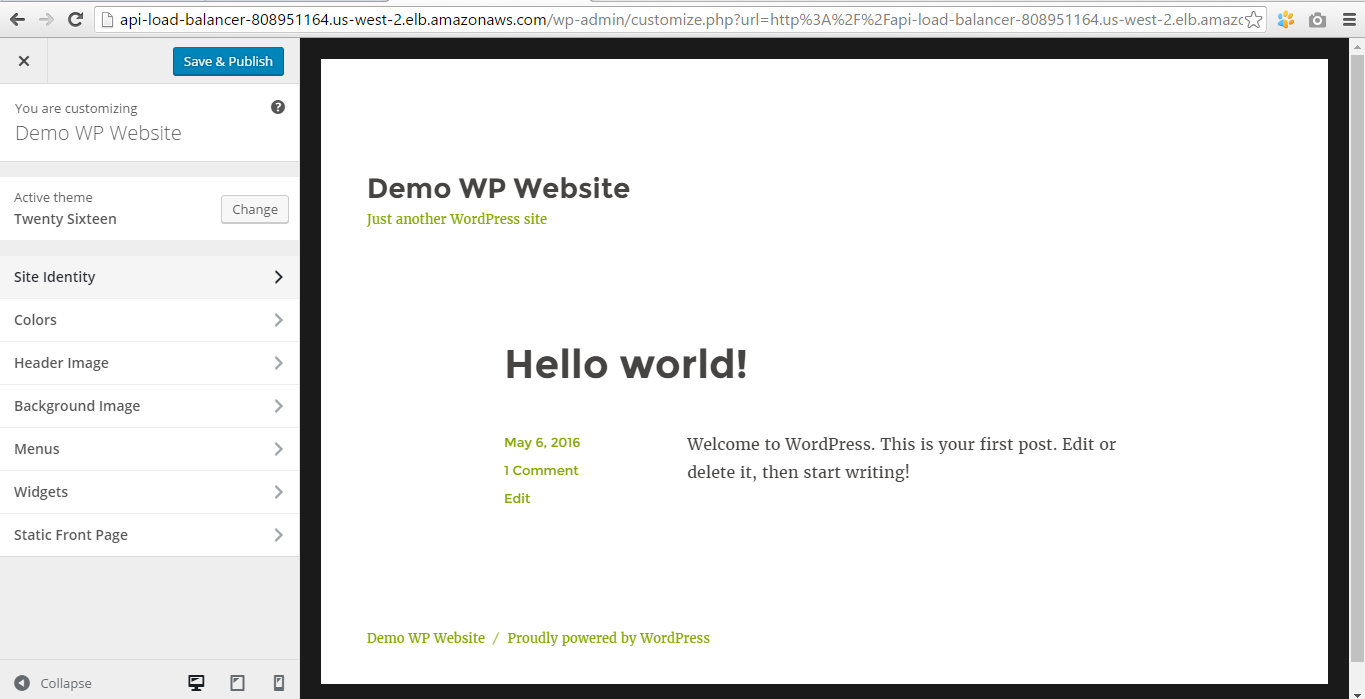
Now our customized WP website is available by the load balancer address.
3. SNS topic
The SNS topic was also created by this moment.
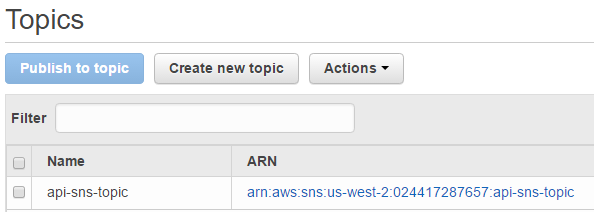
It got the confirmation for subscription, so we can see the subscription ARN.

Increase system load
We are going to increase system load by different ways: using third-party online tools and shell script.
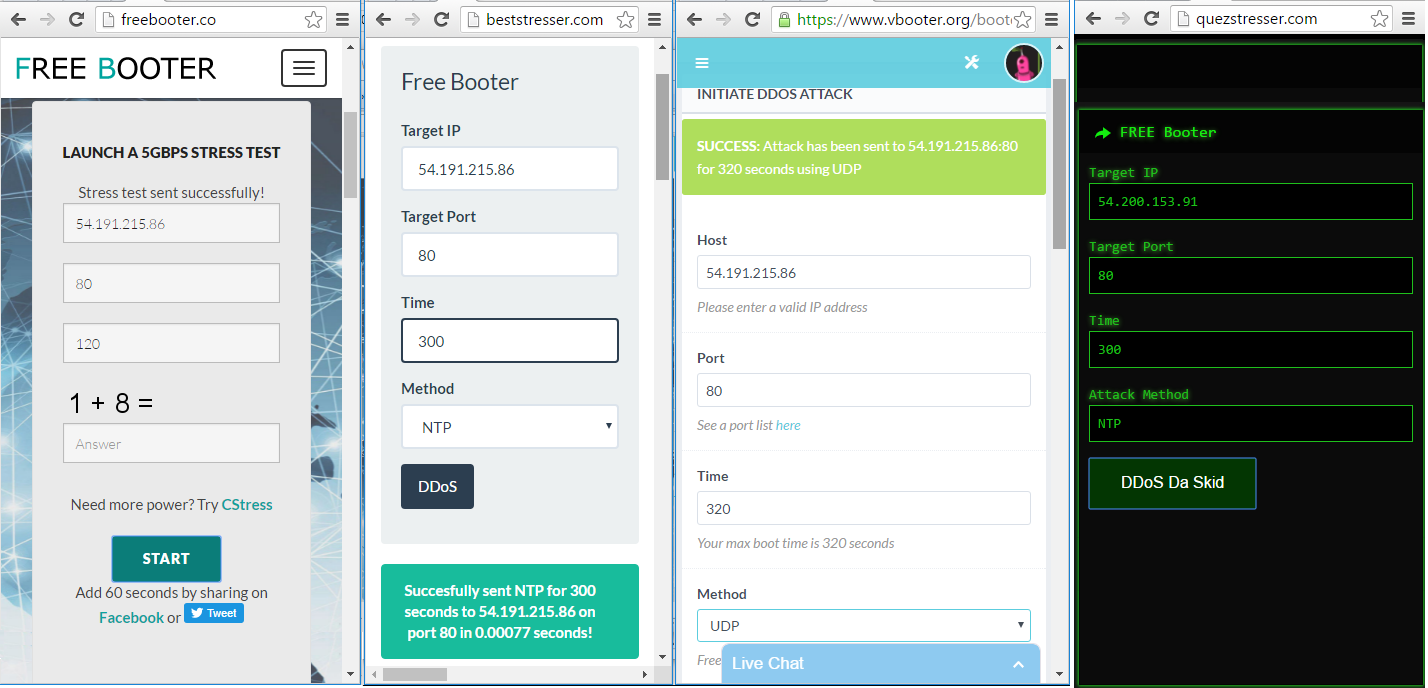
Online web tools
We used 4 free web tools: Free Booter, vBooter, Quez Stresser and Best Stresser. All we need to do is to enter the IP address of our main EC2 instance, port, stress time and choose stress algorithm. The maximum time is 600 seconds, so we’ll repeat stressing several times. The first stress session is started at .
Shell script
The online tools accept only IP addresses, but the load balancer has DNS address and doesn’t have an IP. That’s why we can direct load only to the main EC2 instance, and additional instances will remain unaffected. The solution is to write the shell script which will send 10000 GET requests to the load balancer address using cURL tool.
Let’s create the file stresser.sh with such content:
for i in {1..10000}
do
curl GET http://api-load-balancer-808951164.us-west-2.elb.amazonaws.com
done
At we run this script by entering the following command:
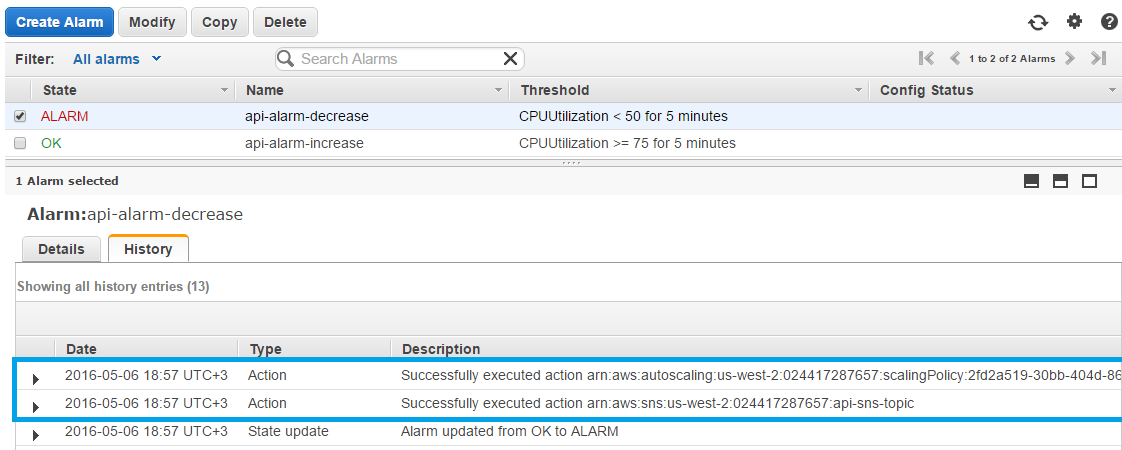
sh stresser.shThe stressers caused increasing of server load, and the 75% point was reached at . Alarm api-alarm-increase s, and its 2 actions were executed.
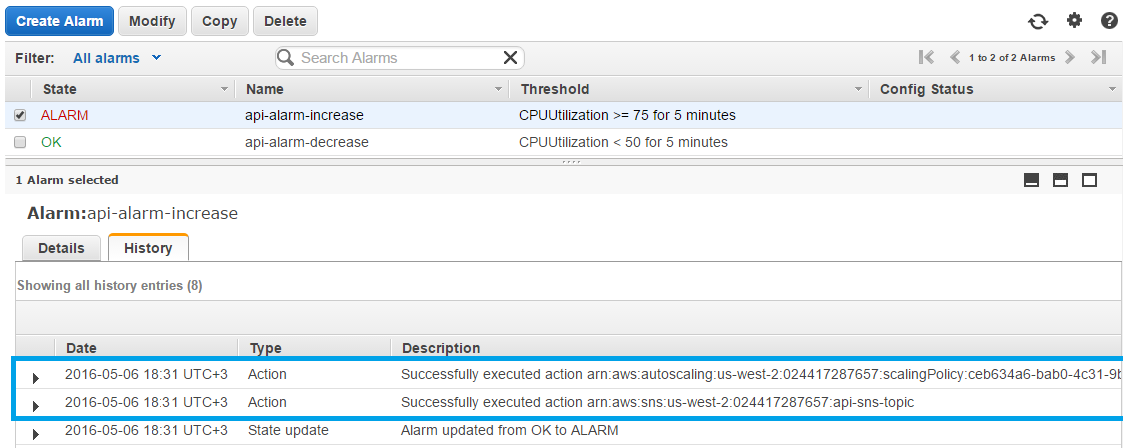
Auto scaling policy added one new EC2 instance.
SNS topic sent a notification, script action.php reacted and created a new DB replica.

This DB replica record was also added to HAProxy.
At the load is still increasing. That’s why another new server has been added.
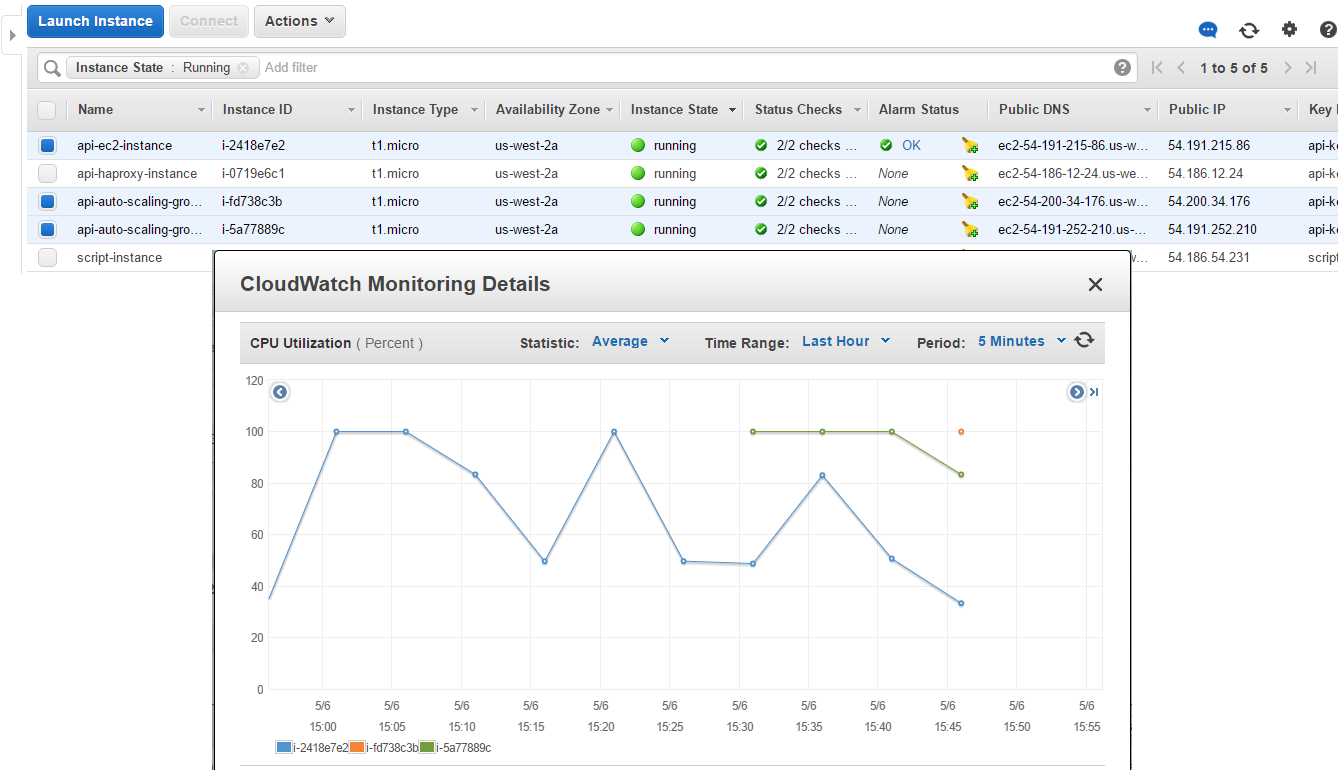
The same is for RDS instances:
Decrease system load
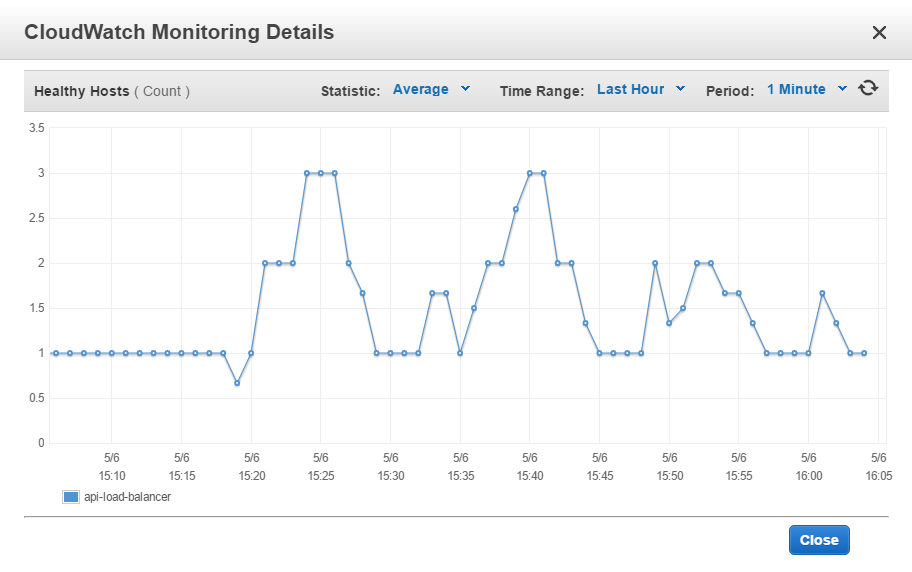
By the stressers stop their work, and load balancer redistribute the load between 3 instances, so it starts decreasing.
Thereby 2 additional instances become unnecessary and removed by the auto scaling policy.
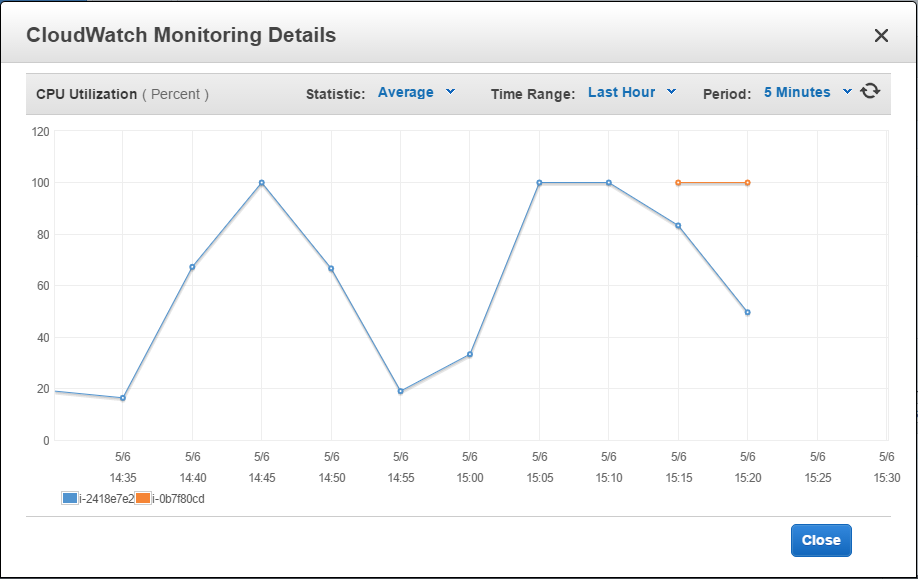
We can see dynamics of instances adding and removing on the load balancer monitoring chart.
As api-alarm-decrease triggered, the new SNS notification was sent, and the last DB replica starts deleting.

Finally, when the load normalized, the only EC2 and RDS instances left as it was in the initial state of the system.
Thus, we managed to build the scalable system with EC2 on-demand and spot instances and replicable RDS database for using it by the WordPress website.
You can download an archive with the project files using this link.