One of the Amazon Web Services features is to run and manage virtual servers provided by Amazon Elastic Compute Cloud (Amazon EC2). This service covers most use cases, including the case when your project needs additional resources: then you can simply scale your system capacity with new instances and remove them when they aren’t needed any more. One more great feature of AWS is its API that allows automating operations you usually launch manually in AWS Console.
This article focuses on just the issue of programmable dynamic scaling. Here we’ll create a system based on on-demand EC2 instance. Then we’ll set conditions showing when additional resources need to be added or removed. The full work cycle can be described in a such way.
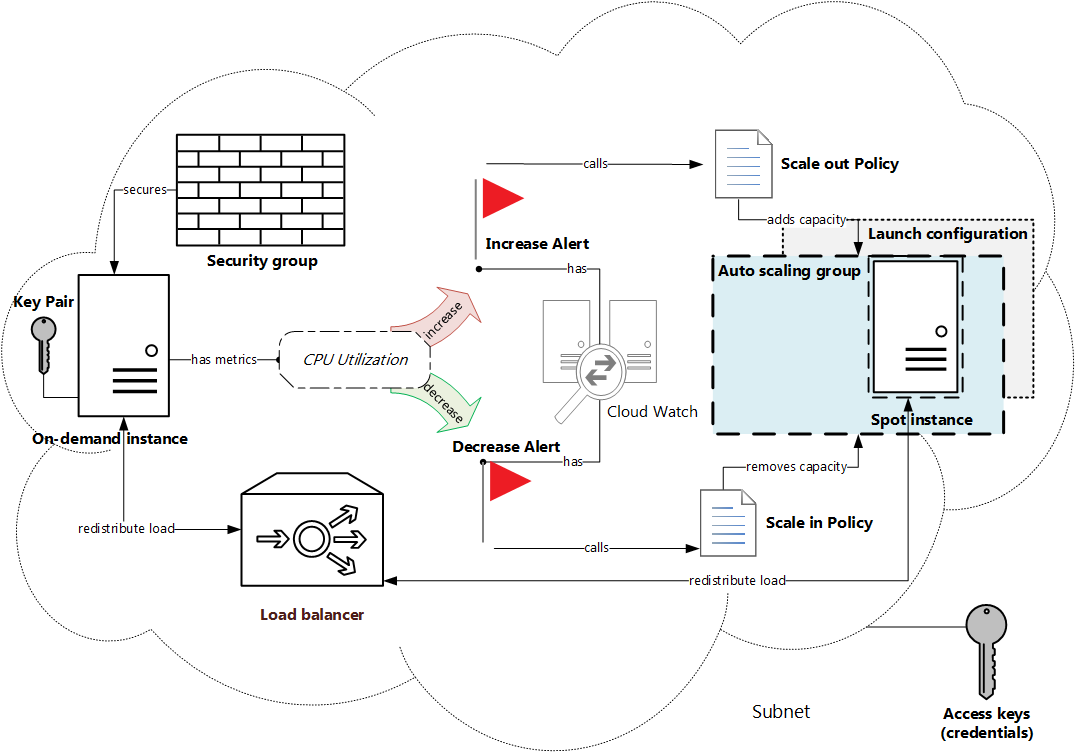
If one of conditions works out then the appropriate action (adding or removing instances) will be triggered. To add a new instance the system will send a spot request with defined bid price. We are going to use spot instances instead of on-demand, because they are usually cheaper (you can set your own bid price). When this spot request is completed, a new spot instance will appear. Then load balancer will redistribute load between the on-demand and spot servers. If load on the on-demand server falls below some point, the spot instance(s) will be terminated.
Finally we should get the system represented on the schema below.
Preparation
1. Install AWS SDK for PHP
First of all, we need to download and install SDK. It’s easy to do via Composer:
composer require aws/aws-sdk-php
AWS SDK needs some dependent packages, so they will be installed too.
Using version ^3.15 for aws/aws-sdk-php
./composer.json has been created
Loading composer repositories with package information
Updating dependencies (including require-dev)
 - Installing  mtdowling/jmespath.php (2.3.0)
   Downloading: 100%

 - Installing guzzlehttp/promises (1.0.3)
   Downloading: 100%

 - Installing psr/http-message (1.0)
   Downloading: 100%

 - Installing guzzlehttp/psr7 (1.2.3)
   Downloading: 100%

 - Installing guzzlehttp/guzzle (6.1.1)
   Downloading: 100%

 - Installing aws/aws-sdk-php (3.15.7)
   Downloading: 100%

aws/aws-sdk-php suggests installing doctrine/cache (To use DoctrineCacheAdapter)
aws/aws-sdk-php suggests installing aws/aws-php-sns-message-validator (To validate incoming SNS notifications)

Writing lock file
Generating autoload files
After successful installation /vendor/autoload.php file will be generated. It needs to be included into the main script.
2. Get project credentials
API calls must be authenticated with account security credentials. There are different types of credentials, but we’ll use access keys, which contain access key ID and access secret key. They can be received from AWS console: top panel → Security Credentials → Access Keys (Access Key ID and Secret Access Key).
Then we need to:
- 1. Create a new key pair by pressing the
Create New Access Keybutton. - 2. Save access keys: copy keys from the appeared modal pop-up or download them as
.csvfile. - 3. Put access keys to a new file.
[default]
aws_access_key_id = J0HNdOEJOHND0EJOHNDO
aws_secret_access_key = J0hndOEjOHND0eJoHNDOj0HNd0EJOHND0EJOHNDo
- 4. Place the credentials file into your
$HOME/.awsfolder so that the full path to the file looks like$HOME/.aws/credentials(with no extension).
Programming
The script we are going to write will consist of several functions. Each function will create a separate part of our system (these parts are highlighted in the image above), so there should be a possibility to use them separately too. That’s why it’s easier to write an OOP class with some public methods, each of them will execute its own task.
1. Configuration file
As we are going to use this script many times for different customers, it should be flexible to changeable requirements. So we’ll define constants responding to all parameters which can be configured (for example, type of instance, spot bid price etc.). As there are a lot of such parameters, it’s a good idea to make them in the separate PHP file config.php.
1.1. Region and Version
Firstly, we need to define a region and an availability zone where the system will be created, and API version. Here are default values used by AWS.
1.2. EC2 instance properties
Also it is necessary to know what kind of machines we are going to use as servers. It is enough to specify ID of Amazon Machine Image (AMI) and instance type (level of CPU, memory, storage, network).
We are going to use instances which are available for free-tier account.
Spot instances require specifying one more parameter which is a bid price. Actual price for certain region, date and instance type displays in Pricing History pop-up: Instances → Spot Requests → Pricing History button.
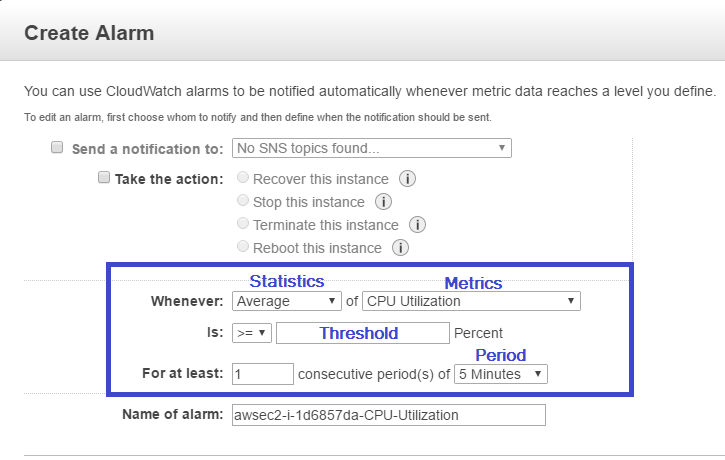
1.3. Alarms settings
The most important point in configuration is to describe rules when the system needs to be scaled. These rules are determined by 4 main parameters:
- 1) monitored metric (CPU Utilization, Disk Reads, Network In etc.);
- 2) statistics (Average, Minimum, Sum etc.);
- 3) threshold (level of metrics);
- 4) period (at least 5 minutes).
They are gathered in the image below.
We are going to create two alarms: one for the increase action and one for the decrease action. To make them more flexible we’ll define separate constants for each of the alarms.
After the configuration file is written, we’ll include it into the main script:
2. Create custom class
Let’s define our custom class Article. Its constructor will contain an array of parameters used for creating any AWS SDK class object.
 EC2_REGION, 'version' => EC2_VERSION);
    }
}
?>
Every AWS client throws exceptions in case of error. We are going to log them into error.log file using private method logException().
Now we are ready to write the rest of class methods.
3. Prepare system environment
Before we create any system object it is necessary to prepare an environment for them. It consists from:
- 1) subnet – component of the virtual private network (VPC);
- 2) key pair for log in to the server;
- 3) security group – a firewall containing inbound and outbound rules allowing network interactions with the server.
3.1. Get system subnet
All AWS items are bound to a certain subnet, so we need to know its ID for executing any creating operations. This will be the first method called in our class constructor.
As SDK documentation says, EC2Client class has a method describeSubnets returning an array with all subnets. First of all, we need to create an object of this class.
 EC2_REGION, 'version' => EC2_VERSION);
        $this->ec2Client = new Ec2Client($params);
        $this->getSubnet();
    }
}
?>
Each subnet resides entirely with one availability zone. We’ll choose the subnet located in the EC2_AVAILABILITY_ZONE. Its ID will be stored in the subnet field.
ec2Client->describeSubnets([
                'Filters' => [
                    [
                        'Name' => 'availabilityZone',
                        'Values' => [EC2_AVAILABILITY_ZONE]
                    ]
                ]
            ]);
            $this->subnet = $result->get('Subnets')[0]['SubnetId'];
        }   catch (Exception $e) {
            $this->logException(__FUNCTION__, $e->getMessage());
            return false;
        }
    }
?>
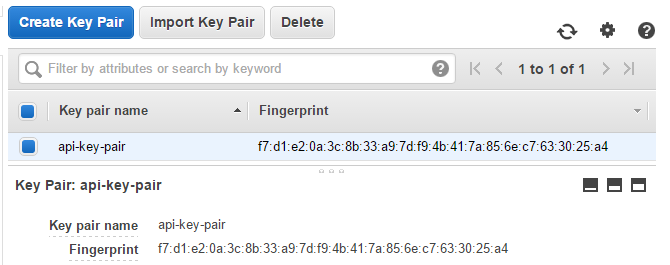
3.2. Create key pair
The purpose of the next method is to create a key pair and put it to the .pem file in the project directory. To make the key name consistent through the whole project let’s define an attribute keyPair.
keyPair = 'api-key-pair';
    }

    public function createKeyPair()
    {
        try {
            $result = $this->ec2Client->createKeyPair([
                'KeyName' => $this->keyPair,
            ]);
            $key = $result->get('KeyMaterial');
            file_put_contents(__DIR__ . '/' . $this->keyPair . '.pem', $key);
            return $this;
        } catch (Exception $e) {
            $this->logException(__FUNCTION__, $e->getMessage());
            return false;
        }
    }
?>
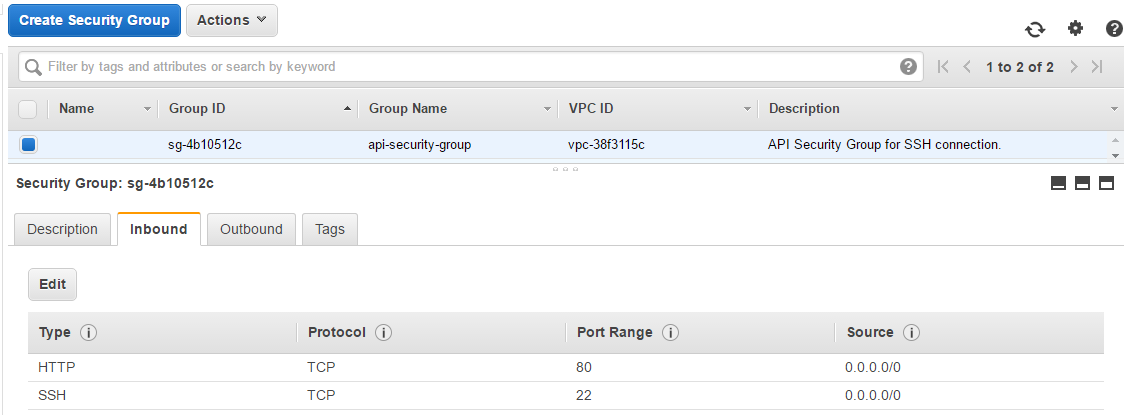
3.3. Establish instance security
In the createSecurityGroup() method we’ll create a security group and add two inbound rules to it. These rules will allow TCP connection through 22 and 80 port from all IPs. Security group’s ID will be assigned to the private field securityGroup.
ec2Client->createSecurityGroup([
                'Description' => 'API Security Group for SSH connection.',
                'GroupName' => 'api-security-group'
            ]);

            $this->securityGroup = $result->get('GroupId');

            $result = $this->ec2Client->authorizeSecurityGroupIngress([
                'GroupId' => $this->securityGroup,
                'IpProtocol' => 'TCP',
                'ToPort' => 22,
                'FromPort' => 22,
                'CidrIp' => '0.0.0.0/0'
            ]);

            $result = $this->ec2Client->authorizeSecurityGroupIngress([
                'GroupId' => $this->securityGroup,
                'IpProtocol' => 'TCP',
                'ToPort' => 80,
                'FromPort' => 80,
                'CidrIp' => '0.0.0.0/0'
            ]);

        }  catch (Exception $e) {
            $this->logException(__FUNCTION__, $e->getMessage());
            return false;
        }
    }
?>
4. Launch on-demand instance
Now we can execute a command that runs one EC2 instance with defined instance type and AMI ID in the chosen subnet using already existing key pair and security group. Instance ID returned by the runInstances() method will be set to the instanceID field.
Note for free-tier accounts: choose proper volume size and disable detailed monitoring.
ec2Client->runInstances([
                'BlockDeviceMappings' => [
                    [
                        'DeviceName' => '/dev/xvda',
                        'Ebs' => [
                            'DeleteOnTermination' => true,
                            'SnapshotId' => 'snap-2974047b',
                            'VolumeSize' => 8,
                            'VolumeType' => 'gp2',
                        ]
                    ]
                ],
                'ImageId' => EC2_AMI_ID,
                'InstanceInitiatedShutdownBehavior' => 'stop',
                'InstanceType' => EC2_INSTANCE_TYPE,
                'KeyName' => $this->keyPair,
                'MaxCount' => 1,
                'MinCount' => 1,
                'Monitoring' => ['Enabled' => false],
                'SecurityGroupIds' => [$this->securityGroup],
                'SubnetId' => $this->subnet
            ]);
            $this->instanceID = $result->get('Instances')[0]['InstanceId'];
            return $this;
        } catch (Exception $e) {
            $this->logException(__FUNCTION__, $e->getMessage());
            return false;
        }
    }
?>
5. Create load balancer
Elastic load balancer will distribute load among all healthy instances attached to it. So createLoadBalancer() method should comprise 3 steps:
- 1) creating load balancer named as
api-load-balancerin the defined availability zone and security group withTCP:80listener; - 2) configuring instance health check: every 30 seconds ping 22 port with 5 seconds timeout using TCP protocol;
- 3) attaching on-demand instance to the
api-load-balancer.
elbClient = new ElasticLoadBalancingClient($params);
        $this->elbName = 'api-load-balancer';
        $this->tag = array('Key' => 'tag', 'Value' => 'api');
    }

    public function createLoadBalancer()
    {
        try {
            $result = $this->elbClient->createLoadBalancer([
                'AvailabilityZones' => [EC2_AVAILABILITY_ZONE],
                'Listeners' => [
                    [
                        'InstancePort' => 80,
                        'InstanceProtocol' => 'TCP',
                        'LoadBalancerPort' => 80,
                        'Protocol' => 'TCP',
                    ]
                ],
                'LoadBalancerName' => $this->elbName,
                'Scheme' => 'internet-facing',
                'SecurityGroups' => [$this->securityGroup],
                'Tags' => [$this->tag]
            ]);

            $result = $this->elbClient->configureHealthCheck([
                'HealthCheck' => [
                    'HealthyThreshold' => 10,
                    'Interval' => 30,
                    'Target' => 'TCP:22',
                    'Timeout' => 5,
                    'UnhealthyThreshold' => 2,
                ],
                'LoadBalancerName' => $this->elbName,
            ]);

            $result = $this->elbClient->registerInstancesWithLoadBalancer([
                'Instances' => [
                    ['InstanceId' => $this->instanceID]
                ],
                'LoadBalancerName' => $this->elbName
            ]);
            return $this;
        } catch (Exception $e) {
            $this->logException(__FUNCTION__, $e->getMessage());
            return false;
        }
    }
}
?>
6. Prepare for scaling
Auto scaling group serves for adding or removing spot instances when they will be needed. Its instances will have characteristics defined in a launch configuration.
We’ll use AutoScalingClient for all these operations.
asClient  = new AutoScalingClient($params);
    }
}
?>
6.1. Define launch configuration
Class Article will have a field lcName containing name of the launch configuration which will be created in the createLaunchConfiguration() method and used while creating auto scaling group.
lcName  = 'api-spot-launch-configuration';
    }

    public function createLaunchConfiguration()
    {
        try {
            $result = $this->asClient->createLaunchConfiguration([
                'AssociatePublicIpAddress' => true,
                'EbsOptimized' => false,
                'ImageId' => SPOT_AMI_ID,
                'InstanceMonitoring' => ['Enabled' => false],
                'InstanceType' => SPOT_INSTANCE_TYPE,
                'KeyName' => $this->keyPair,
                'LaunchConfigurationName' => $this->lcName,
                'SecurityGroups' => [$this->securityGroup],
                'SpotPrice' => SPOT_INSTANCE_PRICE
            ]);
            return $this;
        }  catch (Exception $e) {
            $this->logException(__FUNCTION__, $e->getMessage());
            return false;
        }
    }
?>
6.2. Define auto scaling group
Auto scaling group will be named as api-spot-auto-scaling-group and created in the createAutoScalingGroup() method. This method will use the launch configuration, the load balancer, our subnet and the tag mentioned earlier in the class constructor.
asgName = 'api-spot-auto-scaling-group';
    }

    public function createAutoScalingGroup()
    {
        try {
            $result = $this->asClient->createAutoScalingGroup([
                'AvailabilityZones' => [EC2_AVAILABILITY_ZONE],
                'AutoScalingGroupName' => $this->asgName,
                'DesiredCapacity' => 0,
                'LaunchConfigurationName' => $this->lcName,
                'LoadBalancerNames' => [$this->elbName],
                'MaxSize' => 1,
                'MinSize' => 0,
                'Tags' => [$this->tag],
                'VPCZoneIdentifier' => $this->subnet
            ]);
            return $this;
        }  catch (Exception $e) {
            $this->logException(__FUNCTION__, $e->getMessage());
            return false;
        }
    }
?>
7. Configure scaling
There are two instruments constructing a mechanism for the system scaling. They are auto scaling group policies and cloud watch alarms.
7.1. Specify scaling policies
Here we are going to develop createScaleInPolicy() and createScaleOutPolicy() methods. As a result policies Amazon Resource Names (ARNs) will be obtained. They will be used further during composing of alarm rules, so we need to store them into the fields scaleInPolicyARN and scaleOutpolicyARN.
Scale-in policy will change capacity with 1 point (instance). Scale-out policy will subtract 1 point from capacity.
asClient->putScalingPolicy([
                'AdjustmentType' => 'ChangeInCapacity',
                'AutoScalingGroupName' => $this->asgName,
                'PolicyName' => 'spot-scalein-policy',
                'PolicyType' => 'SimpleScaling',
                'ScalingAdjustment' => 1
            ]);
            $this->scaleInPolicyARN = $result->get('PolicyARN');
            return $this;
        } catch (Exception $e) {
            $this->logException(__FUNCTION__, $e->getMessage());
            return false;
        }
    }

    public function createScaleOutPolicy()
    {
        try {
            $result = $this->asClient->putScalingPolicy([
                'AdjustmentType' => 'ChangeInCapacity',
                'AutoScalingGroupName' => $this->asgName,
                'PolicyName' => 'spot-scaleout-policy',
                'PolicyType' => 'SimpleScaling',
                'ScalingAdjustment' => -1
            ]);
            $this->scaleOutPolicyARN = $result->get('PolicyARN');
            return $this;
        } catch (Exception $e) {
            $this->logException(__FUNCTION__, $e->getMessage());
            return false;
        }
    }
?>
7.2. Set alarms
To put metric alarm it is necessary to specify its parameters defined earlier in config.php file. Also we’ll add an action that will be performed when alarm works out. It will be scaling policy which creation was discussed above.
    public function createAddCapacityAlarm()
    {
        try {
            $result = $this->cwClient->putMetricAlarm([
                'AlarmName' => 'ArticleAddCapacity',
                'AlarmDescription' => 'Add instance when CPU Utilization is '
                                    . 'grater or equal than threshold.',
                'AlarmActions' => [$this->scaleInPolicyARN],
                'ComparisonOperator' => ALARM_ADD_COMPARISON_OPERATOR,
                'Dimensions' => [
                    [
                        'Name' => 'InstanceId',
                        'Value' => $this->instanceID
                    ]
                ],
                'MetricName' => ALARM_ADD_METRIC_NAME,
                'Namespace' => ALARM_ADD_NAMESPACE,
                'EvaluationPeriods' => ALARM_ADD_EVALUATION_PERIODS,
                'Period' => ALARM_ADD_PERIOD,
                'Statistic' => ALARM_ADD_STATISTIC,
                'Threshold' => ALARM_ADD_THRESHOLD
            ]);
            return $this;
        } catch (Exception $e) {
            $this->logException(__FUNCTION__, $e->getMessage());
            return false;
        }
    }

    public function createRemoveCapacityAlarm()
    {
        try {
            $result = $this->cwClient->putMetricAlarm([
                'AlarmName' => 'ArticleRemoveCapacity',
                'AlarmDescription' => 'Remove instance when CPU Utilization is '
                                    . 'lower than threshold.',
                'AlarmActions' => [$this->scaleOutPolicyARN],
                'ComparisonOperator' => ALARM_REMOVE_COMPARISON_OPERATOR,
                'Dimensions' => [
                    [
                        'Name' => 'InstanceId',
                        'Value' => $this->instanceID
                    ]
                ],
                'MetricName' => ALARM_REMOVE_METRIC_NAME,
                'Namespace' => ALARM_REMOVE_NAMESPACE,
                'EvaluationPeriods' => ALARM_REMOVE_EVALUATION_PERIODS,
                'Period' => ALARM_REMOVE_PERIOD,
                'Statistic' => ALARM_REMOVE_STATISTIC,
                'Threshold' => ALARM_REMOVE_THRESHOLD
            ]);
            return $this;
        } catch (Exception $e) {
            $this->logException(__FUNCTION__, $e->getMessage());
            return false;
        }
    }
?>
All methods of the Article class are described. Now we can create an object of this class and call its methods one by one.
createKeyPair()
            ->createSecurityGroup()
            ->createOnDemandInstance()
            ->createLoadBalancer()
            ->createLaunchConfiguration()
            ->createAutoScalingGroup()
            ->createScaleInPolicy()
            ->createScaleOutPolicy()
            ->createAddCapacityAlarm()
            ->createRemoveCapacityAlarm();
?>
Testing
1. Create and check the system
Let’s launch our script in the browser. If any error messages wasn’t displayed on the screen, and error.log file wasn’t created, then everything has worked as expected.
In opposite case, read the log and try to fix those errors. There are two main causes of errors:
- 1) syntax mistakes and mistypes;
- 2) some items have been already created with the same names.
Look into AWS console. If your system is configured properly, these parts should be present there:
Key Pair api-key-pair
Security Group api-security-group
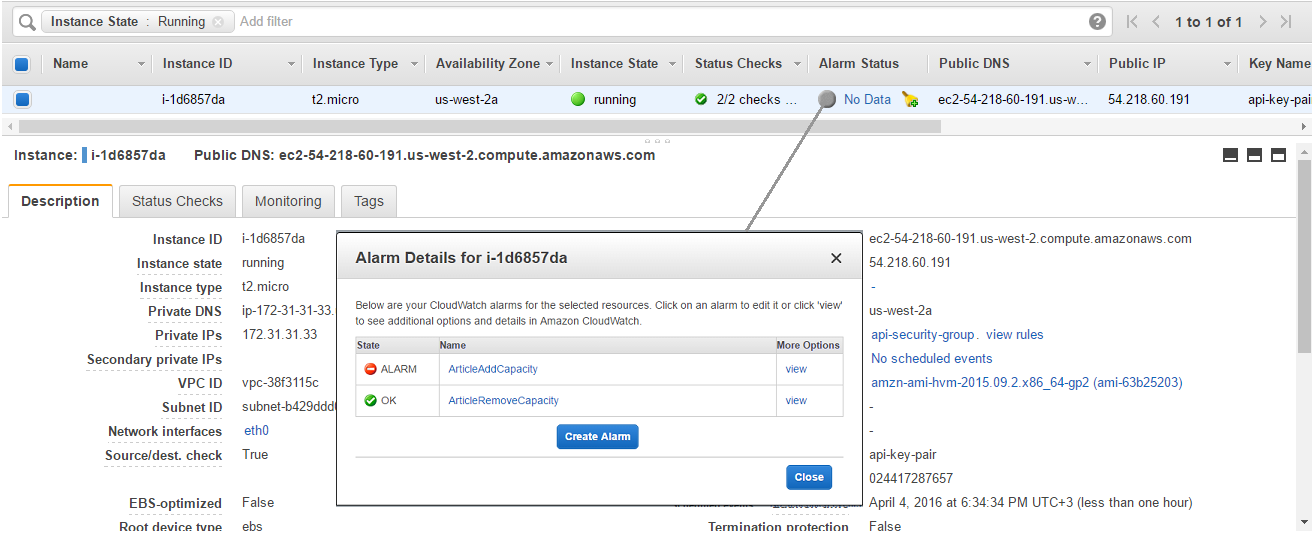
On-demand Instance with two alarms: ArticleAddCapacity and ArticleRemoveCapacity
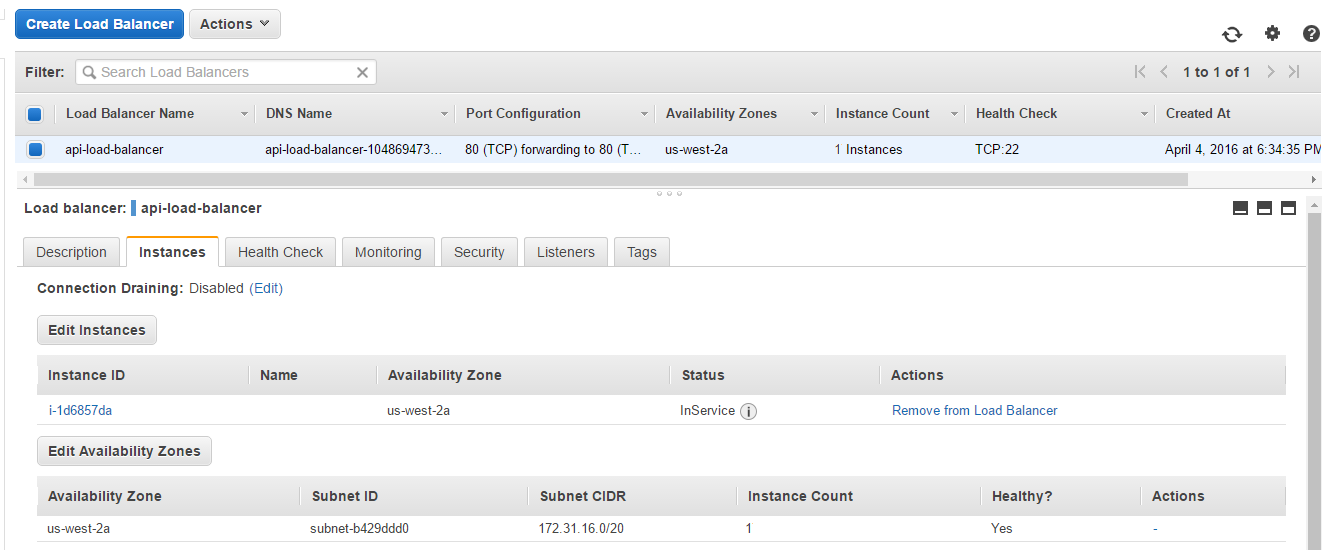
Load Balancer api-load-balancer with one instance attached
Launch Configuration api-launch-configuration
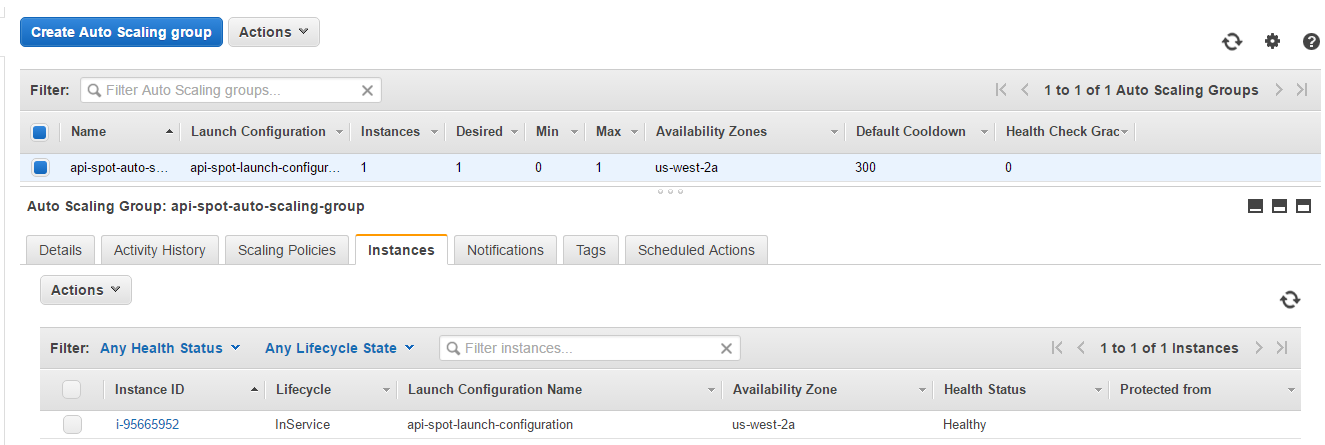
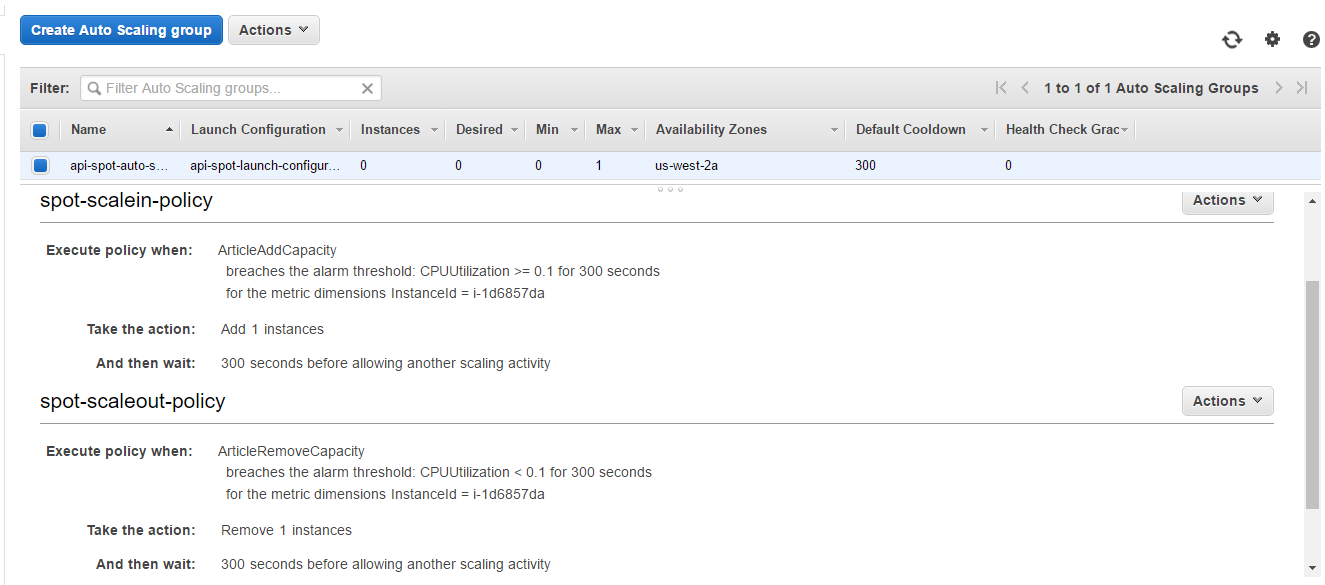
Auto Scaling Group with two policies: spot-scalein-policy and spot-scaleout-policy
2. Increase server load
2.1. Connect to the server via SSH
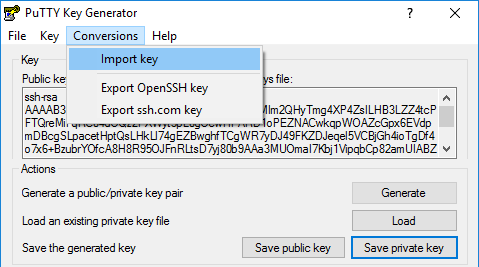
Firstly, convert .pem key received from the createKeyPair() method to .ppk key. We’ll use PuTTy Key Generator utility for this purpose. It can be done by three steps:
- 1) press in the program menu: Conversions → Import Key;
- 2) choose
api-key-pair.pemkey from the project directory; - 3) save private key as
api-key-pair.ppkusing buttonSave private key.
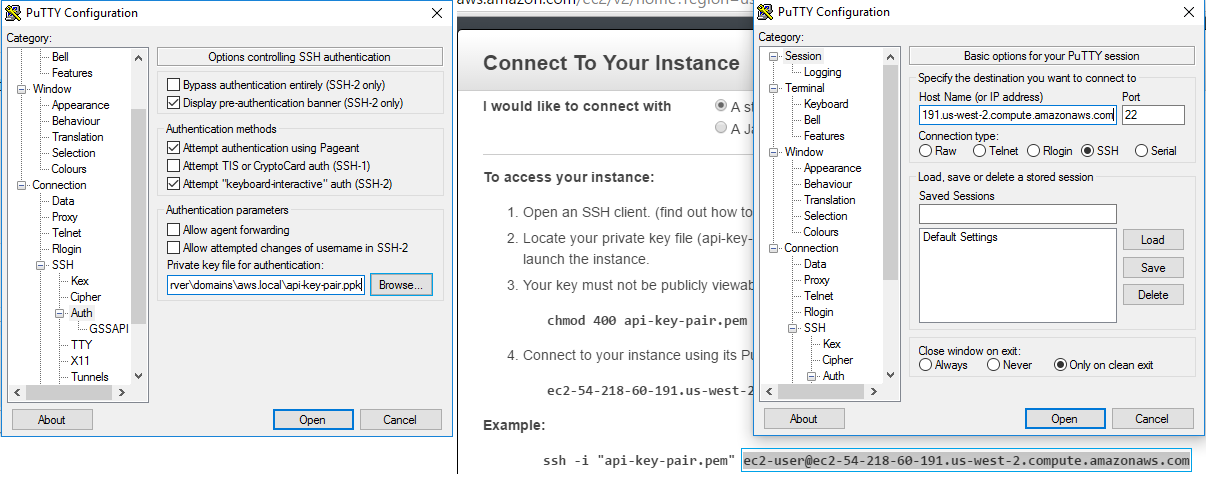
Secondly, find public IP address and the user for the server: go to Instances page → hit the Connect button → see info in the opened pop-up.
Thirdly, open some SSH client, for example, PuTTY. Add the private key at the Connection → SSH → Auth tab. Enter the username and server IP on the Session tab and press Open button.
2.2. Test the server using stress
Stress is a suitable tool to check the system productivity. Use one of the commands below:
- Ubuntu:
sudo apt-get install stress
- Fedora and Centos:
sudo yum install stress
- OS X:
brew install stress
This command will target server load with 3 CPU-bound processes and 10 seconds time-out:
stress --cpu 3 --timeout 10s
After launching stress produces some info messages:
stress: info: [23279] dispatching hogs: 3 cpu, 0 io, 0 vm, 0 hdd
stress: info: [23279] successful run completed in 10s
3. Monitor system behaviour
While stress performs its operations, let’s look what happens with our system.
3.1. Increase system
This part describes the system behaviour during the period from launching stress test till its ending. We’ll go through all process participants in the order they come into play.
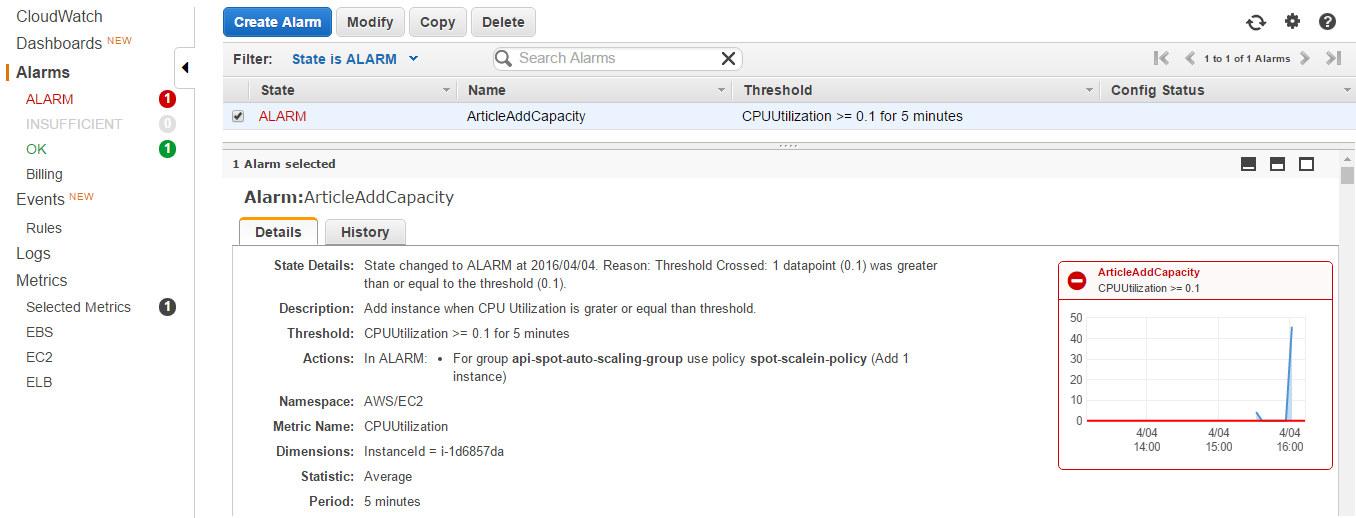
Add capacity alarm
On-demand instance starts working harder, and CPU Utilization metrics breaches the point set in the alarm ArticleAddCapacity.
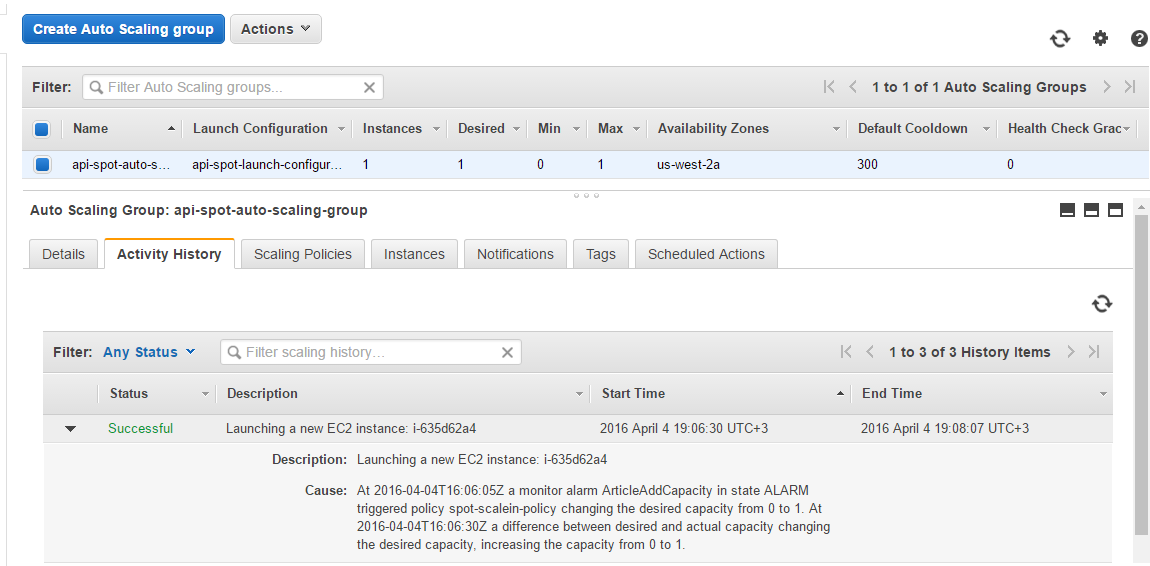
Scale-out policy
Alarm in the ALARM state calls its action which is spot-scaleout-policy policy. As it shown in auto scaling group’s activity history, a new spot request was sent.
Spot request
When spot request is fulfilled, it changes its state from pending to active and gets fulfilled status. It means that a new spot instance has been launched.

Load balancer
The spot instance is automatically attached to the load balancer. Now it has two healthy instances to redistribute load between them.
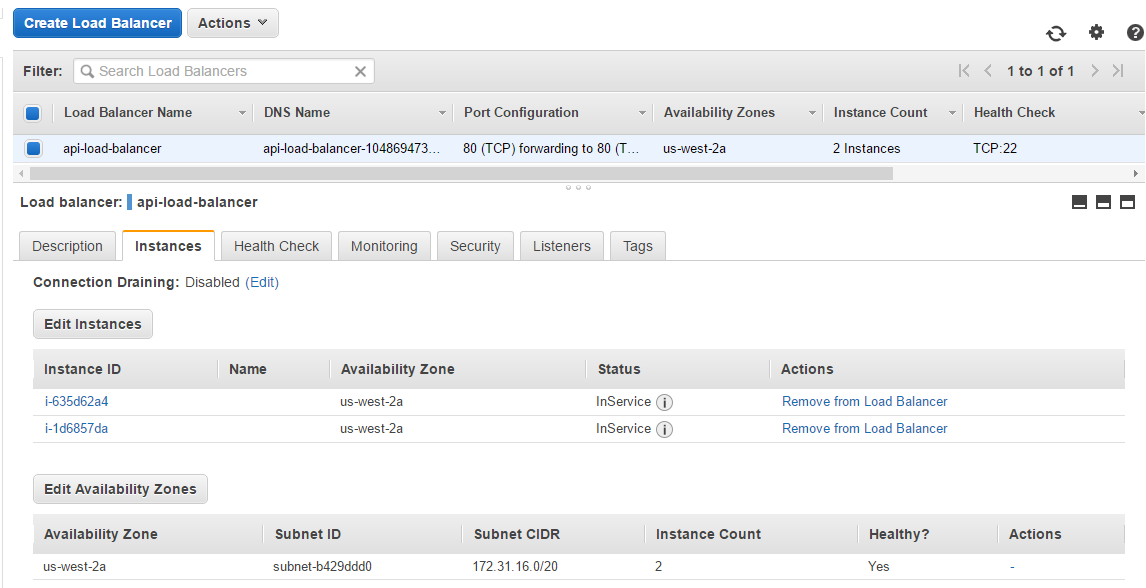
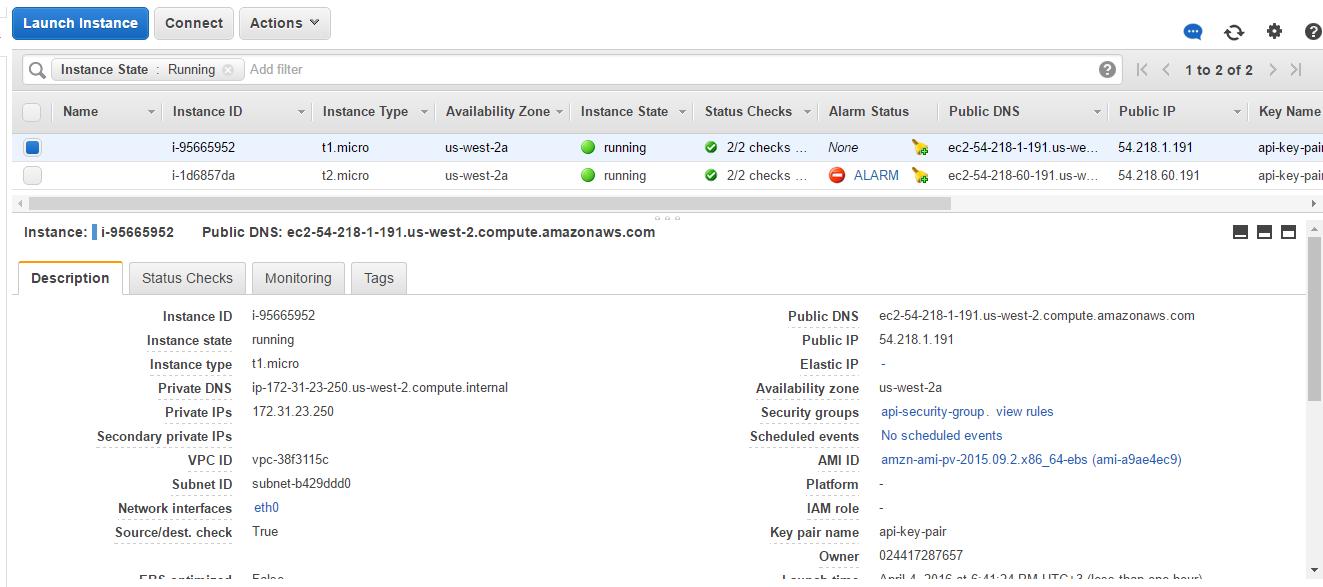
The new spot instance also appears in the instances list.
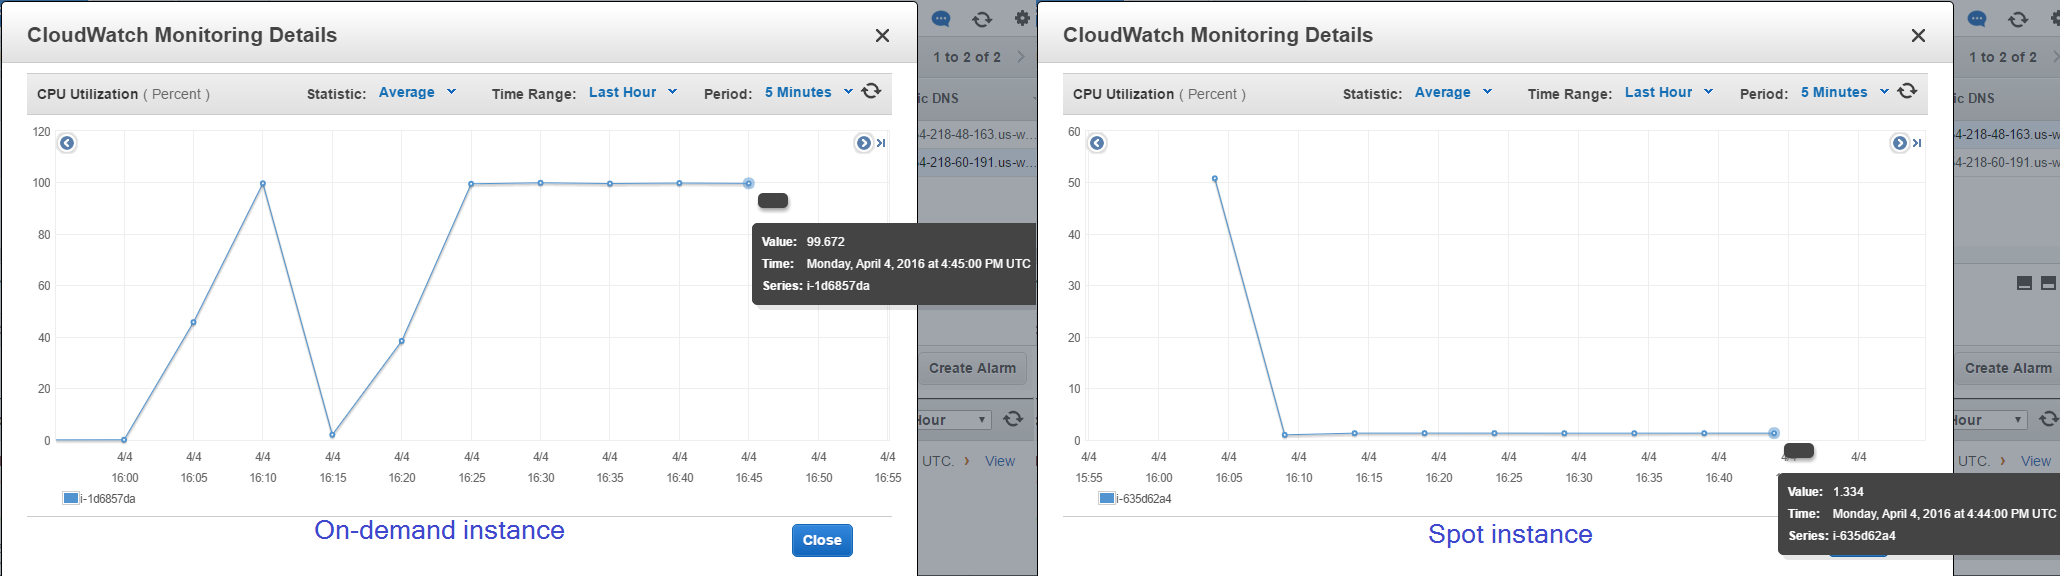
Instances metrics
You can monitor load redistribution looking at the charts of on-demand instance and spot instance metrics.
3.2. Diminish system
This part describes the system behaviour during the period from getting success message from the stress tool to the end of our experiment.
Instances metrics
The server load starts falling on both instances.

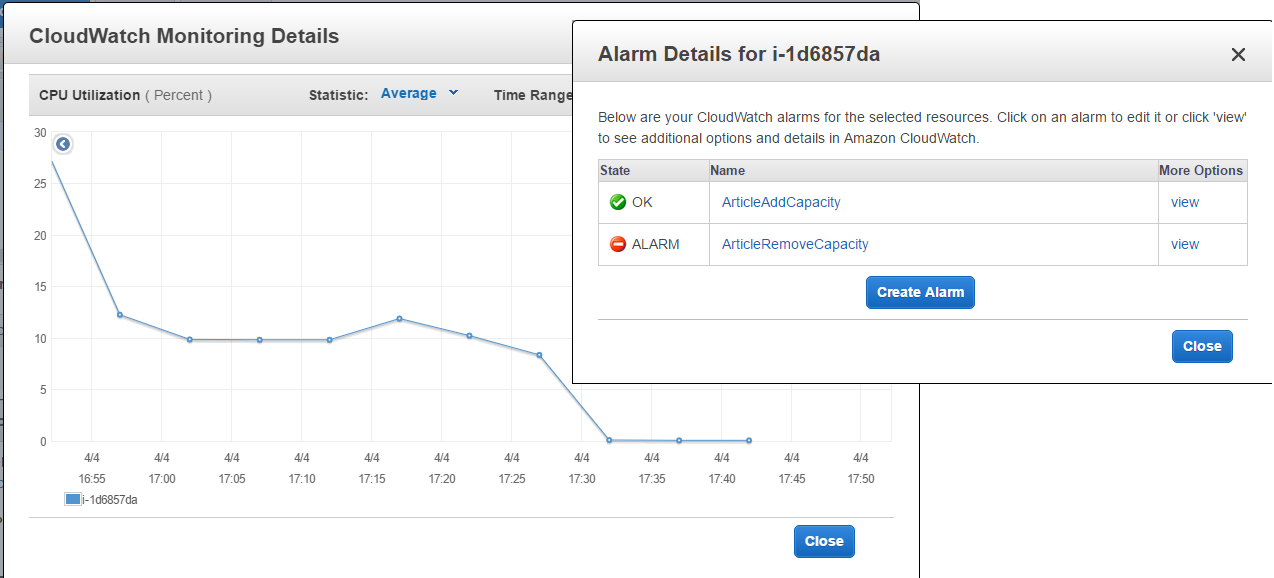
Remove capacity alarm
Eventually, CPU utilization metrics reaches the lowest level set in the alarm ArticleRemoveCapacity, and it changed its state from OK to ALARM.
Scale-in policy
After alarm worked out, the appropriate spot-scalein-policy policy takes effect.

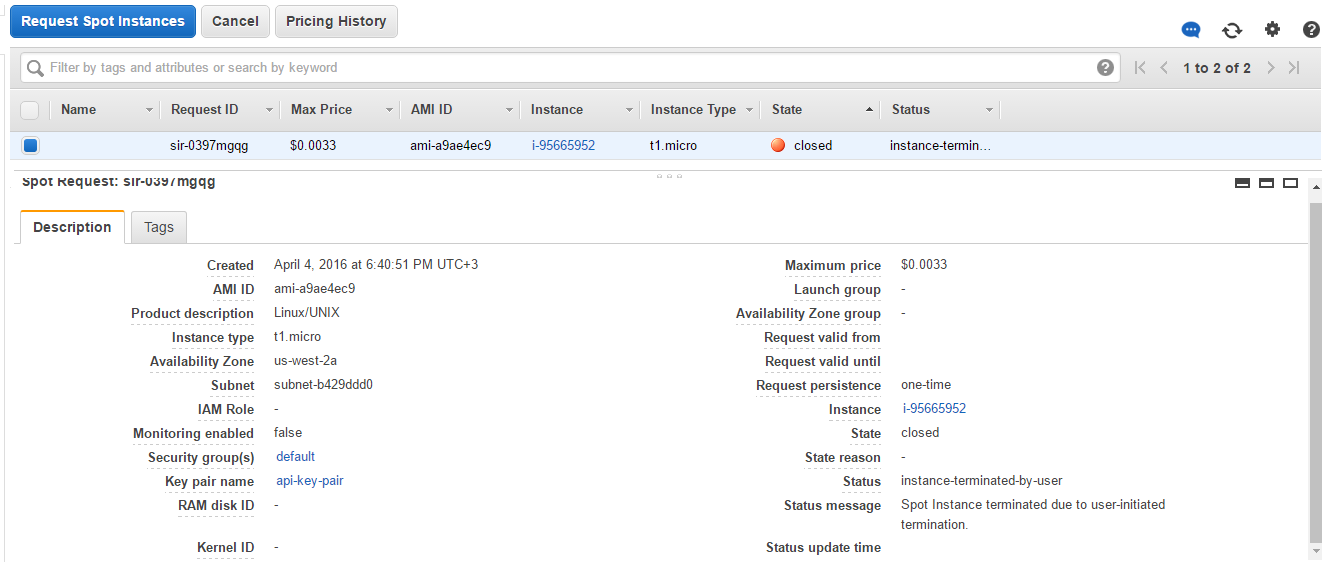
Spot request
Scale-in policy terminates the spot instances, and the corresponding request changed state from active to closed with instance-terminated status.
Launch balancer
As the spot instance is terminated, the load balancer and the instances list have the only on-demand instance attached.
At the end of test we manually terminate the on-demand instance to prevent accident and unwanted spot requests.
Thus, we looked at how to supplement on-demand resources with the spot auto scaling group using only documented features of AWS API, and managed to implement all desired things.
You can download an archive with the project files using this link.